Read The Contemporary Buttercream Bible Online
Authors: Christina Ong Valeri Valeriano
The Contemporary Buttercream Bible (33 page)

To create this cake…
• 15 × 20cm (6 × 8in) square cake
379
• 1.5–2kg (3lb 5oz–4lb 8oz) buttercream
• Paste colours: light blue (Sugarflair Baby Blue),
light green (Sugarflair Spruce Green), light yellow
(Sugarflair Melon), light pink (Sugarflair Pink),
black (Sugarflair Liquorice)
• Plastic bowls
• Clean sponge
• Scissors
• Small flower cookie cutter or flower plunger
• Colourful edible pearls
• Tweezers
• Piping bags
• Small petal nozzle (Wilton 104)
• Cake stand or covered cake board
Crumb coat (see Crumb Coating in Buttercream
Basics) and place the cake on a stand or covered
board. Cover the cake with a smooth finish (see
Smoothing in Buttercream Basics) using 600–800g
(1lb 5oz–1lb 12oz) of plain buttercream. Colour the
remaining buttercream in the following quantities:
150–200g (51⁄2–7oz) each of light blue, light green,
380
light yellow, light pink and black. Reserve a tiny
quantity of each to use to stick on the edible pearls, then follow the tutorial above to colour the
background and stamp the flower design. Pipe a
little unthinned buttercream in the matching colour
in the centre of each flower and add edible pearls.
Using 150–200g (51⁄2–7oz) unthinned light pink
buttercream plus a little darker pink for the centres, pipe hydrangeas round the bottom (see Camellia
and Hydrangea in Piping Flowers).
381

Textile Effects
Open your wardrobe doors and take a look at all
those tops, dresses and cardigans. Notice the prints
and those lovely fabric textures? In this chapter,
we’ll show you how to recreate these textile effects
using luscious buttercream. With just a few small
tools you’ll be magically producing embroidery, lace
and crochet like a skilled needleworker.
382
Brushed Embroidery
Embroidered design, whether simple or lavish, will
always add an exquisite quality. To embroider your
cake, you will use a simple tool – a brush – hence,
the ‘brushed embroidery’ technique. Flowers are
particularly suited to this method, so that’s what we have chosen as our example, although animals and
birds and any other subject you have seen in an
embroidery will work well too. Here, you will gently
stroke the buttercream towards the centre of your
design, leaving not only colour but also a wonderful
thread-like texture on the surface of your cake.
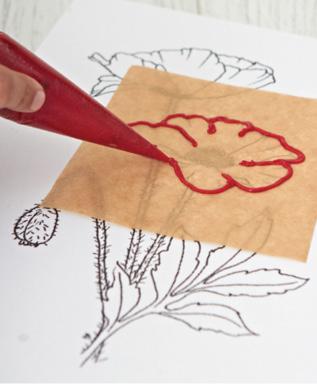
1 If you are using an image you have found, as with
buttercream pattern transfers (see Transfers,
Stamping and Stencilling), make sure that you
make a mirror image before you print, especially if
you need to be precise with the positioning of the
pattern. When the pattern is transferred, over-pipe
the outline with quite a thick line of buttercream
(A). If you are piping the design directly on the
surface of the cake, make sure you use plenty of
buttercream so you have enough to brush (B).
383

A
B
384
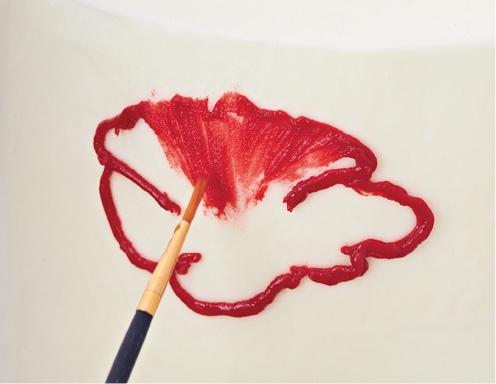
2 Look at your flower pattern as a whole, and
imagine where the stem should be – that will be the
direction where all the strokes should go. Dip your
brush in a bowl of water, and wipe off the excess
water with a tissue. Using your damp brush, pull
the buttercream towards the centre of your flower
(C). Repeat the process to the rest of the petals. If you have pulled all the buttercream, but need more
to complete the flower, over-pipe the outline again
slightly (D).
C
385

D
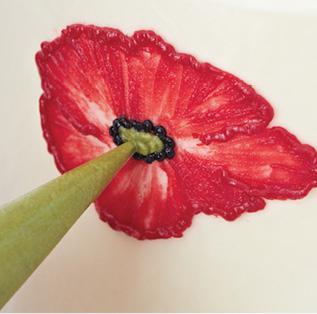
3 Pipe the centre of the flower with dots and spikes
to create a three-dimensional effect, just like real
embroidery (E). There’s no need to brush them but
you may do so if you wish.
386

E
4 Using green tinted buttercream, pipe leaf outlines
and repeat the brushed embroidery method, this
time brushing towards the central vein of the leaf
(F).
F
387

388
To create this cake…
• 25 × 15cm (10 × 6in) round cake (bottom tier), 20
× 10cm (8 × 4in) round cake (middle tier), 15 ×
10cm (6 × 4in) round cake (top tier)
• 2.4–2.9kg (5lb 6oz–6lb 7oz) buttercream
• Dowel rods
• Paste colours: red (Sugarflair Ruby), black
(Sugarflair
Liquorice),
green
(Sugarflair
Gooseberry)
• Small round or square tip paintbrush
• Bowl of water
• Piping bags
• Scissors
• Cake stand or covered cake board
Crumb coat then cover the top and bottom tiers
using 800–900g (1lb 12oz–2lb) of uncoloured
buttercream with a smooth finish (see Covering
Cakes in Buttercream Basics). Cover the middle tier
with 400–500g (14oz–1lb 2oz) red buttercream,
give it a textured finish with a palette knife (see
Palette Knife Techniques). Dowel and stack the
cakes (see Dowelling in Buttercream Basics) and
389
place on a stand or covered board. Colour the
remaining buttercream in the following quantities:
700–800g (1lb 9oz–1lb 12oz) of red, 200–300g
(7–101⁄ oz) black and 300–400g (101
2
⁄2–14oz) green.
Refer to the photograph and follow the tutorial to
paint the poppies and foliage. Pipe the centre of the flowers to add texture, using a piping bag with the
tip snipped off.
390
Lace
Lace evokes such an elegant and timeless style,
especially on a cake. There are a few lace-effect
variations and each of them is equally impressive.
The Irregular Lace project involves freehand piping
using
black-tinted
buttercream
on
a
white
background to highlight the intricacy of the lace.