Bread Matters (15 page)
Authors: Andrew Whitley

- Does it look done? Check both top and bottom crusts for firmness and colour.
- How long has it been in the oven? If a large loaf looks as if it might be ready after 10 minutes, it is unlikely to be baked through. The oven may be delivering too much top heat, so try to shield the top crust with a sheet or two of baking parchment while the rest of the loaf bakes. Conversely, if it has been in the oven for 50 minutes and still looks rather pale, it may well be simply drying out: the lack of colour may be due to insufficient oven heat or a ‘spent’ dough without enough residual sugars to produce crust colour. Get it out before it turns to a biscuit.
- How do the ‘shoulders’ look and feel? The shoulder of a loaf is the point just below the top of the side where it gives way to the domed top. This is easier to see in a tin loaf, but the principle applies to freestanding loaves as well. The shoulder is often the last area of crust to firm up. Sometimes it is obvious to the eye, but you can confirm whether it is done by gently pushing a fingertip into the side of the loaf. If it feels at all fragile or squashy, it needs a bit longer in the oven.
- If your oven consistently seems to bake the top crust of a tin loaf before the sides or bottom are done, you can tip the loaf out of its tin and finish baking it on the oven rack, which will allow more direct heat to firm up the crust all round.
Preliminary yeasted doughs
Making bread from start to finish in one sequence can seem an impossible rush and you may sometimes feel that you have no alternative but to make warm dough and add extra yeast, simply to get a result in the time available. I know the feeling: nothing is worse for a commercial baker than realising that the bread won’t be ready by the time the van departs or the shop opens. But if we respond to pressure by cutting corners, we end up with poor bread. Luckily, there is a way of slowing the breadmaking process down
and
making deadlines easier to meet. It involves the use of preliminary doughs, such as ‘sponges’ and ‘ferments’, which are a way of building extra time into the process to improve flavour, texture and nutritional quality. Preliminary doughs have many names and often seem complicated. In fact, they are quite easy to manage. And not only do they produce better bread, they make it easier to fit the whole activity into a busy life.
Preliminary doughs, made in advance of the main dough, have the following functions:
- Yeast reproduction.
- Flavour accumulation.
- Gluten ripening.
- Improved nutrition.
Until commercial baker’s yeast became widely available at reasonable prices, it was uncommon to make a ‘straight’ dough, in which all the ingredients are mixed in one go. Early manufactured yeasts were expensive and hard to store without refrigeration. Before that, bakers used a barm, the froth on a fermenting malt liquor, often obtained from a brewery. Either way, they needed to spend some time growing more yeast cells so that there were enough of them to aerate the final dough.
A small quantity of yeast, mixed with a source of food (usually flour) and water and left for several hours, will multiply. Some fermentation will also take place, but provided that there is sufficient oxygen in the mix, the yeast cells will reproduce. Over a period of many hours, lactobacilli, present in the flour and water mix, will also become active, producing lactic and acetic acids, which give the dough a vinegary aroma and a slightly acid taste. The pH of the dough will gradually drop, eventually creating conditions that are more favourable to ‘wild’ strains of yeast rather than standard baker’s yeast
(Saccharomyces cerevisiae).
A preliminary dough that has been fermented for several hours generates a complex of enzymes and acids that have a ‘ripening’ effect on the gluten of the main dough, which retains more gas and so turns into a better-risen loaf.
Finally, the preliminary stages play an important part in long fermentations, not just because the result is stretchier or better-tasting dough but also because lactic acid bacteria can improve the nutritional quality of bread in the following ways:
- They lower post-prandial glucose and insulin responses in humans, thereby reducing the risk of obesity and diabetes.
- They assist in the formation of resistant starch, a type of dietary fibre.
- They increase mineral bioavailability, partly by reducing phytic acid, which stops the body absorbing minerals such as iron, calcium, zinc and magnesium.
- They neutralise the gliadin peptides in wheat flour, which are toxic to coeliacs
2
.
Several names are used to describe preliminary doughs. Here are some of them, with notes about their particular function:
Pre-ferment
A general term for a part of the dough’s ingredients that is fermented separately in advance.
Ferment
A thin batter containing water, yeast, a small amount of flour and sometimes a little sugar. Its purpose is to encourage yeast to begin fermenting and reproducing quickly to give it a good ‘start’, particularly when it is to be added to a dough containing significant amounts of fat, fruit, sugar, spice etc, which inhibit yeast activity. Some gluten ‘ripening’ takes place in a ferment: if it is left for long enough, it froths up and then ‘falls’ as the gluten is softened and over-extended. ‘Ripeness’ is defined as a softening of the gluten, which allows a finer and more extensible network of gas bubbles to develop. A ‘flying ferment’ is one that provides a modest boost to yeast activity but is not allowed to stand long enough to froth up and fall.
Sponge
Stiffer than a ferment but slacker than a proper dough, a sponge is a mixture of flour, water and yeast that is fermented for two to 24 hours. In the traditional terminology, a ‘half sponge’ was one using half of the total amount of dough liquid. Half sponges and quarter sponges were most common. Depending on the length of time for which the sponge is fermented, the following changes occur:
- Soluble protein is produced, which acts as a yeast food.
- The gluten softens and becomes more extensible.
- Acids (lactic, acetic and a small amount of butyric) and esters develop, giving flavour to the sponge and subsequent dough.
- Yeast cells reproduce and increase in number.
Biga
This is the Italian term for a sponge. In some Italian recipes the biga is made very stiff and contains a large proportion of the total flour; the final dough is made by adding mostly water. The advantage of this method is that it helps control the speed of yeast fermentation and reproduction at ambient temperatures in very warm conditions.
Poolish
Despite its strange name, this is the French equivalent of the English sponge. The term is much loved by a rather earnest kind of American artisan baker.
Starter
Usually denotes an initial culture of flour, water and ‘wild’ yeasts and lactobacilli, either bought in or self-generated (as in sourdough starter), or a residual piece of dough or batter kept back to initiate a subsequent cycle of dough development.
Old dough
An admirably explicit English term, to be preferred to the slightly less precise French
pâte fermentée
because the English indicates that the dough has indeed been fermented for long enough to be described as ‘old’. This is usually a piece of dough kept back from the previous day’s baking, so it is at least 24 hours old. It contains all the dough ingredients, including any salt and fat in the recipe, which are not normally found in sponges or sourdoughs. It contains significant amounts of lactic and acetic acids and, like a sponge, conditions the gluten in the main dough as well as contributing flavour. Old dough is to be distinguished from ‘acid dough’, which is made specifically for the purpose of adding to a fresh dough and does not contain salt or fat. Old dough can be used at up to 20 per cent of final dough weight. The longer it is kept the more acid it becomes, and the smaller the amount that should be used in the final dough.
Leavens and sourdoughs
These are preliminary doughs based on naturally occurring yeasts and bacteria. They are dealt with in more detail in Chapter 7.
You now have a general idea of how to make good bread. Of course, I have dealt so far with general principles; I will go into more detail in the individual recipes as required.
But before actually getting your hands dirty, spare a moment to think about how you are going to time things. Good bread needs a lot of time; you probably don’t have much to spare. Here are some ideas for scheduling the various stages of baking to fit in with life as we live it.
Timing it right
Two variables control the speed at which bread dough works – temperature and yeast activity (although yeast quantity and yeast activity are related, they are not the same thing). So, with a bit of planning, we can determine how quickly dough ferments by warming it up or cooling it down and by deciding how much yeast (and what kind) to use. The key variable is temperature: yeast works more quickly in warm doughs than in cool ones. Some speeding up can be achieved by increasing the amount of yeast used, but I don’t recommend this. For one thing, the resulting bread may have a pronounced aftertaste of yeast, which some people dislike; for another, dough made with excessive yeast can be harder to control and may produce over-aerated, crumbly and dry-tasting bread. And even with extra yeast, if the dough is cold, it may take a long time to rise.
Before starting, you need to decide when you want to be taking your baked loaves out of the oven. Approximate timings for the five stages involved in producing bread, using various strategies, are given below.
Straight dough
A straight dough is defined as one where all the ingredients are mixed at the beginning of the process, which then proceeds with no interruptions other than the time required for each stage.
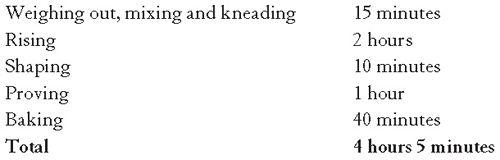
These are only guidelines. Baking time, for instance, will vary from oven to oven and both rising and proving may take more or less time.
To achieve a baked loaf from scratch in three or four hours with normal quantities of yeast, a starting dough temperature of around 27°C is required, as is a reasonably warm place (say 22-27°C) for the dough to rise and prove. If you cannot provide these conditions, it doesn’t matter, but remember that the whole process may take longer.
Adjusting the heat of the water is the easiest way of getting the right dough temperature. You can warm the flour but it takes much longer – and you still need to know how hot or cold the water should be. For a simple formula to determine the water temperature required, see page 68.
Many recipe books call for tepid, lukewarm or hand-hot water – without any reference to the other ingredients or the time of year. This can result in doughs that ferment too quickly in summer and appear moribund in winter. Flour taken from a cold larder in winter may be as low as 6°C. To make this into a dough at the desired temperature of 27°C requires water which, at 48°C, is a good deal hotter than a typical clothes wash.
Dissolving yeast in hot water may harm it, so use some cooler water for this purpose; it follows that you will need to make the remainder slightly warmer still in order to maintain the correct overall water temperature. Don’t get too anxious about all this, though. The important thing is simply to avoid killing the yeast with hot water.
Once you’ve made bread a few times, you’ll probably be able to adjust your water without a thermometer. But it pays to do the calculation and follow it precisely a few times, if only to appreciate how warm (or cool) water sometimes needs to be and to get to know what a dough feels like when it is made at around 27°C.
There is nothing magic about this figure. Indeed, in summer or in parts of the world where kitchen temperatures may rise to 30°C and beyond, you should start a dough at a temperature lower than 27°C in order to control the speed of fermentation, remembering that the friction of kneading as well as exposure to the heat of the surroundings can cause a significant rise in temperature. In warm bakeries in summer, ice is often used in the dough to keep the temperature down. Of course, mechanical mixing generates significant heat, which does not easily escape from a large mass of dough. The more typical problem for home bakers is to prevent heat loss from a relatively small volume of dough.
In a dough that is too warm, the yeast can work so fast that it quickly exhausts its available nourishment and stops producing the carbon dioxide gas that makes the dough rise. In extreme cases, it may ‘run out of steam’ before the dough has risen properly, resulting in a pale, sad-looking, undersized loaf. Bread made with hot dough tends to have a drier, more crumbly texture and to stale rapidly. And above all, fast doughs leave no time for the other, bacterial, fermentation whose by-products contribute significant flavour and nutritional value to the baked bread.