Build Your Own ASP.NET 3.5 Website Using C# & VB (102 page)
Read Build Your Own ASP.NET 3.5 Website Using C# & VB Online
Authors: Cristian Darie,Zak Ruvalcaba,Wyatt Barnett
Tags: #C♯ (Computer program language), #Active server pages, #Programming Languages, #C#, #Web Page Design, #Computers, #Web site development, #internet programming, #General, #C? (Computer program language), #Internet, #Visual BASIC, #Microsoft Visual BASIC, #Application Development, #Microsoft .NET Framework

Just below the welcome message and the
Logout
link sits our old friend, Menu, which
displays the navigation menu. Since the Menu is now part of the LoggedInTemplate
of the LoginView, it’s displayed only for logged-in users, as we planned.
Finally, it’s worth noting that you can use Visual Web Developer to edit the various
templates (and the controls they house). Open
Dorknozzle.master
in the designer,
and click the smart tag of the LoginView control. The options that display, which
are shown in
Figure 13.20
, are certainly interesting.
Figure 13.20. Viewing
LoginView Tasks
Licensed to [email protected]
Security and User Authentication
593
The
Edit RoleGroups…
link lets you administer the templates that are shown to users
who are assigned particular roles. This facility is useful when you want to display
to users specific content that’s relevant to their roles. For example, if you wanted
to display to administrators different menus than you show to regular users, you
could create a group for users within the Users role, and another group for users in
the Administrators role, then create different views for these groups using templates.
To check in your code whether or not the current user is authenticated (that is,
logged in), you must check the value of
HttpContext.Current.User.Identity.IsAuthenticated. To check the role of the
logged-in user, you must use the HttpContext.Current.User.IsInRole method,
as shown here:
Visual Basic
If HttpContext.Current.User.IsInRole("Administrators") Then
⋮
C#
if (HttpContext.Current.User.IsInRole("Administrators"))
{
⋮
This method returns True if the current user is a member of the specified role, and
False if he or she is not.
Summary
In this chapter, we examined the approaches you can use to secure your ASP.NET
applications. You learned how to create a simple Login page, configure the
Web.config
file to handle authentication and authorization, and check for usernames
and passwords using a database.
ASP.NET’s membership features provide extraordinary built-in functionality, and
we have explored a number of these features through this chapter. The complete
list of features is much larger, and, as we mentioned at the beginning of this chapter,
there are entire books that deal solely with this topic.
Licensed to [email protected]
594
Build Your Own ASP.NET 3.5 Web Site Using C# & VB
In Chapter 14, we
’ll learn to work with files and directories, and send email messages using ASP.NET.
Licensed to [email protected]
Working with Files and Email
The .NET Framework exposes a set of classes for working with text files, drives,
and directories, through the System.IO namespace. This namespace exposes functionality that allows you to read from, write to, and update content within directories and text files. On occasion, you will want to read from and write to a text file. Text
files almost always use a format that’s based on the ASCII standard, which is perhaps
the most widely accepted cross-platform file format, having been around since the
1960s. This makes it a very useful way of exchanging information between programs—even if they’re running on different platforms and operating systems. As we’ll see in the course of this chapter, we can use the set of classes exposed by
the System.IO namespace to complete the following tasks:
Write to text files.
The sales department within our fictitious company may want to write sales
and forecast information to a text file.
Licensed to [email protected]
596
Build Your Own ASP.NET 3.5 Web Site Using C# & VB
Read from text files.
As a member of the web development team, you may want to use the data
within a text file to create dynamic graphs to display sales and revenue forecasts
on the Web.
Upload files from the client to the server.
You may want to create an interface that allows staff from the Human Resources
department to upload company documentation for reference by employees.
Access directories and directory information.
You may want to let the Human Resources department choose the drive to which
staff will upload files. For instance, you may have one drive dedicated to
spreadsheets, and another just for Word documents.
Once you have a firm grasp on the intricacies of working with text files and directory
information, you’ll learn how to send email in ASP.NET using the System.Net.Mail
namespace. We’ll finish the chapter with a quick introduction to serialization.
Writing and Reading Text Files
The System.IO namespace contains three different groups of classes:
■ classes for working with files
■ classes for working with streams
■ classes for working with directories
As we progress through this chapter, we’ll look at each of these groups. However,
let’s begin by discussing the tasks of writing to and reading from text files with the
aid of the classes that work with files and streams. These classes include:
File
contains methods for working with files
FileStream
represents a stream for reading and writing to files
StreamReader
reads characters from a text file
Licensed to [email protected]


Working with Files and Email
597
StreamWriter
writes characters to a text file
Path
contains methods for manipulating a file or directory
For the most part, we read from and write to text files by using the File class to
return a stream. If we want to write to a text file, we use the StreamWriter class;
conversely, we use the StreamReader class to read from a text file.
Setting Up Permissions
Before our ASP.NET page can read and write files to your hard disk, the ASP.NET
page must have permissions to access the file we’re trying to read or write. The task
of setting the permissions depends on our context. Here's a couple of possible
scenarios:
■ If you’re running the page using Cassini (Visual Web Developer’s integrated web
server), the code will run under the credentials of your user account, so it will
inherit all your permissions. For example, if you’re a computer administrator,
then your page will be able to access any resource on your computer.
■ If you’re running the page using IIS, the code will run under the credentials of
the ASPNET user account, or the Network Service user account, depending on
your operating system. By default, this account has access to any folder that’s
part of an IIS application.
Running Under IIS
The IIS scenario is particularly relevant because your web application will run
under IIS when it’s hosted on a production server. Also of note is the fact that,
while you may fine-tune the permission rules on your development machine, on
a hosting server you probably won’t be allowed to access folders outside your
application’s virtual directory.
On your own machine, you’ll need to set special permissions only if you use IIS,
and you want to write in a folder that’s not part of an existing IIS application. If
you’re in this situation, read on. Otherwise, feel free to skip to the next section, in
Licensed to [email protected]
598
Build Your Own ASP.NET 3.5 Web Site Using C# & VB
which we’ll create within your application’s folder structure a file that will be accessible under the default configuration of either IIS or Cassini. Detailed instructions are provided only for Windows XP, which requires an extra
step compared to Windows Vista. If you run Windows Vista, follow the exercise,
but exclude
Step 2. At Step 5, you should add the account
Network Service
instead of
ASPNET
.
1.
Create a new folder called
WritingTest
somewhere on your disk. For the purposes
of this discussion, I’ll assume it’s at
C:\WritingTest
.
2.
In Windows XP, simple file sharing is enabled by default. This hides the
Security
tab you’ll need to select in
Step 4
, preventing you from granting web applications write access to this directory. To disable simple file sharing, open the Windows
Control Panel and double-click the
Folder Options
icon. In the
View
tab, uncheck
Use simple file sharing (Recommended)
(as Figure 14.1 indicates, this should be
the last option on the list).
3.
Open the
C:
drive with the Windows Explorer (not the IIS control panel), rightclick on the
WritingText
directory and select
Properties
. 4.
Select the
Security
tab.
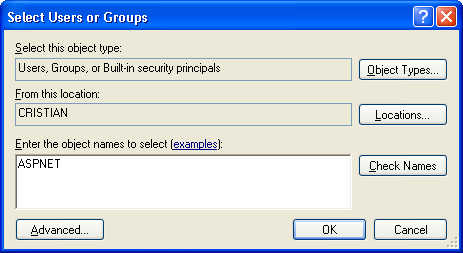
5.
Add the
ASPNET
account (
Network Service
if you run Vista) to the
Group or
user names
list by clicking
Add…
, and typing it into the
Select Users or Groups
dialog as shown in
Figure 14.2
. A new entry called
ASP.NET Machine Account
(
machinename
\ASPNET)
will be added to the list.
Figure 14.2. Adding the ASPNET account
Licensed to [email protected]

