Read Canning and Preserving For Dummies Online
Authors: Amelia Jeanroy
Canning and Preserving For Dummies (15 page)

Tomato Paste
Tomato paste is packed with flavor, and if you’re overrun with tomatoes, this recipe is the answer because it uses
a
lot
of fruit! You can use this thick paste as-is for pizza (it’s only slightly less thick than store bought but just as rich and fabulous); simply add your seasonings right on top. Your family will love the extra tomato taste. You can also add this paste to soups for amazing flavor and extra vitamins. For this recipe, use paste or plum tomatoes, which have much less extra water to cook off. This thick, rich sauce is canned in half-pint jars.
Preparation time:
15 minutes
Cooking time:
1 hour, and then 3 hours more
Processing time:
30 minutes
Yield:
16 half-pints
16 pounds plum or paste tomatoes, cubed
3 cups sweet pepper, chopped
2 bay leaves
2 tablespoons salt
3 cloves garlic
Bottled lemon juice or citric acid
1
Combine all ingredients in a 6-quart pot and cook slowly over medium heat for 1 hour, stirring frequently to prevent sticking. Remove the bay leaves and press the mixture through a food mill or sieve. Return the mixture to the pot and continue to cook for another 3 hours over medium-low heat, stirring often.
2
Prepare your canning jars and two-piece caps (lids and screw bands) according to the manufacturer’s instructions. Keep the jars and lids hot. (For detailed instructions on preparing your jars, see Chapter 4.)
3
Pour the hot mixture into your canning jars, leaving 1/4-inch headspace. Add 1/2 tablespoon lemon juice or 1/8 teaspoon citric acid to each half-pint jar. Release any air bubbles with a nonreactive utensil (refer to Chapter 3), adding more of the mixture as necessary to maintain the proper headspace. Wipe the jar rims; seal the jars with the two-piece caps, hand-tightening the bands.
4
Process the filled half-pint jars in a water-bath canner for 30 minutes from the point of boiling.
5
Remove the jars from the canner with a jar lifter. Place them on a clean kitchen towel away from drafts. After the jars cool completely, test the seals (see Chapter 4). If you find jars that haven’t sealed, refrigerate them and use them within two weeks.
Tip:
To check for sauce thickness, put a spoonful of sauce onto the center of a plate. Wait for 60 seconds and see if water seeps from it. If so, cook for 30 minutes more and recheck.
Per 1/2-cup serving:
Calories 48 (From fat 6); Fat 1g (Saturated 0g); Cholesterol 0mg; Sodium 455mg; Carbohydrates 11g (Dietary fiber 2g); Protein 2g.

Tomato Juice
Tomato juice makes a nice change from traditional fruit juices. And because tomato juice is a great tenderizer and adds a wonderful flavor to gravy, you can also use it to cook tough pieces of meat.
Preparation time:
1 hour
Processing time:
Pints, 40 minutes; quarts, 45 minutes
Yield:
14 pints or 7 quarts
25 pounds tomatoes
Lemon juice or citric acid
1
Prepare your canning jars and two-piece caps (lids and screw bands) according to the manufacturer’s instructions. Keep the jars and lids hot. (For detailed instructions on preparing your jars, see Chapter 4.)
2
Wash and core tomatoes. Roughly chop them into chunks. Place the tomatoes in a large pot and bring them to simmer over medium heat, stirring frequently to prevent scorching. Cook the tomatoes until they’re soft, about 25 to 30 minutes.
3
Strain the tomatoes through a food mill to separate the juice from the skins and seeds. Return the juice to the pot and bring it to a simmer over medium heat. Allow it to simmer 5 minutes.
4
Ladle the hot juice into your canning jars. To each quart jar, add 2 tablespoons of lemon juice or 1/2 teaspoon citric acid. To each pint jar, add 1 tablespoon lemon juice or 1/4 teaspoon citric acid. Leave 1/2-inch headspace. Release any air bubbles with a nonreactive utensil (refer to Chapter 3), adding more juice as necessary to maintain the proper headspace. Wipe the jar rims; seal the jars with the two-piece caps, hand-tightening the bands.
5
Process the filled jars in a water-bath canner for 40 minutes (pints) or 45 minutes (quarts) from the point of boiling.
6
Remove the jars from the canner with a jar lifter. Place them on a clean kitchen towel away from drafts. After the jars cool completely, test the seals (see Chapter 4). If you find jars that haven’t sealed, refrigerate them and use them within two weeks.
Per 1/2-cup serving:
Calories 35 (From fat 0); Fat 0g (Saturated 0g); Cholesterol 0mg; Sodium 16mg; Carbohydrates 7g (Dietary fiber 2g); Protein 3g.
Chapter 6
Sweet Spreads: Jams, Jellies, Marmalades, and More
In This Chapter
Exploring the world of preserves
Unlocking the mystery of pectin
Firming up your jams and jellies
Satisfying your sweet tooth with tasty spreads
Recipes in This Chapter
Strawberry-Rhubarb Jam
Herb Tea Jelly
Kumquat Marmalade
Lime-Ginger Marmalade
Apple Butter
Any-Time-of-the-Year Strawberry Preserves
Sweet spreads are our most favorite items to can. Think outside of the box for ways to serve your homemade creations. For some of our favorite serving ideas, check out the introductory notes in the recipes. We hope you’ll come up with even more ideas. You can make combinations of ingredients that aren’t commercially available. Sweet spreads aren’t just for toast anymore!
In this chapter, we include a variety of our favorite recipes with unique flavor combinations. The recipes utilize a variety of preparation techniques that take you step by step through each process. In addition to fresh fruit, some recipes use frozen fruit and fruit juice.
Understanding Your Sweet Spreads
Making sweet spreads is basic chemistry, using exact proportions of fruit and sugar, cooking the two, and sometimes adding acid or pectin. Don’t worry if chemistry wasn’t your strong suit in school. Good recipes do the homework for you. Your responsibility is to follow the recipe exactly, using the correct ingredients and measuring them accurately.
 Never double a sweet spread recipe or adjust the sugar amount. Recipes are balanced to achieve a specific consistency and texture. Any alteration or adjustment to the recipe upsets the perfect chemical balance and adversely affects your spread by producing inferior results. If you want more of the same recipe, make it twice. If you would like to use less sugar, find another recipe that uses your desired amount.
Sweet spreads, generically referred to as
preserves,
come in many forms and textures. The various types of sweet spreads are as follows:
Jam:
Jam is a combination of fruit (crushed or chopped), sugar, and sometimes pectin and acid, cooked until the pieces of fruit are soft and almost lose their shape. Common uses for jam include bread spreads, cookie and pastry fillings, and a topping for cheesecake.
Jelly:
This mixture combines fruit juice, sugar, and sometimes pectin. It’s transparent with a bright color and should be firm, yet jiggly. If you use fresh fruit, you may be instructed to strain it. Use jelly as a bread spread or as a filling for cakes and cookies.
Marmalade:
These are soft jellies with pieces of fruit rind, usually citrus fruit, suspended in them. In addition to bread spread, marmalades are great as a glaze on a baked ham (use your favorite flavor!).
Preserves:
In addition to the generic term representing all sweet spreads, preserves have a definition of their own. They contain cooked fruit, sugar, and sometimes pectin and have a jamlike consistency, but with whole or large pieces of fruit. The fruit maintains its shape during the cooking process.
Butter:
This smooth, thick spread is made from fruit purée and sugar cooked for a long period of time. The results are a thick spread. Butters normally use less sugar than other sweet spreads and may have spices added to enhance the flavor of the fruit.
Conserves:
These usually contain two fruits mixed with sugar and nuts and cooked to achieve a consistency similar to jam. Traditionally, conserves were used as a spread on biscuits and crumpets.
Choosing Fruit for Sweet Spreads
Always select the freshest fruit available to you. Everyone has his or her favorite. Know when your favorites are in season for the best selection, the highest quality, and, usually, the most reasonable pricing. (For detailed information on selecting fresh fruits, check out Chapter 5.)
Local growers are good indicators of the types of fruit grown in your area. Check out your local farmer’s markets and ask the sellers about their fruit. People love to talk about their passion, and who better to learn from than the person who grows the food you’re buying? Ask questions about the fruit you see, how they determine ripeness, and how a particular fruit tastes. If they’re not passing out samples, they’ll probably be happy to cut you a taste.
 Carry copies of your favorite recipes when you’re visiting local growers or farmer’s markets. That way, you’ll always buy the right amount of fruit for your favorite recipe.
Getting Up to Speed with Fruit Pectin
Pectin
is a natural, water-based substance that’s present in ripe fruit. It’s essential for thickening jams, jellies, and other types of preserves. Some recipes add commercial fruit pectin when more than the naturally occurring amount of pectin is needed (like when you want to thicken a fruit juice into a jelly). If your recipe does include such an ingredient, you’ll see the kind of pectin (powdered or liquid) listed.
 Never alter the amount of sugar your recipe calls for or use sugar substitutes. Exact amounts of sugar, fruit, and pectin are a must for a good
set —
that is, a consistency that isn’t too thick to spread or too runny.
Commercial pectin basics
Commercial pectin is available in most supermarkets or where canning supplies are sold. Pectin may be in short supply in the spring and summer months because these are such popular times of year for canning. So be sure you have enough on hand before you start preparing your recipe.
Inspect the pectin container for water stains, holes, or any other sign that it’s come into contact with food (like food stuck to the package). Check to make sure the package is sealed and that it’s not past the use-by date.
Using pectin after the date on the package may affect your final product because the quality of the pectin may have deteriorated. Pectin wasn’t always marked with a date. If your pectin container doesn’t provide an expiration date, don’t use it; it may be a sign that your product is extremely old.
Types of commercial fruit pectin
Pectin is available in two forms: liquid and powdered (dry). Although both products are made from fruit, they’re not interchangeable. Be sure to use the correct type and amount of pectin your recipe calls for.
Using liquid fruit pectin
Liquid pectin is usually made from apples. Today, a box contains two 3-ounce pouches. The most common brand is Certo.
 Liquid fruit pectin was originally sold in 6-ounce bottles. Older recipes may call for “one-half of a bottle.” If you read a pouch of liquid pectin today, it states, “1 pouch equals 1/2 bottle.”
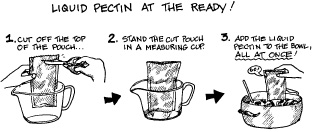
Because you have to add your liquid pectin at the specified time and temperature, have it at the ready: Cut off the top of the pouch and stand it in a measuring cup or other container to keep it from spilling (see Figure 6-1). Then, when it’s time to add the liquid pectin, add it all at the same time, squeezing the pouch with your fingers like you do to get the last bit of toothpaste out of the tube.
Figure 6-1:
Getting a pouch of liquid pectin ready.
Using powdered (dry) fruit pectin
Powdered pectin is made from citrus fruits or apples. It comes in a box similar to a gelatin- or pudding-mix box and contains 1 3/4 ounces (the most commonly used size) or 2 ounces. Use the size stated in your recipe ingredients, and add it before you heat the fruit mixture.