Canning and Preserving For Dummies (45 page)
Read Canning and Preserving For Dummies Online
Authors: Amelia Jeanroy

Frozen Winter Squash
Winter squash includes banana, butternut, and Hubbard. Winter squashes are known for their creamy smooth flavor. They are usually cooked with brown sugar or honey and are a gorgeous bright orange or yellow color from the high vitamin A content. You can add them interchangeably to any bread, cake, stew, or pancake recipe calling for pumpkin. (
Note:
You follow this same recipe to freeze pumpkin!)
Preparation time:
30 minutes
Yield:
1 pint
1 to 1 1/2 pounds winter squash
1
Peel the outer skin of the winter squash, scrape out the seeds, and cut the flesh into chunks.
2
Place the squash in a 3-quart saucepan and add enough water to cover the bottom of the pan. Cook the squash over medium-low heat until the flesh is soft, about 10 to 30 minutes. or until a chunk slides off a fork. Remove the squash from the pan and mash it until smooth.
3
Place the mashed squash in a rigid container, leaving the appropriate amount of headspace (refer to Table 15-2). Seal and freeze.
Per 1/2-cup serving:
Calories 43 (From fat 1); Fat 0g (Saturated 0g); Cholesterol 0mg; Sodium 3mg; Carbohydrates 11g (Dietary fiber 3g); Protein 1g.

Thawing and using your vegetables
Properly thawing your vegetables completes the cycle of preserving your fresh vegetables by freezing. Thawed vegetable results are best when thawed in your refrigerator rather than on your kitchen counter. A package of vegetables containing a single serving size takes less time to thaw than a package containing 1 pound of vegetables.
Of course, you don’t have to thaw your vegetables. You can always add them directly to hot water or a recipe and allow them to thaw and cook with the rest of the ingredients.
Freezing Fresh Herbs
The flavors fresh herbs impart in just about any dish are truly a gift from nature. Frozen herbs are a great compromise when fresh herbs aren’t available.
 Thawed herbs are great in cooked dishes, but they aren’t suitable as a garnish because they’re limp after freezing and thawing. If you grow your own herbs, harvest them early in the day before the sun wilts the leaves. Some herbs that freeze well include basil, chervil, chives, cilantro, comfrey, dill, lovage, mint, parsley, savory, sweet fennel, and thyme.
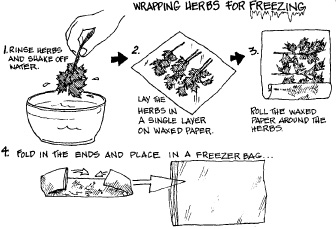
To prepare fresh herbs for the freezer, follow these steps (see Figure 15-3):
1. Clean the herbs.
Hold the bottom of the stems (don’t remove the leaves from the stems) and swish the herbs in a bowl of cool water.
2. Drain and dry the herbs, gently shaking off any excess water.
3. Lay the herb sprigs flat, not touching each other, on a piece of wax paper.
4. Starting at one end, roll the wax paper snuggly over the herbs.
This keeps the herbs separate and easy to use one sprig at a time.
5. Place the rolled herbs in a freezer bag, label the package, and freeze.
There’s no need to thaw the herbs before using them.
 Some herbs, like basil, mint, parsley and cilantro, turn black if you freeze the leaves directly. For these herbs, purée them in just enough olive oil to make a paste and then freeze them in ice cube trays. They keep their fresh flavor and color.
Figure 15-3:
Wrapping herbs for freezing.
If you’re still stumped for more ways you can freeze fresh herbs, try the following:
Herb cubes:
After washing the herbs, remove the leaves from the stem and cut them into pieces. Place 1 teaspoon to 1 tablespoon of herbs in each opening of an ice-cube tray. Pour boiling water into the tray and freeze the herb cubes. After the cubes are frozen solid (usually 24 hours) pop them out of the tray and into a plastic freezer bag. When your recipe calls for 1 teaspoon or 1 tablespoon of an herb, add the ice cube to the dish and continue cooking!
Herbed butter:
Add chopped fresh herbs to one cube of softened, unsalted butter. For a mild herb flavor, start with 1/4 cup of herbs, adjusting the amount to your personal taste. Transfer the flavored butter to an ice-cube tray sprayed with no-stick cooking spray and freeze the butter. After the butter is frozen (about 24 hours), remove the butter cubes, placing them in a labeled freezer bag. Serve the flavored butter with bread or add one to a casserole.
Herbed butter logs:
Flavor the butter as stated in the previous paragraph. Form the flavored butter into a log in a sheet of wax or parchment paper. Twist the ends, place the log in a freezer bag, and freeze it. Slice off what you need and return the log to the freezer.
Part V
Drying and Storing

In this part . . .
Food preservation is not all about canning and freezing. Part V shows you all about preserving your foods by drying them. Here you discover the art of drying foods, the different methods that work, as well as those that are no longer recommended. This part also includes plenty of recipes for drying fruits and vegetables for delicious snacking or to speed up a quick dinner, and instructions for drying assorted common herbs for teas and seasoning. You also discover alternative ways to store your foods without losing quality and flavor.
Chapter 16
Dry, Light, and Nutritious: Drying Food
In This Chapter
Discovering the secrets for successful drying
Mastering the drying process
Preserving the quality of your dried food
In the world of food preservation, sun-drying is the oldest method known. Although canning and freezing require exact applications of processing procedures, drying food isn’t exact or precise. Don’t be surprised if you find yourself working by trial and error when it comes to knowing how long it takes for your food to reach its degree of doneness. Just follow the general guidelines provided and make adjustments. Remember, drying isn’t exact.
In this chapter, you can find basic techniques for drying food, the best drying methods, and how drying food prevents spoilage. Drying is simple and easy to do in your home. Most of the equipment and tools you need, except an electric dehydrator, are probably just waiting for you in your kitchen.
Opening the Door to Successful Food Drying
Drying food is also referred to as
dehydrating
. The goal in this technique is to remove moisture from your food. Achieving a successfully dried product requires removing 80 to 95 percent of the food’s moisture. Removing moisture inactivates the growth of bacteria and other microorganisms but doesn’t kill them.
Key factors in drying food
The following factors affect your finished product:
Heat:
The correct temperature is important in drying food. It must be high enough to force out moisture but not so high that it cooks the food. If your temperature is too high, your food exterior cooks or hardens before the interior of the food dries, trapping moisture in your food — known as
case hardening
. If your temperature is too low or the humidity too high, your food dries too slowly. Both of these dilemmas may cause your food to spoil before you consume it.
The temperature guidelines for drying food are as follows: 125 degrees for vegetables, 135 degrees for fruit, and 145 degrees for meat. Always follow the instructions for the correct drying temperature for your food in your recipe or the owner’s manual for your dehydrator.
Dry air:
Dry air absorbs moisture leaving the food in the drying process. The higher the humidity, the longer foods takes to dry because of the additional moisture in the air.
Air circulation:
Circulating air carries away moisture absorbed by dry air. This keeps the humidity level constant in the drying chamber.
Uniform size:
Pieces of food uniform in size and thickness contain about the same amount of moisture and therefore dry in the same general time, preventing some pieces from not being completely dried and spoiling the entire batch when stored.
Necessary equipment
After you decide which drying method you want to use, assemble your basic tools to aid you in completing the drying process. In addition to the basics every kitchen should have (knives, cutting board, vegetable peeler, grater, and so on; go to Chapter 2 for a whole list of basic supplies), consider the following, which are particularly useful when you’re drying food:
Blender:
Use this for puréeing fruit. For a great fruit purée recipe, head to Chapter 17.
Food processor:
You’ll make uniform slices in a blink of the eye.
Oven thermometer:
For safely drying food in your oven, it’s critical to know the exact temperature of your oven chamber.
Racks and tray:
Your electric dehydrator provides the correct size of trays for your unit. For oven- or sun-drying, you can use oven racks, net-covered racks, or baking sheets. Racks with mesh bottoms or oven racks work well and provide air circulation. To prevent food from falling off the racks, tightly stretch and pin layers of cheesecloth or nylon netting over the racks. If you use baking sheets, you need to rotate the sheets and turn the food over for even drying.
Other tips for successful drying
Drying is one of the easiest ways to preserve food. Still, following a few suggestions can ensure your success:
Pick quality food:
Food of high quality that’s ripe, mature, and in top condition is the best for drying. If you dry food during the peak of its season, you get high-quality food at a lower price because the food is more abundant.
Wash and eliminate blemishes.
Always wash your food to remove dust, dirt, grime, or insects. When you clean your food, start with a clean sink and clean utensils. Any residue from previous use may cross-contaminate your food. (For detailed information on bacteria and safe food handling, check out Chapter 3.)
Strive for uniform size.
It’s important to prepare your food in uniform size and thickness for the food to be done about the same time. If you have two different-size pieces of the same fruit, spread like sizes on one tray. Because one tray of food with smaller or thinner pieces will finish drying before the other tray with larger pieces, you won’t spend time sorting through the food and disrupting the drying process.
Place your food carefully on the drying trays.
Whether you’re using an electric dehydrator, a conventional oven, or Mother Nature, make sure you arrange the food in a single layer and leave spaces between the pieces of food so that they’re not touching each other or the edge of the tray.
Watch for spoilage while the food’s drying.
The shorter the drying period, the less opportunity there is for mold to develop on your food. If mold does develop, remove the moldy pieces and then clean the area with a cloth moistened with distilled white vinegar with an acidity level of 5 percent to kill mold spores.
Test your food for doneness.
The length of time required for drying your food varies with the quality of your food, whether you’re using a pretreating method, your climate and humidity, the size of the food pieces, the moisture content of the food, and the drying temperature. This all means you can’t blindly follow the recommended drying time. Instead, you have to test your food for doneness. Here’s how: Remove a piece from the tray and allow it to cool completely. Then check to see whether it matches the recipe’s description of how the food should look and feel when what properly dried.
The easiest method for checking your dried food for doneness is touching and tasting it. This may sound overly simplified, but there’s nothing like using your senses.
Store your cooled food in plastic bags, glass containers, or rigid plastic containers with airtight seals.
Make sure to label the container with contents and date. For more on storage containers and how to make your dried food last, head to the later section “Protecting the Life of Your Dried Food.”
Choosing a Drying Method
The three approved methods for drying food are using an electric dehydrator, using a conventional oven, and drying in the sun. All methods work well when you follow basic food-drying procedures, use high-quality fresh food, and practice good sanitation for food preparation.
An electric dehydrator
If you dry a lot of food, an electric dehydrator is a great investment (see Figure 16-1). It’s the most reliable method for achieving the most consistent results each time you dry food. This method dries your food evenly and quickly, doesn’t tie up your oven, and produces great results in any weather.
An electric dehydrator dries your food by heating the air inside the chamber to a low temperature and circulating the warm air through the chamber with a fan, passing the heat evenly over your food for the entire drying process. After you place your food in your dehydrator, it needs little or no attention.
To use an electric dehydrator, follow these steps:
1. Prepare your food according to the recipe and arrange it carefully on the drying trays.
2. Following the instructions for using your dehydrator, allow the food to dry for the specified period of time.
Turn the pieces of food and rotate the trays from bottom to top to ensure even drying of all the food in the dehydrator.
3. Test your food for doneness and then label and store it in an airtight container.
Each time you use your dehydrator, review the operating instructions including preheating the unit, filling the trays, setting the temperature, and the time recommended for drying your food. If you have any questions regarding the use or operation of your unit, contact the manufacturer. You can find this information in your owner’s manual or check with the store you purchased it from.
Figure 16-1:
Two examples of electric dehydrators.

If you’re purchasing a dehydrator, carefully assess your needs. Then consider the following factors when making your final decision:
Overall construction:
Purchase a unit that’s approved for safe home use by the Underwriters Laboratory (UL). If the unit isn’t UL approved, don’t buy it — it may not be safe for use in your home. Choose one with insulated walls that’s easy to clean and drying trays that you can move easily in and out of the dehydrator without disturbing the food.
Capacity:
Purchase a dehydrator big enough to hold the amount of food you’ll dry at one time. Typically, the most common-sized food dehydrator has four trays. Each tray holds about 3/4 to 1 square foot of food. Some dehydrators expand to utilize 30 trays at one time. Snack-size dehydrators with two trays are also available.
Heat source:
Select one with an enclosed heating element. Wattage needs to accommodate about 70 watts for each tray the unit holds.
Fan:
The fan circulates the heated air around your food. Purchase a dehydrator with a quiet fan, because it runs for long periods of time. If your unit isn’t equipped with a fan, you need to rearrange the trays more often during the drying period for an even drying.
When buying a dehydrator secondhand, always plug it in to hear how it sounds when running. The level of noise is not an indicator of quality, but a loud dehydrator needs an out-of-the-way place to run, or it’ll be too inconvenient to use.