Foundation Game Design with ActionScript 3.0, Second Edition (96 page)
Read Foundation Game Design with ActionScript 3.0, Second Edition Online
Authors: Rex van der Spuy

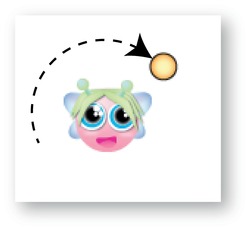
Figure 10-3.
Click the stage to make Button Fairy fly to that spot.
Here's the code that makes this happen:
package
{
  import flash.display.Sprite;
  import flash.events.Event;
  import flash.events.MouseEvent;
  import flash.ui.Mouse;
  [SWF(width="550", height="400",
  backgroundColor="#FFFFFF", frameRate="60")]
  public class ClickToMove extends Sprite
  {
    private const EASING:Number = 0.1
    private var _fairy:Fairy = new Fairy();
    //Variables to capture the point that
    //the mouse clicks
    private var _target_X:Number;
    private var _target_Y:Number;
    public function ClickToMove()
    {
      stage.addChild(_fairy);
      stage.addEventListener
        (Event.ENTER_FRAME, enterFrameHandler);
      stage.addEventListener
        (MouseEvent.MOUSE_DOWN, mouseDownHandler)
    }
    private function mouseDownHandler(event:MouseEvent):void
    {
      _target_X = stage.mouseX;
      _target_Y = stage.mouseY;
    }
    private function enterFrameHandler(event:Event):void
    {

//Figure out the distance between the
      //target position and the center of the fairy
      var vx:Number
        = _target_X - (_fairy.x + _fairy.width / 2);
      var vy:Number
        = _target_Y - (_fairy.y + _fairy.height / 2);
      var distance:Number = Math.sqrt(vx * vx + vy * vy);
      //Move the fairy if it's more than 1 pixel
      //away from the target position
      if (distance >= 1)
      {
        _fairy.x += vx * EASING;
        _fairy.y += vy * EASING;
      }
    }
  }
}
When the player clicks anywhere on the stage with the mouse, themouseDownHandleris called. It stores the mouse's position in two variables:_target_Xand_target_Y. Those two numbers are then used as the point to move the fairy to. Those values are changed only when the player clicks the mouse. The rest of the code is identical to the previous example.
Easy easing!
Our little easing formula is a wonderfully flexible bit of code, but if you want to use some more advanced easing effects in your game, consider installing and using a custom tween engine. Tween engines are specialized classes written by helpful programmers that you can add to your AS3.0 code library to animate your objects in all sorts of interesting ways. There are too many tween engines available to recommend one over another, and they're all really good, so you'll need to do a bit of research on your own to find out which of them might be best to use with your game. Here are the best known AS3.0 tween engines available at the time of writing: Tweener, TweenLite, GTween, Twease and Tweensy.
A web search will turn up the current download sites and installation instructions.
But, better yet, make your own tween engine! It's not hard to do at all, and Keith Peter's superb books,
Foundation ActionScript 3.0 Animation
and
AdvancED ActionScript 3.0 Animation
(both available from Apress), will show you how.
To round off this discussion of mouse-driven player control systems, let's look at a real-world example that takes into account the kind of complexity that some of your games will demand. We're going to use this as the model for the player control scheme that we're going to use in the demo game, Killer Bee Pandemonium!, at the end of the chapter.
You'll find this example in the ButtonFairy project folder in the chapter's source files. Run the SWF and you'll see that you can fly Button Fairy around the stage by dragging the mouse, much like you could in the example from the previous section “Moving an object with easing.” In this version, an orange circle, the fairy's “wand,” rotates around the fairy and angles itself toward the mouse cursor. Click the left mouse button and you can fire stars in all directions. The stars are removed when they hit the stage boundaries.
Figure 10-4
shows what you'll see.
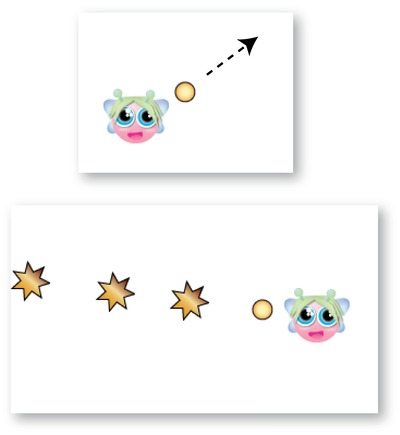
Figure 10-4.
Button Fairy flies in the direction her wand is pointing, and she can fire stars in all directions.
This is an important example that demonstrates the following key game design techniques:
- How to rotate an object around another object
- How to fire projectiles in all directions
- How to use composition to make all the game objects using a single
GameObjectclass
Figure 10-5
illustrates how the project is structured.
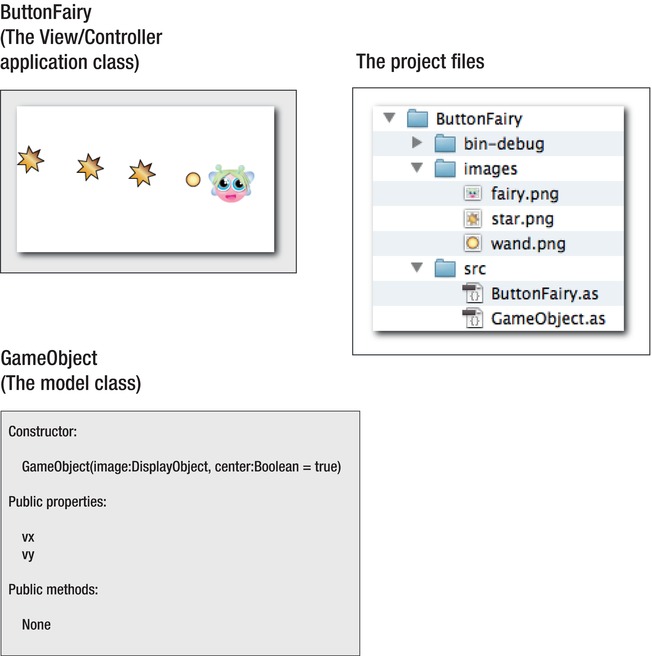
Figure 10-5.
The project classes and files
The code that moves Button Fairy around the stage is identical to the code we looked at in the section “Moving an object with easing.” The new code that moves the wand and fires the stars has been added to it, and you'll find out exactly how it works in the following pages. Here's the entire application class that makes all this work:
package
{
  import flash.display.DisplayObject;
  import flash.display.Sprite;
  import flash.events.Event;
  import flash.events.MouseEvent;
  import flash.ui.Mouse;
  [SWF(width="550", height="400",
  backgroundColor="#FFFFFF", frameRate="60")]
  public class ButtonFairy extends Sprite
  {
    //Embed the images
    [Embed(source="../images/fairy.png")]
    private var FairyImage:Class;
    [Embed(source="../images/wand.png")]
    private var WandImage:Class;
    [Embed(source="../images/star.png")]
    private var StarImage:Class;
    //Private properties
    private const EASING:Number = 0.1;
    private var _fairyImage:DisplayObject = new FairyImage();
    private var _wandImage:DisplayObject = new WandImage();
    //Create the fairy and wand game objects
    //(The images will be centered by the GameObject class)
    private var _fairy:GameObject = new GameObject(_fairyImage);
    private var _wand:GameObject = new GameObject(_wandImage);
    //A variable to store the angle between
    //the mouse and the center of the fairy
    private var _angle:Number;
    //An array to store the stars
    private var _stars:Array = new Array();
    public function ButtonFairy()
    {
      //Add the fairy and the wand to the stage
      stage.addChild(_fairy);
      stage.addChild(_wand);
      //Hide the mouse
      Mouse.hide();
      //Add the event listeners
      stage.addEventListener
        (Event.ENTER_FRAME, enterFrameHandler);
      stage.addEventListener
        (MouseEvent.MOUSE_DOWN, mouseDownHandler);
    }
    private function enterFrameHandler(event:Event):void
    {
      //Find the angle between the center of the
      //fairy and the mouse
      _angle
        = Math.atan2
        (
          _fairy.y - stage.mouseY,
          _fairy.x - stage.mouseX
        );
      //Move the wand around the fairy
      var radius:int = -50;
      _wand.x = _fairy.x + (radius * Math.cos(_angle));
      _wand.y = _fairy.y + (radius * Math.sin(_angle));
      //Figure out the distance between the
      //mouse and the center of the fairy
      var vx:Number = stage.mouseX - _fairy.x;
      var vy:Number = stage.mouseY - _fairy.y;
      var distance:Number = Math.sqrt(vx * vx + vy * vy);
      //Move the fairy if it's more than 1 pixel away from the mouse
      if (distance >= 1)
      {
        _fairy.x += vx * EASING;
        _fairy.y += vy * EASING;
      }
      //Move the stars
      for(var i:int = 0; i < _stars.length; i++)
      {
        var star:GameObject = _stars[i];
        star.x += star.vx;
        star.y += star.vy;
        //check the star's stage boundaries
        if (star.y < 0
        || star.x < 0
        || star.x > stage.stageWidth
        || star.y > stage.stageHeight)
        {
          //Remove the star from the stage
          stage.removeChild(star);
          star = null;
          //Remove the star from the _stars array
         _stars.splice(i,1);
          //Reduce the loop counter
          //by one to compensate
          //for the removed star
          i--;
        }
      }
    }
    private function mouseDownHandler(event:MouseEvent):void
    {
      //Create a star and add it to the stage
      var starImage:DisplayObject = new StarImage();
      var star:GameObject = new GameObject(starImage);
      stage.addChild(star);
      //Set the star's starting position
      //to the wand's position
      star.x = _wand.x;
      star.y = _wand.y;
      //Set the star's velocity based
      //on the angle between the center of
      //the fairy and the mouse
      star.vx = Math.cos(_angle) * -7;
      star.vy = Math.sin(_angle) * -7;
      //Push the star into the _stars array
      _stars.push(star);
    }
  }
}
The images of all the objects are embedded into the application class. Each individual object is made using composition by sending the image to theGameObjectclass, like this:
private var _fairy:GameObject = new GameObject(_fairyImage);
private var _wand:GameObject = new GameObject(_wandImage);
TheGameObjectclass contains the vx and vy properties that all the objects need to move. When it receives an image through its constructor method, it displays it and centers it within its containing sprite. Here's the entireGameObjectclass that does this:
package
{
  import flash.display.DisplayObject;
  import flash.display.Sprite;
  {
    public class GameObject extends Sprite
    {
      //Public properties
      public var vx:Number = 0;
      public var vy:Number = 0;
      public function GameObject
        (image:DisplayObject, center:Boolean = true)
      {
        //Add the image
        this.addChild(image);
        //Center the image if the "center" option is true
        if(center)
        {
          image.x -= image.width / 2;
          image.y -= image.height / 2;
        }
      }
    }
  }
}
Thecenterparameter is set totrueby default. This means that the object's x and y positions will refer to its center point. This is very useful in this game example because we want the fairy to be centered over the mouse, the wand to rotate around the fairy's center, and the stars to be added to the stage at the wand's center point. Centering all the objects will simplify the code in the application class.
If you want to use this class to create a game object, but you don't want the image to be centered, includefalseas the second argument, like this:
private var _fairy:GameObject = new GameObject(_fairyImage, false);
Now the object's x and y registration point will be its top-left corner, as it has been for most of the examples in this book.
Creating all the game objects from this one class is a powerful programming technique called
composition
. It saves you the trouble of having to make a unique class for each object. If all your game objects share the same properties, it's a great solution.
For many more examples of composition, and a detailed explanation of exactly how it works, see the bonus chapter “Drag-and-Drop Games” in the book's download package.
Button Fairy's wand is the yellow dot that fires stars in all directions. It rotates around the center of the fairy, and always points toward the mouse, as shown in
Figure 10-6
.