Happy Endings: Finishing the Edges of Your Quilt (31 page)
Read Happy Endings: Finishing the Edges of Your Quilt Online
Authors: Mimi Dietrich
Tags: #Crafts & Hobbies, #Quilts & Quilting

But wait! Take a few moments to share some information with future generations. Sign your newest “work of heart” with your name and other information you would like to remember. Record the date, celebrate the occasion, and dedicate it to someone special. Your quilt is now a part of history, and you want to remember its story. Don’t you wish your grandmother had done this with her quilts?
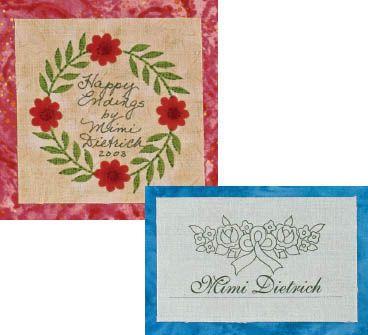
You can sign your quilt several ways. You can embroider or quilt an inscription on the front of your quilt. You can use a fine-line permanent marker to write the information in a corner on the back of the quilt. Or you can make a “designer” label to sew to the back of your quilt.
Iron a piece of freezer paper to the wrong side of your label fabric. The freezer paper will stabilize the fabric and keep it from stretching as you write. Using a fine-line permanent marker, write your information and sign your name for a personalized quilt label.
The information you put on your quilt label will help to bring back special memories. (And after you have finished 10 more quilts, you’ll see why it’s a good thing you recorded the information when you did!) Your family and friends will cherish your special “signed” gifts. It will help historians of the future remember you and help ensure a happy ending for your quilt.
Hanging Sleeves
If you are planning to hang your quilt on a wall (or in a quilt show), sew a sleeve to the back. You can either do this before applying the binding or after. The sleeve should be made from a tube of fabric. When you slide the hanging rod into the sleeve, the back of the quilt will be protected.
Some quilters sew a second hanging sleeve to the bottom of the quilt. A dowel placed in this sleeve will add weight to the quilt and help it hang straight.
If your quilt is very wide, it’s a good idea to sew two smaller hanging sleeves with a space in the middle, rather than one long sleeve all the way across the back of the quilt. That way, when you hang the quilt, you can use a nail or hook to support the center of the dowel and the quilt so that the quilt won’t sag.
If you haven’t attached the binding yet, use the procedure immediately following. If you have already attached the binding, see the alternate method for attaching a sleeve, opposite.
Method One
1.
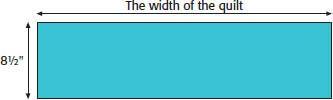
Cut a strip of fabric as long as the width of your quilt and 8½" wide. This strip will make a 4"-wide sleeve. To create a deeper sleeve, double the desired finished width and add ½" for seam allowances. If, for example, you wish to add a 6"-wide sleeve, cut the sleeve 12½" wide. If you’re planning to enter your quilt in a show, check the specifications before attaching a sleeve. A 4"-wide sleeve is commonly called for, but standards may differ from one quilt show to another.
2.
Turn under ¼" twice at each short end of the strip and stitch a narrow hem.

3.
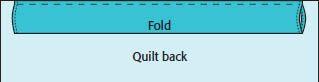
Fold the sleeve lengthwise, wrong sides together, and pin the raw edges to the top of the quilt before you attach the binding. Machine baste ⅛" from the top edge.
4.
Sew the binding to the quilt. The raw edges of the sleeve will be covered when the binding is turned to the back of the quilt.
5.
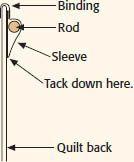
Pin the folded edge of the sleeve to the back of the quilt. Blindstitch the sleeve to the back of the quilt, being very careful not to stitch through to the front of the quilt.

Happy Ending Hint
When you pin the bottom of the sleeve to the back of the quilt, roll the edge up ¼". This adds a little extra room for the hanging rod and will help the front of the quilt hang smoothly.