iOS Programming: The Big Nerd Ranch Guide, 3/e (Big Nerd Ranch Guides) (52 page)
Read iOS Programming: The Big Nerd Ranch Guide, 3/e (Big Nerd Ranch Guides) Online
Authors: Aaron Hillegass,Joe Conway
Tags: #COM051370, #Big Nerd Ranch Guides, #iPhone / iPad Programming

Saving, Loading, and Application States
There are many ways to save and load data in an iOS application. This chapter will take you through some of the most common mechanisms as well as the concepts you need to understand to write to or read from the filesystem on iOS.
Any iOS application is really doing one thing: providing an interface for a user to manipulate data. Every object in an application has a role in this process. Model objects, as you know, are responsible for holding on to the data that the user manipulates. View objects simply reflect that data, and controllers are responsible for what is going on while the application is running. Therefore, when talking about saving and loading data, we are almost always talking about saving and loading model objects.
In
Homepwner
, the model objects that a user manipulates are instances of
BNRItem
.
Homepwner
would actually be a useful application if instances of
BNRItem
persisted between runs of the application, and in this chapter, we will use
archiving
to save and load
BNRItem
s.
Archiving is one of the most common ways of persisting model objects on iOS. Archiving an object involves recording all of its instance variables and saving them to the filesystem. Unarchiving an object loads the data from the filesystem and creates objects from that record.
Classes whose instances need to be archived and unarchived must conform to the
NSCoding
protocol and implement its two required methods,
encodeWithCoder:
and
initWithCoder:
.
- (void)encodeWithCoder:(NSCoder *)aCoder;
- (id)initWithCoder:(NSCoder *)aDecoder;
@end
Make
BNRItem
conform to
NSCoding
. Open
Homepwner.xcodeproj
and add this protocol declaration in
BNRItem.h
.
Now we need to implement the required methods. Let’s start with
encodeWithCoder:
. When a
BNRItem
is sent the message
encodeWithCoder:
, it will encode all of its instance variables into the
NSCoder
object that is passed as an argument. You can think of this
NSCoder
object as a container for data that is responsible for organizing that data and writing it to the filesystem. It organizes the data in key-value pairs.
In
BNRItem.m
, implement
encodeWithCoder:
to add the instance variables to the container.
{
[aCoder encodeObject:itemName forKey:@"itemName"];
[aCoder encodeObject:serialNumber forKey:@"serialNumber"];
[aCoder encodeObject:dateCreated forKey:@"dateCreated"];
[aCoder encodeObject:imageKey forKey:@"imageKey"];
[aCoder encodeInt:valueInDollars forKey:@"valueInDollars"];
}
Notice that pointers to objects are encoded with
encodeObject:forKey:
, but
valueInDollars
is encoded with
encodeInt:forKey:
. Check the documentation for
NSCoder
to see all of the types you can encode. Regardless of the type of the encoded value, there is always a key, which is a string that identifies which instance variable is being encoded. By convention, this key is the name of the instance variable being encoded.
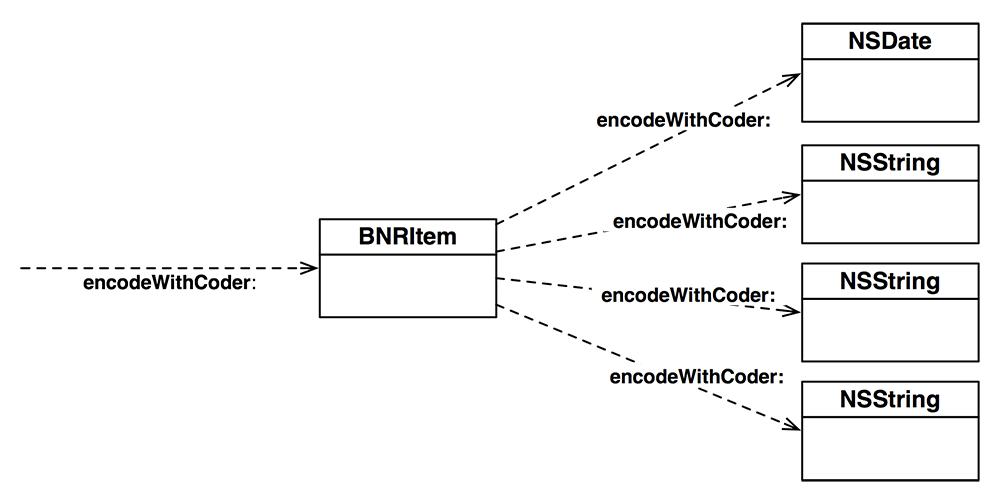
When an object is encoded, that object is sent
encodeWithCoder:
. When an object is sent
encodeWithCoder:
, it encodes its instance variables in the same way – by sending them
encodeWithCoder:
(
Figure 14.1
). Thus, encoding an object is a recursive process where objects encode other objects.
Figure 14.1 Encoding an object

To be encoded, these objects must also conform to
NSCoding
. Check out the documentation for
NSString
and
NSDate
: they are
NSCoding
compliant.
The purpose of the key used when encoding is to retrieve the encoded value when this
BNRItem
is loaded from the filesystem later. Objects being loaded from an archive are sent the message
initWithCoder:
. This method should grab all of the objects that were encoded in
encodeWithCoder:
and assign them to the appropriate instance variable. Implement this method in
BNRItem.m
.
{
self = [super init];
if (self) {
[self setItemName:[aDecoder decodeObjectForKey:@"itemName"]];
[self setSerialNumber:[aDecoder decodeObjectForKey:@"serialNumber"]];
[self setImageKey:[aDecoder decodeObjectForKey:@"imageKey"]];
[self setValueInDollars:[aDecoder decodeIntForKey:@"valueInDollars"]];
dateCreated = [aDecoder decodeObjectForKey:@"dateCreated"];
}
return self;
}
Notice that this method has an
NSCoder
argument, too. In
initWithCoder:
, the
NSCoder
is full of data to be consumed by the
BNRItem
being initialized. Also notice that you sent
decodeObjectForKey:
to the container to get objects back and
decodeIntForKey:
to get the
valueInDollars
.
In
Chapter 2
, we talked about the initializer chain and designated initializers. The
initWithCoder:
method isn’t part of this design pattern; you will keep
BNRItem
’s designated initializer the same, and
initWithCoder:
will not call it.
(By the way, archiving is how XIB files are created.
UIView
conforms to
NSCoding
. Instances of
UIView
are created when you drag them onto the canvas area. When the XIB file is saved, these views are archived into the XIB file. When your application launches, it unarchives the views from the XIB file. There are some minor differences between a XIB file and a standard archive, but overall, it’s the same process.)
BNRItem
s are now
NSCoding
compliant and can be saved to and loaded from the filesystem using archiving. You can build the application to make sure there are no syntax errors, but, we still need a way to kick off the saving and loading. We also need a place on the filesystem to store the saved
BNRItem
s.
Every iOS application has its own
application sandbox
. An application sandbox is a directory on the filesystem that is barricaded from the rest of the filesystem. Your application must stay in its sandbox, and no other application can access your sandbox.
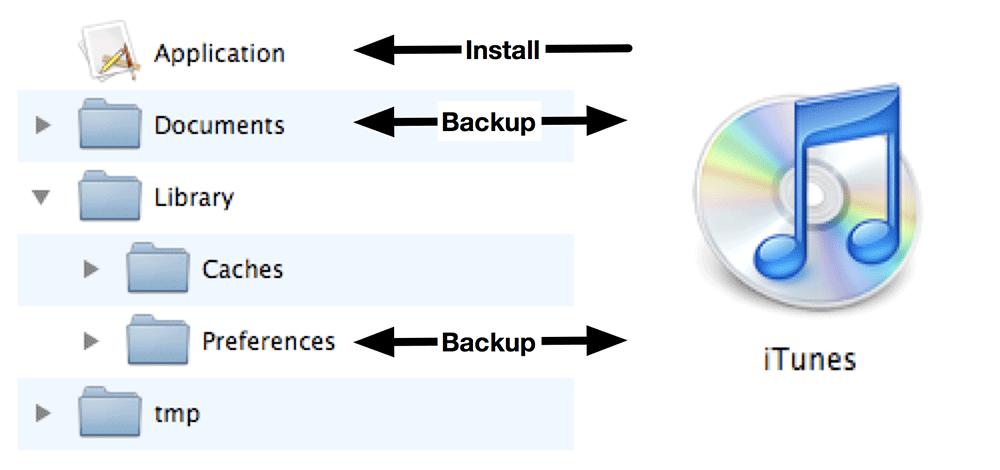
Figure 14.2 Application sandbox

The application sandbox contains a number of directories:
application bundle
This directory contains all the resources and the executable. It is read-only.
This directory is where any preferences are stored and where the
Settings
application looks for application preferences.
Library/Preferences
is handled automatically by the class
NSUserDefaults
(which you will learn about in
Chapter 18
) and is backed up when the device is synchronized with
iTunes
or iCloud. (We’ll see how to synchronize with iCloud in
Chapter 30
.)
This directory is where you write data that you will use temporarily during an application’s runtime. You should remove files from this directory when done with them, and the operating system may purge them while your application is not running. It does not get backed up when the device is synchronized with
iTunes
or iCloud. To get the path to the
tmp
directory in the application sandbox, you can use the convenience function
NSTemporaryDirectory
.
This directory is where you write data that the application generates during runtime and that you want to persist between runs of the application. It is backed up when the device is synchronized with
iTunes
or iCloud. If something goes wrong with the device, files in this directory can be restored from
iTunes
or iCloud. For example, in a game application, the saved game files would be stored here.
This directory is where you write data that the application generates during runtime and that you want to persist between runs of the application. However, unlike the
Documents
directory, it does not get backed up when the device is synchronized with
iTunes
or iCloud. A major reason for not backing up cached data is that the data can be very large and extend the time it takes to synchronize your device. Data stored somewhere else – like a web server – can be placed in this directory. If the user needs to restore the device, this data can be downloaded from the web server again.
The
BNRItem
s from
Homepwner
will be saved to a single file in the
Documents
directory. The
BNRItemStore
will handle writing to and reading from that file. To do this, the
BNRItemStore
needs to construct a path to this file.
Open
BNRItemStore.h
and declare a new method.
Implement this method in
BNRItemStore.m
.
{
NSArray *documentDirectories =
NSSearchPathForDirectoriesInDomains(NSDocumentDirectory,
NSUserDomainMask, YES);
// Get one and only document directory from that list
NSString *documentDirectory = [documentDirectories objectAtIndex:0];
return [documentDirectory stringByAppendingPathComponent:@"items.archive"];
}
You can build to check for syntax errors.
The function
NSSearchPathForDirectoriesInDomains
searches the filesystem for a path that meets the criteria given by the arguments. On iOS, the last two arguments are always the same. (This function is borrowed from Mac OS X, where there are significantly more options.) The first argument is a constant that specifies the directory in the sandbox you want the path to. For example, searching for
NSCachesDirectory
will return the
Caches
directory in the application’s sandbox.
You can search the documentation for one of the constants you already know – like
NSDocumentDirectory
– to locate the other options. Remember that these constants are shared by iOS and Mac OS X, so not all of them will work on iOS.
The return value of
NSSearchPathForDirectoriesInDomains
is an array of strings. It is an array of strings because, on Mac OS X, there may be multiple paths that meet the search criteria. On iOS, however, there will only be one (if the directory you searched for is an appropriate sandbox directory). Therefore, the name of the archive file is appended to the first and only path in the array. This will be where
BNRItem
s live.