Read iOS Programming: The Big Nerd Ranch Guide, 3/e (Big Nerd Ranch Guides) Online
Authors: Aaron Hillegass,Joe Conway
Tags: #COM051370, #Big Nerd Ranch Guides, #iPhone / iPad Programming
iOS Programming: The Big Nerd Ranch Guide, 3/e (Big Nerd Ranch Guides) (33 page)

Notification and Rotation
Objective-C code is all about objects sending messages to other objects. This communication usually occurs between two objects, but sometimes a bunch of objects are concerned with one object. They all want to know when this object does something interesting, and it’s not feasible for that object to send messages to every interested object.
Instead, an object can post notifications about what it is doing to a centralized notification center. Interested objects register to receive a message when a particular notification is posted or when a particular object posts. In this chapter, you will learn how to use a notification center to handle notifications. You’ll also learn about the autorotation behavior of
UIViewController
.
Every application has an instance of
NSNotificationCenter
, which works like a smart bulletin board. An object can register as an observer (
“
Send me
‘
lost dog
’
notifications
”
). When another object posts a notification (
“
I lost my dog
”
), the notification center forwards the notification to the registered observers (
Figure 8.1
).
Figure 8.1 NSNotificationCenter
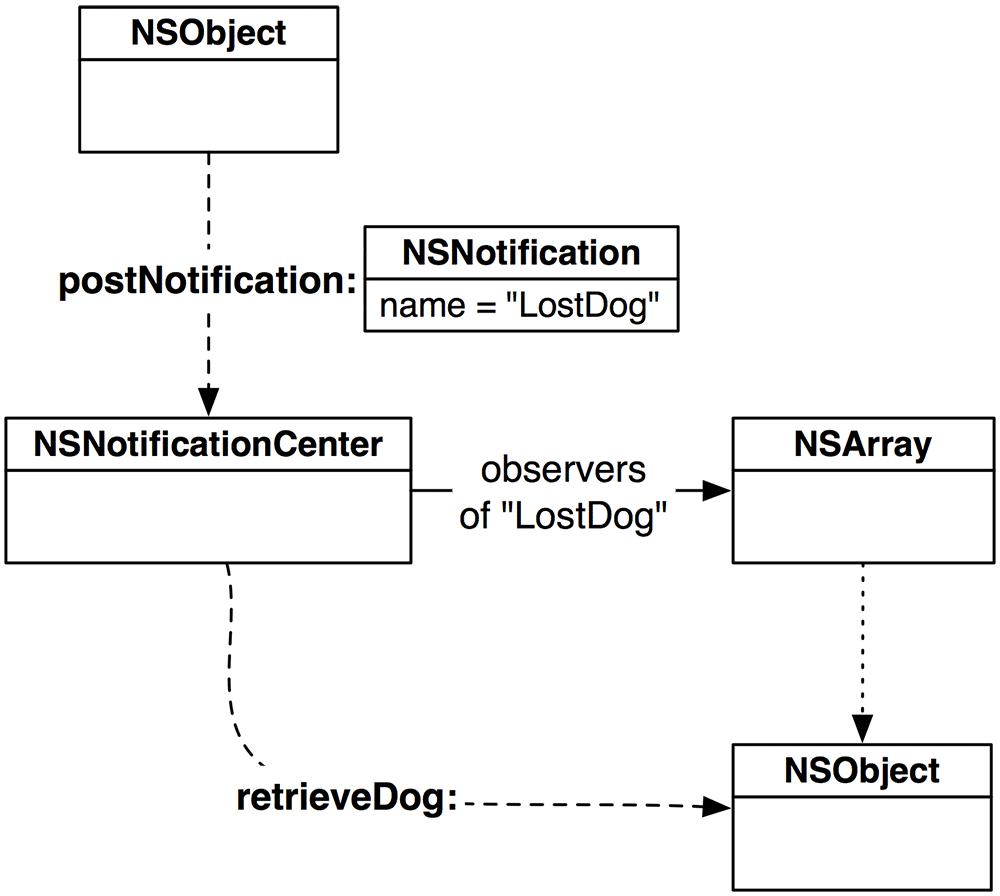
Notifications are instances of
NSNotification
. Every
NSNotification
object has a name and a pointer back to the object that posted it. When you register as an observer, you can specify a notification name, a posting object, and the message you want to sent to you when a qualifying notification is posted.
The following snippet of code registers you for notifications named
LostDog
that have been posted by any object. When an object posts a
LostDog
notification, you’ll be sent the message
retrieveDog:
.
[nc addObserver:self // The object
self
will be sent
selector:@selector(retrieveDog:) //
retrieveDog:
name:@"LostDog" // when
@"LostDog"
is posted
object:nil]; // by
any object
.
Note that
nil
works as a wildcard in the notification center world. You can pass
nil
as the
name
argument, which will give you every notification regardless of its name. If you pass
nil
for the notification name and the posting object, you will get every notification.
The method that is triggered when the notification arrives takes an
NSNotification
object as the argument:
{
id poster = [note object];
NSString *name = [note name];
NSDictionary *extraInformation = [note userInfo];
}
Notice that the notification object may have a
userInfo
dictionary attached to it. This dictionary is used to pass additional information, like a description of the dog that was found. Here’s an example of an object posting a notification with a
userInfo
dictionary attached:
NSNotification *note = [NSNotification notificationWithName:@"LostDog"
object:self
userInfo:extraInfo];
[[NSNotificationCenter defaultCenter] postNotification:note];
For a (real-world) example, when a keyboard is coming onto the screen, it posts a
UIKeyboardDidShowNotification
that has a
userInfo
dictionary. This dictionary contains the on-screen region that the newly visible keyboard occupies.
This is important: the notification center keeps strong references to its observers. If the object doesn’t remove itself as an observer before it is destroyed, then the next time a notification that the object registered for is posted, the center will try to send the object a message. Since that object no longer exists, your application will crash. Thus, if an object registers with the notification center, that object must unregister in its
dealloc
method.
{
[[NSNotificationCenter defaultCenter] removeObserver:self];
}
It’s important to understand that
NSNotification
s and the
NSNotificationCenter
are not associated with visual
“
notifications,
”
, like push and local notifications that the user sees when an alarm goes off or a text message is received.
NSNotification
s and the
NSNotificationCenter
comprise a design pattern, like target-action pairs or delegation.
One object that regularly posts notifications is
UIDevice
. Here are the constants that serve as names of the notifications that a
UIDevice
posts:
UIDeviceBatteryStateDidChangeNotification
UIDeviceBatteryLevelDidChangeNotification
UIDeviceProximityStateDidChangeNotification
Wouldn’t it be cool to get a message when the device rotates? Or when the phone is placed next to the user’s face? These notifications do just that.
Create a new
Empty Application
project and name it
HeavyRotation
. Enter
Rotation
into the
Class Prefix
field, enter
iPhone
for the device family, and only check the box for
Use Automatic Reference Counting
.
In
RotationAppDelegate.m
, register to receive notifications when the orientation of the device changes:
didFinishLaunchingWithOptions:(NSDictionary *)launchOptions
{
self.window = [[UIWindow alloc] initWithFrame:[[UIScreen mainScreen] bounds]];
// Override point for customization after application launch.
// Get the device object
UIDevice *device = [UIDevice currentDevice];
// Tell it to start monitoring the accelerometer for orientation
[device beginGeneratingDeviceOrientationNotifications];
// Get the notification center for the app
NSNotificationCenter *nc = [NSNotificationCenter defaultCenter];
// Add yourself as an observer
[nc addObserver:self
selector:@selector(orientationChanged:)
name:UIDeviceOrientationDidChangeNotification
object:device];
self.window.backgroundColor = [UIColor whiteColor];
[self.window makeKeyAndVisible];
return YES;
}
Now, whenever the device’s orientation changes, the message
orientationChanged:
will be sent to the instance of
RotationAppDelegate
. In the same file, add an
orientationChanged:
method:
{
// Log the constant that represents the current orientation
NSLog(@"orientationChanged: %d", [[note object] orientation]);
}
Build and run the application. (This is best run on the device because the simulator won’t let you achieve some orientations. If you must use the simulator, you can change the orientation by choosing
Rotate Left
or
Rotate Right
from the
Hardware
menu.)
Take another look at the
@selector
directive you used when you added an observer to the notification center. This directive takes the name of a method and wraps it up in a
SEL
data type. Doing so allows method names to be passed as arguments to methods. But the method name must be exact. Here, the name of the method is
orientationChanged:
including the colon. If you omit the colon from the
@selector
directive like this,
then the application will crash when the device rotates and for good reason: The notification center will send the message
orientationChanged
to the
RotationAppDelegate
.
RotationAppDelegate
does not implement to a method named
orientationChanged
. It implements a method named
orientationChanged:
. The colon is an essential part of the method name.
Many classes post notifications including
UIApplication
,
NSManagedObjectContext
,
MPMoviePlayerController
,
NSFileHandle
,
UIWindow
,
UITextField
, and
UITextView
. See their class reference pages in the documentation for details.
Many applications rotate and resize all of their views when the user rotates the device. You could implement this using
UIDevice
notifications, but it would be a lot of work. Fortunately, you can use
autorotation
to simplify the process.
If the view on screen is controlled by a view controller, when the device is rotated, the view controller is asked if it is okay to rotate the view. If the view controller agrees, the view is resized and rotated. Its subviews are also resized and rotated.
You will need a
UIViewController
subclass to get this autorotating behavior. This view controller’s
view
will have subviews, so we will use the
UIViewController
template with a XIB file to create this class.
Select
File
→
New
→
New File...
. From the
iOS
section, select
Cocoa Touch
, choose the
Objective-C class
template, and click
Next
.
Figure 8.2 UIViewController template

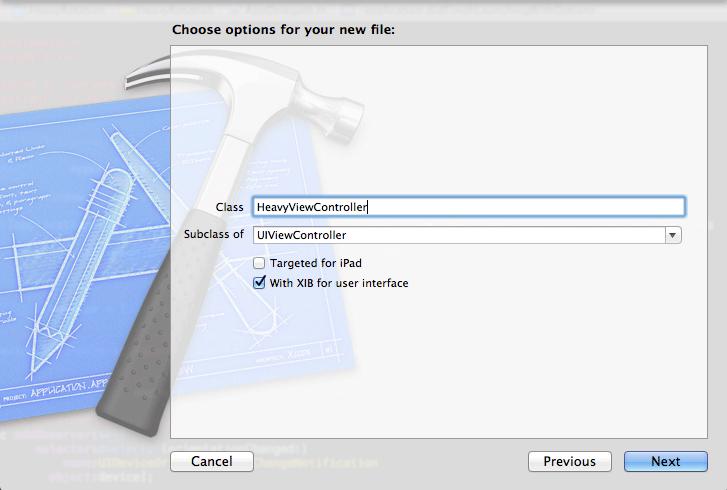
On the next pane, name this new subclass
HeavyViewController
, select
UIViewController
as the superclass, uncheck
Targeted for iPad
, and check
With XIB for user interface
. Then click
Next
(
Figure 8.3
).
Figure 8.3 UIViewController template options
Save these new files when the sheet appears. Then, open
HeavyViewController.m
and delete everything between
@implementation
and
@end
. The file should look like this:
@implementation HeavyViewController
@end
Using this template gives you a subclass of
UIViewController
named
HeavyViewController
. You also get a XIB file named
HeavyViewController.xib
. This XIB file has a
File's Owner
of type
HeavyViewController
, whose
view
outlet is connected to a 320x460 point sized view object.
To implement autorotation in
HeavyRotation
, you need to do two things:
- Override
shouldAutorotateToInterfaceOrientation:
in
HeavyViewController
to allow autorotation.
- Carefully set the autoresize mask on each subview so that it acts reasonably when the superview is resized to fill the rotated window.
When the device rotates, view controllers whose views are currently on the screen will be sent the message
shouldAutorotateToInterfaceOrientation:
. This method returns a
BOOL
that indicates whether it is okay to autorotate the view controller’s view.
For iPhone applications, you typically allow right-side up, landscape left, and landscape right. On the iPad, you typically allow all orientations, including upside-down. In
HeavyViewController.m
, implement this method to return
YES
for the three typical iPhone orientations.
{
// Return YES if incoming orientation is Portrait
// or either of the Landscapes, otherwise, return NO
return (x == UIInterfaceOrientationPortrait)
|| UIInterfaceOrientationIsLandscape(x);
}
Now let’s find something to rotate. Drag any image (smaller than 1024x1024) from
Finder
into the project navigator. (Alternatively, you can use the file
joeeye.jpg
in the solutions at
http://www.bignerdranch.com/solutions/iOSProgramming3ed.zip
.)
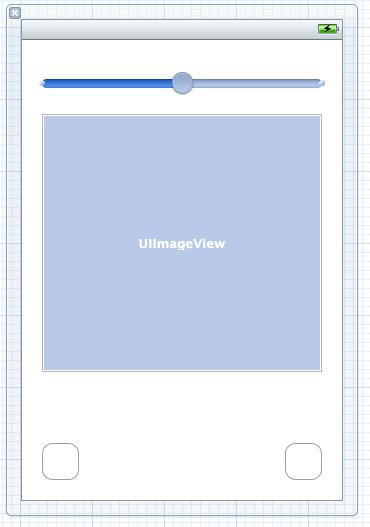
Open
HeavyViewController.xib
. Drop a slider, an image view, and two buttons on the view (
Figure 8.4
).
Figure 8.4 HeavyViewController XIB layout
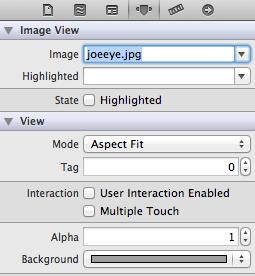
Then select the
UIImageView
and show the attributes inspector. Set the
Image
property to your image file, set the
Mode
to
Aspect Fit
, and set the background color to gray, as shown in
Figure 8.5
.
Figure 8.5 UIImageView attributes
When the device rotates, two things happen. First, the view is rotated to be aligned with the device orientation. Second, the view is resized to fit the screen. For example, a view that is 320 points wide and 480 points tall in portrait mode will be 480 points wide and 320 points tall in landscape mode. When a view is resized, it will
autoresize
all of its subviews. Each subview is resized according to its
autoresizing mask
property. You can modify the autoresizing mask of a view by selecting the view in the XIB file and then clicking the icon to reveal the
size inspector
(
Figure 8.6
).
Figure 8.6 Autosizing in size inspector
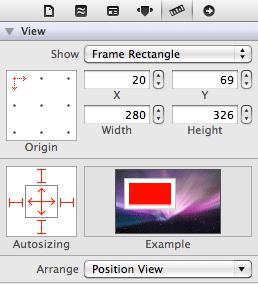
Check out the box labeled
Autosizing
in
Figure 8.6
. You can click this control in six different places: on the four sides outside the inner box and along the vertical and horizontal axes inside the inner box. We call the outside four
struts
, and the inside two
springs
. Clicking on one of these areas toggles an autoresizing mask option. A solid red line means the option is on, and a dim red dotted line means the option is off.
A spring that is turned on tells the view to change size when its superview changes size. For example, if you turn on the horizontal spring, the view will change its width at the same rate that its superview changes its width.
A strut tells the view to keep the margin between the view and its superview constant. For example, if you turn on the left strut, the view will maintain the distance from the left side of its superview when the superview changes its width.
You can toggle the springs and struts and watch the animated example next to the
Autosizing
area to see what happens.
In your
HeavyRotation
application, you have four views. Here’s how you want them to handle autorotation:
- The image view should stay centered and resize with its superview.
- The slider should get wider but not taller. It should stay fixed at the top of the superview and keep the same distance from the left and right edges.