Read iOS Programming: The Big Nerd Ranch Guide, 3/e (Big Nerd Ranch Guides) Online
Authors: Aaron Hillegass,Joe Conway
Tags: #COM051370, #Big Nerd Ranch Guides, #iPhone / iPad Programming
iOS Programming: The Big Nerd Ranch Guide, 3/e (Big Nerd Ranch Guides) (67 page)

In
Chapter 5
, we talked briefly about
UIResponder
and the first responder. A
UIResponder
can receive touch events.
UIView
is one example of a
UIResponder
subclass, but there are many others, including
UIViewController
,
UIApplication
, and
UIWindow
. You are probably thinking,
“
But you can’t touch a
UIViewController
. It’s not an on-screen object.
”
You are right – you can’t send a touch event
directly
to a
UIViewController
, but view controllers can receive events through the
responder chain
. (By the way, you get two bonus points for keeping the view controller and its view separate in your brain.)
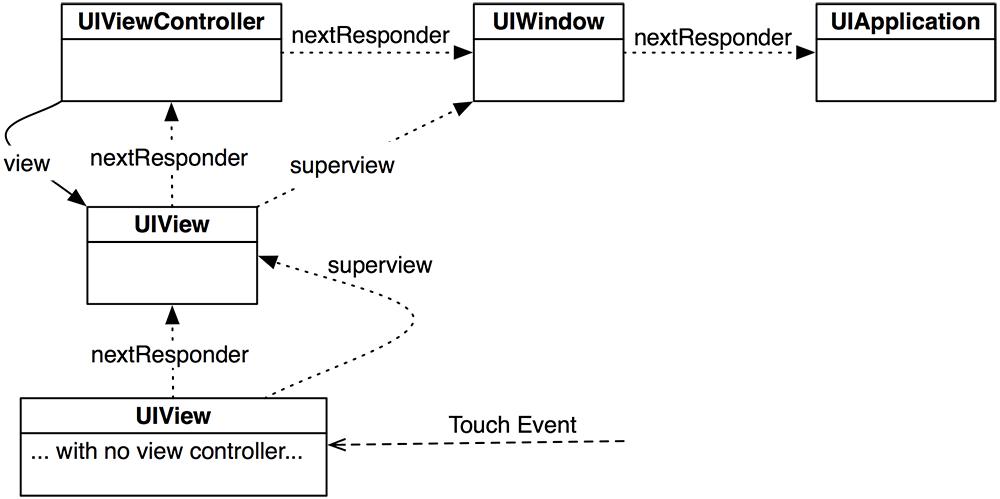
Every
UIResponder
has a pointer called
nextResponder
, and together these objects make up the responder chain (
Figure 19.3
). A touch event starts at the view that was touched. The
nextResponder
of a view is typically its
UIViewController
(if it has one) or its superview (if it doesn’t). The
nextResponder
of a view controller is typically its view’s superview. The top-most superview is the window. The window’s
nextResponder
is the singleton instance of
UIApplication
. If the application doesn’t handle the event, then it is discarded. (Note that the window and application don’t do anything with an event unless you subclass them.)
Figure 19.3 Responder chain
How does a
UIResponder
not
handle an event? It forwards the same message to its
nextResponder
. That is what the default implementation of methods like
touchesBegan:withEvent:
do. So if a method is not overridden, its next responder will attempt to handle the touch event.
You can explicitly send a message to a next responder, too. Let’s say there is a view that tracks touches, but if a double tap occurs, its next responder should handle it. The code would look like this:
{
UITouch *touch = [touches anyObject];
if ([touch tapCount] == 2) {
[[self nextResponder] touchesBegan:touches withEvent:event];
return;
}
... Go on to handle touches that aren't double taps
}
Save the lines when the application terminates. Reload them when the application resumes.
Make it so the angle at which a line is drawn dictates its color once it has been added to
completeLines
.
Use two fingers to draw circles. Try having each finger represent one corner of the bounding box around the circle. You can simulate two fingers on the simulator by holding down the option button. (Hint: This is much easier if you track touches that are working on a circle in a separate dictionary.)
The class
UIControl
is the superclass for several classes in Cocoa Touch, including
UIButton
and
UISlider
. We’ve seen how to set the targets and actions for these controls. Now we can take a closer look at how
UIControl
overrides the same
UIResponder
methods you implemented in this chapter.
In
UIControl
, each possible
control event
is associated with a constant. Buttons, for example, typically send action messages on the
UIControlEventTouchUpInside
control event. A target registered for this control event will only receive its action message if the user touches the control and then lifts the finger off the screen inside the frame of the control. Essentially, it is a tap.
For a button, however, you can have actions on other event types. For example, you might trigger a method if the user removes the finger
inside or outside
the frame. Assigning the target and action programmatically would look like this:
action:@selector(resetTemperature:)
forControlEvents:UIControlEventTouchUpInside | UIControlEventTouchUpOutside];
Now consider how
UIControl
handles
UIControlEventTouchUpInside
.
- (void)touchesEnded:(NSSet *)touches withEvent:(UIEvent *)event
{
// Reference to the touch that is ending
UITouch *touch = [touches anyObject];
// Location of that point in this control's coordinate system
CGPoint touchLocation = [touch locationInView:self];
// Is that point still in my viewing bounds?
if (CGRectContainsPoint([self bounds], touchLocation))
{
// Send out action messages to all targets registered for this event!
[self sendActionsForControlEvents:UIControlEventTouchUpInside];
} else {
// The touch ended outside the bounds, different control event
[self sendActionsForControlEvents:UIControlEventTouchUpOutside];
}
}
So how do these actions get sent to the right target? At the end of the
UIResponder
method implementations, the control sends the message
sendActionsForControlEvents:
to itself. This method looks at all of the target-action pairs the control has, and if any of them are registered for the control event passed as the argument, those targets are sent an action message.
However, a control never sends a message directly to its targets. Instead, it routes these messages through the
UIApplication
object. Why not have controls send the action messages directly to the targets? Controls can also have
nil
-targeted actions. If a
UIControl
’s target is
nil
, the
UIApplication
finds the
first responder
of its
UIWindow
and sends the action message to it.
UIGestureRecognizer and UIMenuController
In
Chapter 19
, you handled raw touches and determined their course by implementing methods from
UIResponder
. Sometimes, you want to detect a specific pattern of touches that make a gesture, like a pinch or a swipe. Instead of writing code to detect common gestures yourself, you can use instances of
UIGestureRecognizer
.
A
UIGestureRecognizer
intercepts touches that are on their way to being handled by a view. When it recognizes a particular gesture, it sends a message to the object of your choice. There are several types of gesture recognizers built into the SDK. In this chapter, we will use three of them to allow
TouchTracker
users to select, move, and delete lines. We’ll also see how to use another interesting iOS class,
UIMenuController
.
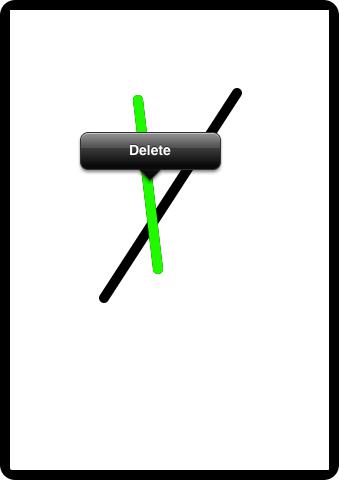
Figure 20.1 TouchTracker by the end of the chapter
You don’t instantiate
UIGestureRecognizer
itself. Instead, there are a number of subclasses of
UIGestureRecognizer
, and each one is responsible for recognizing a particular gesture.
To use an instance of a
UIGestureRecognizer
subclass, you give it a target-action pair and attach it to a view. Whenever the gesture recognizer recognizes its gesture on the view, it will send the action message to its target. All
UIGestureRecognizer
action messages have the same form:
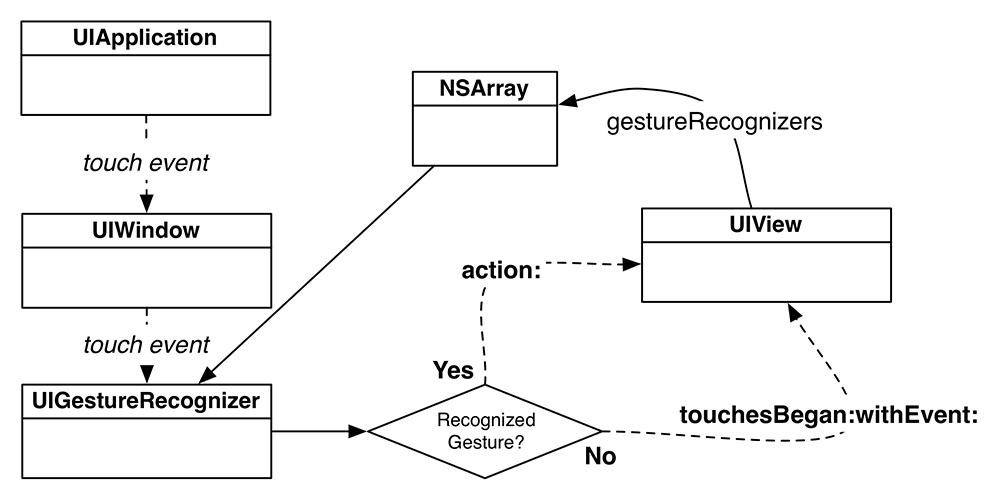
When recognizing a gesture, the gesture recognizer intercepts the touches destined for the view (
Figure 20.2
). Thus, a view with gesture recognizers may not receive the typical
UIResponder
messages like
touchesBegan:withEvent:
.
Figure 20.2 UIGestureRecognizers intercept UITouches
The first
UIGestureRecognizer
subclass you will use is
UITapGestureRecognizer
. When the user taps a line in
TouchTracker
, you will present a menu that allows them to delete it. Open
TouchTracker.xcodeproj
from
Chapter 19
.
In the first part of this section, we are going to recognize a tap, determine which line is close to where the tap occurred, store a reference to that line, and change that line’s color to green so that the user knows it has been selected.
In
TouchDrawView.m
, edit the
initWithFrame:
method to create an instance of
UITapGestureRecognizer
and attach it to the
TouchDrawView
being initialized.
{
self = [super initWithFrame:r];
if (self) {
linesInProcess = [[NSMutableDictionary alloc] init];
completeLines = [[NSMutableArray alloc] init];
[self setBackgroundColor:[UIColor whiteColor]];
[self setMultipleTouchEnabled:YES];
UITapGestureRecognizer *tapRecognizer =
[[UITapGestureRecognizer alloc] initWithTarget:self
action:@selector(tap:)];
[self addGestureRecognizer:tapRecognizer];
}
return self;
}
Now whenever a tap occurs on this
TouchDrawView
, the
UITapGestureRecognizer
will send it the message
tap:
. In
TouchDrawView.m
, implement the
tap:
method. For now, just have it log something to the console.
{
NSLog(@"Recognized tap");
}
Build and run the application and then tap on the screen. You should notice two things: the console reports that a tap was recognized, and a dot is drawn on the view. That dot is a very short line and a bug. In this application, we don’t want anything drawn in response to a tap. Add the following code to
tap:
to remove any lines in process and redisplay the view.
{
NSLog(@"Recognized tap");
// If we just tapped, remove all lines in process
// so that a tap doesn't result in a new line
[linesInProcess removeAllObjects];
[self setNeedsDisplay];
}
Build and run again. Now a tap should have no effect except for logging a statement to the console.
Now, in order to
“
select a line,
”
we need to find a line close to where the tap occurred and then store a reference to that line for later. In
TouchDrawView.h
, declare a new method and a new property. Also, at the top of this file, forward declare the
Line
class.
@interface TouchDrawView : UIView
{
NSMutableDictionary *linesInProcess;
NSMutableArray *completeLines;
}
@property (nonatomic, weak) Line *selectedLine;
- (Line *)lineAtPoint:(CGPoint)p;
- (void)clearAll;
- (void)endTouches:(NSSet *)touches;
@end
Synthesize
selectedLine
in
TouchDrawView.m
.
@synthesize selectedLine;
Implement
lineAtPoint:
in
TouchDrawView.m
to get a
Line
close to the given point.
{
// Find a line close to p
for (Line *l in completeLines) {
CGPoint start = [l begin];
CGPoint end = [l end];
// Check a few points on the line
for (float t = 0.0; t <= 1.0; t += 0.05) {
float x = start.x + t * (end.x - start.x);
float y = start.y + t * (end.y - start.y);
// If the tapped point is within 20 points, let's return this line
if (hypot(x - p.x, y - p.y) < 20.0) {
return l;
}
}
}
// If nothing is close enough to the tapped point, then we didn't select a line
return nil;
}
(There are better ways to implement
lineAtPoint:
, but this simplistic implementation is okay for our purposes.)
The point we are interested in, of course, is where the tap occurred. We can easily get this information. Every
UIGestureRecognizer
has a
locationInView:
method. Sending this message to the gesture recognizer will give you the coordinate where the gesture occurred in the coordinate system of the view that is passed as the argument.
In
TouchDrawView.m
, send the
locationInView:
message to the gesture recognizer, pass the result to
lineAtPoint:
, and make the returned line the
selectedLine
.
{
NSLog(@"Recognized tap");
CGPoint point = [gr locationInView:self];
[self setSelectedLine:[self lineAtPoint:point]];
// If we just tapped, remove all lines in process so a new one
// isn't drawn on every tap
[linesInProcess removeAllObjects];
[self setNeedsDisplay];
}
Finally, in
TouchDrawView.m
, update
drawRect:
to draw the
selectedLine
in green. Make sure this code comes after you draw the complete and in progress lines.
for (NSValue *v in linesInProcess) {
Line *line = [linesInProcess objectForKey:v];
CGContextMoveToPoint(context, [line begin].x, [line begin].y);
CGContextAddLineToPoint(context, [line end].x, [line end].y);
CGContextStrokePath(context);
}
// If there is a selected line, draw it
if ([self selectedLine]) {
[[UIColor greenColor] set];
CGContextMoveToPoint(context, [[self selectedLine] begin].x,
[[self selectedLine] begin].y);
CGContextAddLineToPoint(context, [[self selectedLine] end].x,
[[self selectedLine] end].y);
CGContextStrokePath(context);
}
}
Build and run the application. Draw a few lines and then tap on one. The tapped line should appear in green.