Read iOS Programming: The Big Nerd Ranch Guide, 3/e (Big Nerd Ranch Guides) Online
Authors: Aaron Hillegass,Joe Conway
Tags: #COM051370, #Big Nerd Ranch Guides, #iPhone / iPad Programming
iOS Programming: The Big Nerd Ranch Guide, 3/e (Big Nerd Ranch Guides) (79 page)

When using a
UITableViewController
, you typically implement the appropriate data source methods to return the content of each cell. This makes sense when you have dynamic content – like a list of
BNRItem
s that may change – but it is a lot of work when you have a table whose content never changes. Storyboards allow you to add static content to a table view without having to implement the data source methods.
To see how easy this is, we’re going to add a
UITableViewController
to the storyboard and give it static content. (Depending on a number of factors, the root view controller of the
UINavigationController
may already be a
UITableViewController
. If this is the case in your storyboard, go through the following steps anyway for the practice.)
First, you need to delete the current root view controller of the navigation controller. In
Storytime.storyboard
, select the black bar that represents the
UIViewController
that is the root view controller. Then press the Delete key. That view controller is now gone, and the navigation controller no longer has a root view controller.
Next, drag a
UITableViewController
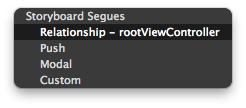
from the library onto the canvas. To set this table view controller as the root view controller of the navigation controller, Control-drag from the navigation controller’s view to the table view controller. Let go, and from the black panel that appears, select
Relationship - rootViewController
(
Figure 24.7
).
Figure 24.7 Setting a relationship
This establishes the
UITableViewController
as the root view controller of the
UINavigationController
. There will now be an arrow from the navigation controller to the table view controller. In the middle of this arrow is an icon that represents the type of relationship between the two view controllers (
Figure 24.8
).
Figure 24.8 UINavigationController and UITableViewController

(Notice the zoom in and out controls in the bottom right corner? You can zoom in and out to see more of the canvas. This is especially useful when you have a lot of view controllers. However, you cannot select the view objects when zoomed out.)
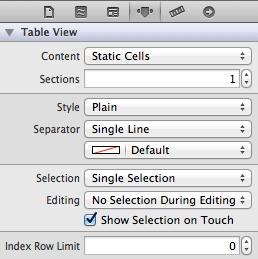
Next, select the
Table View
of the
UITableViewController
. In the attributes inspector, change the
Content
pop-up menu to
Static Cells
(
Figure 24.9
).
Figure 24.9 Static cells
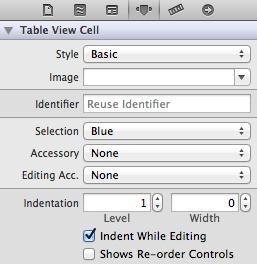
Three
UITableViewCell
s will appear on the table view. You can now select and configure each one individually. Select the top-most cell and, in the attributes inspector, change its
Style
to
Basic
(
Figure 24.10
).
Figure 24.10 Basic UITableViewCell
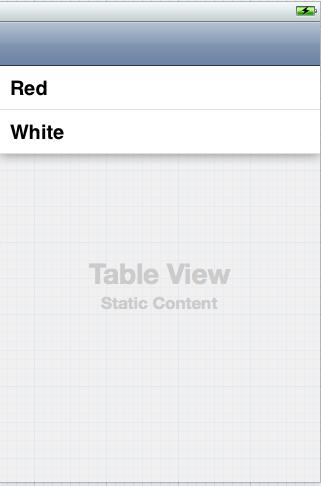
Back on the canvas, the selected cell will now say
Title
. Double-click on the text and change it to
Red
.
Repeat the same steps for the second cell but have the title read
White
. Let’s get rid of the third cell; select it and press Delete.
Figure 24.11
shows the updated table view.
Figure 24.11 Configured cells
Build and run the application. You will see exactly what you have laid out in the storyboard file – a table view underneath a navigation bar. The table view has two cells that read
Red
and
White
. And you didn’t have to write any data source methods.
Most iOS applications have a number of view controllers that users navigate between. Storyboards allow you to set up these interactions as
segues
without having to write code.
A segue moves another view controller onto the screen when triggered and is represented by an instance of
UIStoryboardSegue
. Each segue has a style, an action item, and an identifier. The
style
of a segue determines how the view controller will be presented, such as pushed onto the stack or presented modally. The
action item
is the view object in the storyboard file that triggers the segue, like a button, a bar button item, or another
UIControl
. The
identifier
is used to programmatically access the segue. This is useful when you want to trigger a segue that doesn’t come from an action item, like a shake or some other interface element that can’t be set up in the storyboard file.
Let’s start with two push segues. A push segue pushes a view controller onto the stack of a navigation controller. We’ll need to set up two more view controllers in our storyboard, one whose view’s background is red, and the other, white. The segues will be between the table view controller and these two new view controllers. The action items will be the table view’s cells; tapping a cell will push the appropriate view controller onto the navigation controller’s stack.
Drag two
UIViewController
s onto the canvas. Select the
View
of one of the view controllers and, in the attributes inspector, change its background color to red.
Next, select the cell titled
Red
. Control-drag to the view controller whose view has the red background. A black panel titled
Storyboard Segues
will appear. This panel lists the possible styles for this segue. Select
Push
.
Then, select the
White
cell and Control-drag to the other view controller. Your canvas should look like
Figure 24.12
.
Figure 24.12 Setting up two segues
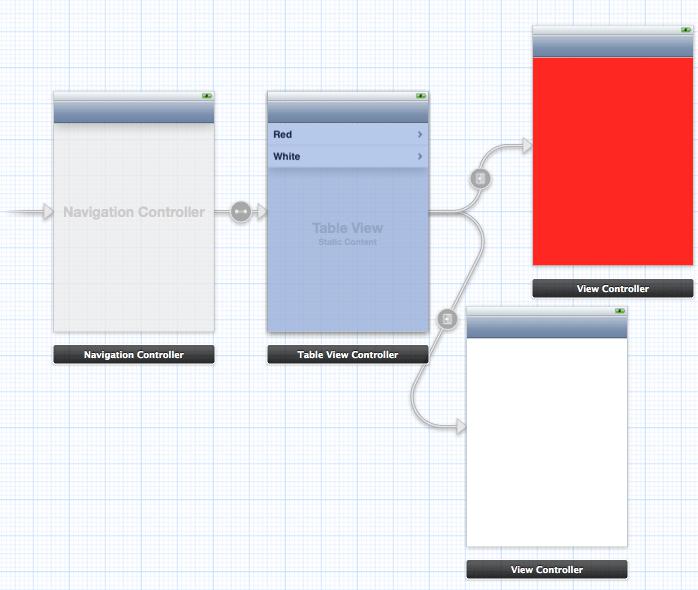
Notice the arrows that come from the table view controller to the other two view controllers. Each of these is a segue. The icon in the circle tells us that these segues are push segues.
Build and run the application. Tap on each row, and you will be taken to the appropriate view controller. You can even move back in the navigation stack to the table view controller like you would expect. The best part about this? We haven’t written any code yet.
Note that push segues only work if the origin of the segue is inside a navigation controller. Fortunately for us, the origin of these segues is the table view controller, which meets this requirement.
Now let’s look at another style a segue – a
Modal
segue. Drag a new
UIViewController
onto the canvas. We want this segue’s action item to be a bar button item on the table view controller’s navigation item.
Drag a
Bar Button Item
from the library onto the right corner of the navigation bar at the top of the table view controller’s view. Then, Control-drag from this bar button item to the view controller you just dropped on the canvas. Select
Modal
from the black panel. The storyboard canvas now looks like
Figure 24.13
. (Notice that the icon for the modal segue is different from the icon for the push segues.)
Figure 24.13 A modal segue
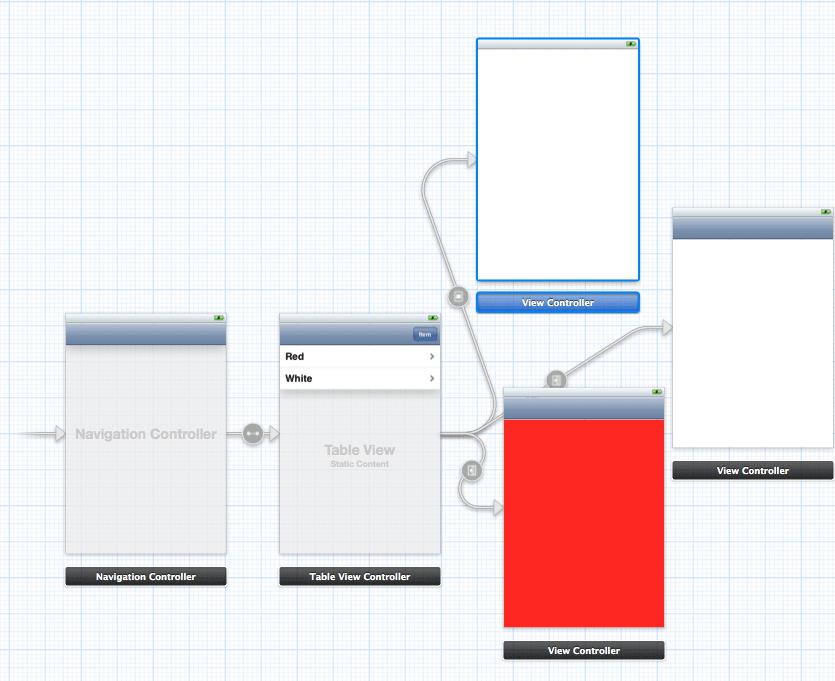
Build and run the application. Tap the bar button item, and a view controller with a white view will slide onto the screen. All is well – except you can’t dismiss this view controller. You’ll have to write some actual code to do that.
Right now, every view controller in the storyboard is a standard instance of
UIViewController
or one of its standard subclasses. We cannot write code for any of these as they are. To write code for a view controller in a storyboard, you have to create a subclass of
UIViewController
and specify in the storyboard that the view controller is an instance of your subclass.
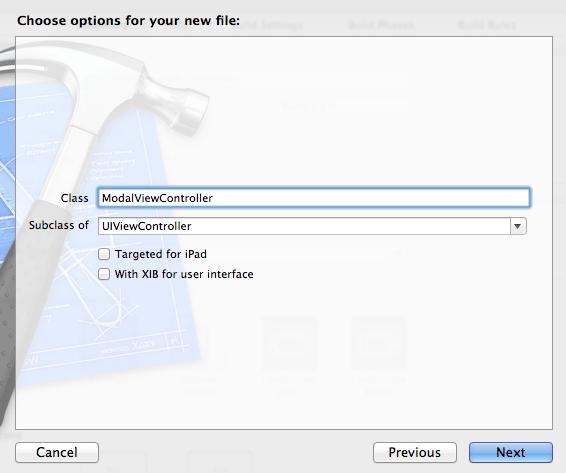
Let’s create a new
UIViewController
subclass to see how this works. Create a new file from the
UIViewController
template. Name it
ModalViewController
and configure it as shown in
Figure 24.14
.
Figure 24.14 ModalViewController
In
ModalViewController.h
, declare a new
IBAction
.
- (IBAction)dismiss:(id)sender;
@end
In
ModalViewController.m
, implement this method to dismiss the instance of
ModalViewController
.
{
[[self presentingViewController] dismissViewControllerAnimated:YES
completion:nil];
}
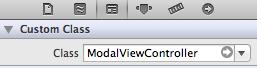
Open
Storytime.storyboard
again. Select the black bar underneath the modally presented view controller. In the identity inspector, change the
Class
to
ModalViewController
(
Figure 24.15
).
Figure 24.15 Changing view controller to ModalViewController
Now, after making sure you are zoomed in, drag a
Round Rect Button
onto the
ModalViewController
’s
view
. Label this button
Dismiss
.
Select the button and notice that the black bar that represents the view controller now shows two icons: the second icon is the view controller object. Control-drag from the button to this view controller icon and let go – when the panel appears, select the
dismiss:
method (
Figure 24.16
).
Figure 24.16 Setting outlets and actions in a storyboard
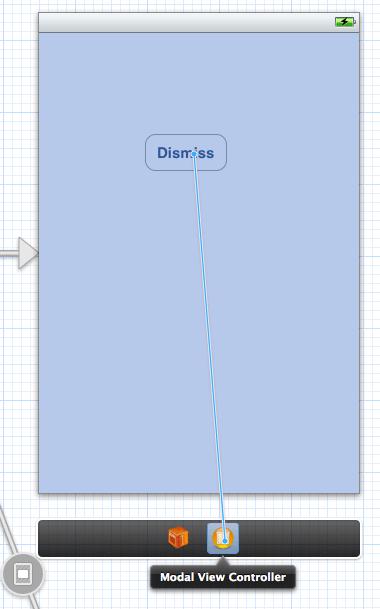
This button is now hooked up to send the message
dismiss:
to its
ModalViewController
whenever tapped. Build and run the application, present the
ModalViewController
, and then tap on the
Dismiss
button. Voilà!