Just in Case (56 page)

Cheese press: to make a hard cheese; you can buy a ready-made press or order press-building plans from a cheese-making supply house
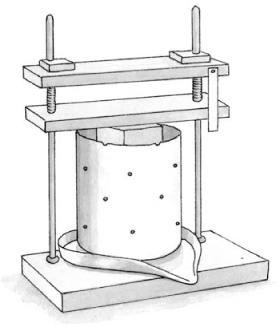
CHEESE PRESS
And, of course, to make cheese you’ll need milk. You can use low-fat, skim, or even reconstituted powdered milk for many soft cheeses, but I have not had good results unless my milk has some fat in it. Raw milk is great if you can get it. Some grocery-store milk is ultra pasteurized, which won’t work for making some cheeses, so read the label carefully before purchasing.
Cheese making will be easier if you find a class or an experienced cheese maker to give you some guidance on your first few attempts.
BASIC WHITE CHEESE (QUESD BLANCD)
Most of the supplies you need to turn out this simple cheese are probably already in your kitchen. The ingredients could not be more basic.
1
gallon whole milk
⅛ cup apple cider vinegar
• In a large pot, heat the milk, stirring to prevent scorching, until it reaches 200°F. Add the vinegar in a thin trickle, and continue to stir until the curds separate from the whey. Do not let the milk boil or the cheese will be ruined.
• Line a colander with butter muslin and ladle the curds into the colander. Tie the four corners of the muslin into a knot and hang the bag to drain for several hours. Refrigerate for several hours, until the cheese sets. Store in the refrigerator.
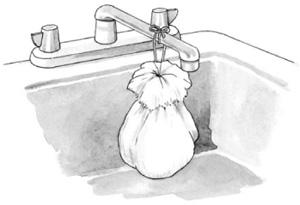
HANGING CURDS TD DRAIN
CHEDDAR CHEESE
Ricki Carroll has a wonderful recipe for a real cheddar cheese in her book, but I was looking for a way to make a cheddar from ingredients you might have in storage and came up with this. It isn’t the same as a properly aged cheddar made from fresh ingredients, but in an emergency it passes quite well.
1
cup vegetable oil, plus extra for greasing the pan
6
cups warm water
4
½ cups powdered milk
2
5
/s cups white vinegar
1 to 2
teaspoons salt (to taste)
9
tablespoons cheddar cheese powder (I get mine from a food co-op)
• Grease a large saucepan with a bit of vegetable oil. Blend the oil, water, milk, and vinegar and heat in the saucepan, stirring to prevent scorching, until the mixture reaches 115°F and curds begin to form.
• Line a colander with butter muslin and ladle the curds into it. Let drain. Then rinse, first in warm water, then in cold. Place the curds in a bowl and add salt to taste, then mix in the cheese powder. Wrap the cheese in cheesecloth. Set the cheese between two plates with a weight, such as a brick, on the top plate; press until all of the liquid is expelled. This will take a few hours. Wrap the cheese in a vinegar-soaked cheesecloth and store in the refrigerator.
MDCK PARMESAN CHEESE
This isn’t real Parmesan cheese, but it will substitute if need be, and it does add a nice touch to a pizza or a pasta dish.
1
½ cups boiling water
½ cup powdered milk
4
½ teaspoons lemon juice
Salt
• Blend the boiling water, dry milk, and lemon juice in a saucepan. Heat over low heat until the milk boils. Place the mixture in a cheesecloth bag and strain. Then rinse the curds under cold water and let drain.
• Use your hands to break up the curds until they are very fine. Spread them on a cookie sheet and dry for two hours on low heat, about 200°F. (You can use a solar oven for this, but you will need to prop open the top to keep the heat low enough.) You want the curds to dry, not cook. When they are dry, add salt to taste and blend the curds into a powder.
THIRTY-MINUTE MDZZARELLA
This is a Ricki Carroll recipe from Home
Cheese Making.
I couldn’t believe this wonderful cheese took only thirty minutes to prepare. The only downside is that six adults ate the entire block in one sitting.
1
gallon pasteurized (but not ultra pasteurized) whole milk
1
½ level teaspoons citric acid dissolved in ¼ cup cool, unchlorinated water 1/8-1/4 teaspoon lipase powder dissolved in
J/
4 cup cup cool water and allowed to sit for twenty minutes (this is optional but will improve flavor; lipase can be purchased from a cheese supply company)
¼ teaspoon liquid rennet (or ¼ rennet tablet) dissolved in ¼ cup cool water
1
teaspoon cheese salt (optional)
• Heat the milk to 55°F. While stirring, add the citric acid solution to the milk and mix thoroughly. If you are adding lipase, do it now. Continue heating the milk over medium-low heat until it reaches 88°F. The milk will begin to curdle. Gently mix in the diluted rennet, stirring in an up-and-down motion. Continue heating until the milk reaches 100°F-105°F.
• Turn off the heat and let the mixture sit for 5 to 8 minutes. The curds will be pulling away from the sides of the pot. They should look like thick yogurt and have a bit of shine. If the whey is still milky instead of clear, wait a few more minutes. Scoop out the curds with a perforated ladle and place them in a 2-quart micro wavable bowl. Press the curds gently with your hands, pouring off as much whey as possible. Reserve the whey.
• Microwave the curds on high power for 1 minute. Drain off all excess whey. Gently fold the cheese over and over, as if you were kneading bread, with your hand or a spoon. This distributes the heat evenly throughout the cheese. Microwave two times for 35 seconds each. After each heating, knead again and drain away the excess whey. You may want to wear rubber gloves; the curds will become too hot to touch with your bare hands. Add the salt to taste after the second microwave. Knead the cheese quickly until it is smooth. When the cheese becomes elastic, start to pull and stretch it as you would taffy. If it breaks, the curds need to be reheated.
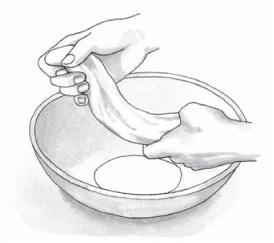
STRETCHING MDZZARELLA
• When the cheese is smooth and shiny, roll it into a log or small balls. Eat while still warm, or place the cheese in a bowl of ice water for about a half hour to produce a consistently smooth texture. If you must wait, cover it and store it in the refrigerator.
Note: If you don’t have a microwave, heat the reserved whey to at least 175°F. Add !4 cup of cheese salt to the whey. Shape the curds into one or more balls. Now, put on heavy rubber gloves. Place each ball in a ladle or strainer and dip it into the whey for several seconds. Knead the curd with spoons between each dip. Repeat this process several times, until the curd is smooth and pliable.
BAKING BREAD
H
OMEMADE BREADS AND
rolls have the ability to turn an ordinary meal into an event. If you’ve never made bread you may think that there is some magic involved, but it really is a simple, if somewhat lengthy, process. But since most of the time is spent waiting for the bread to rise, it doesn’t need to take that much time from your day. Even if you don’t want to bake bread on a day-to-day basis, you should know how to do it, so that you can do it without much fuss if you need to.
Basically, all you need is flour, some sweetener, some oil, yeast, salt, and some liquid. The flour can be white, whole wheat, or a combination of the two. Honey, sugar, maple syrup, or molasses will do as a sweetener; it isn’t used for flavor so much as to give the yeast something to work with. Any liquid fat, such as melted shortening or butter, will do for the oil; though you don’t need much, it usually helps to have some.
Yeast refers to active dry yeast. You can buy those small packets in the market, but it is a really expensive way to make bread. I buy SAF instant yeast in one-pound bricks from a big-box store. The bricks store well unopened and freeze almost indefinitely. Yeast is a plant and will die in temperatures that are too hot and become inactive in temperatures that are too cold. The water that you dissolve yeast in should feel comfortably warm when sprinkled on the inside of your wrist. If you want to test your yeast’s liveliness, dissolve a teaspoon in a quarter cup of warm water. Add a teaspoon of sugar and let it sit for ten minutes. You should see bubbles, indicating that the yeast has begun to work. If the mixture just sits there, the yeast is too old and needs to be replaced. Rotate!
Liquid for bread is usually water or milk. If you’re using a lot of milk, you should scald it first to denature some of the milk proteins. Otherwise the dough may feel sticky and heavy. Scalding refers to heating the milk until bubbles form around the edge of the pan. Scalding is not the same as boiling; if the milk is allowed to boil it will taste terrible and ruin the bread. I am a lazy cook, so rather than scald my milk I usually don’t add more than half a cup to any recipe or I add a quarter cup of powdered milk to the flour. This improves the crumb and makes the loaf keep better but doesn’t take as long.
Yeast breads need to be kneaded to develop the gluten in the flour. Bread that is not kneaded adequately will not rise well, and the texture will be heavy and unpleasant. Kneading involves using the palms of your hands to push the dough down and away from you. After a push with your hands, you give the dough a quarter turn and repeat the process. It takes ten to fifteen minutes to fully knead dough by hand.
The dough will need to rise before baking. The ideal place is warm and draft free. An unlit oven is a good spot for rising (as long as you don’t forget and preheat the oven to cook something else without removing the dough first). Cover the dough with a damp cloth to keep the top from drying out. I like to let the dough rise twice. Lots of people omit the second rising, but I think it makes the texture of the bread much better. In each case, the dough should be allowed to rise until it has about doubled in size, and then it should be punched down. The first rise takes about an hour. The second rise should take place in the baking pan and will take a bit less time. If you forget and let the dough rise for too long, it will fall. If this happens you can punch it down again and let it rise a third time, although the dough may develop a bit of a sour flavor.