Make: Electronics (18 page)
Authors: Charles Platt

Experiment 7: Relay-Driven LEDs
You will need:
- AC adapter, wire cutters and strippers.
- DPDT relay. Quantity: 2.
- LEDs. Quantity: 2.
- Resistor, 680Ω approx. Quantity: 1.
- Pushbutton, SPST. Quantity: 1.
- Hookup wire, 22 gauge, or patch cords.
- Alligator clips. Quantity: 8.
- Utility knife.
The next step in our exploration of switching is to use a remote-controlled switch. By “remote-controlled,” I mean one to which you can send a signal to turn it on or off. This kind of switch is known as a
relay
, because it relays an instruction from one part of a circuit to another. Often a relay is controlled by a low voltage or small current, and switches a larger voltage or higher current.
This setup can be cost-effective. When you start your car, for instance, a relatively small, cheap switch sends a small signal down a relatively long, thin, inexpensive piece of wire, to a relay that is near the starter motor. The relay activates the motor through a shorter, thicker, more expensive piece of wire, capable of carrying as much as 100 amps.
Similarly, when you raise the lid on an a top-loading washing machine during its spin cycle, you close a lightweight switch that sends a small signal down a thin wire to a relay. The relay handles the bigger task of switching off the large motor spinning the drum full of wet clothes.
Before you begin this experiment, you need to upgrade your power supply. We’re not going to use batteries anymore, because most relays require more than 6 volts, and in any case you should have a power supply that can give you a variety of voltages on demand. The simplest way to achieve this is by using an AC adapter.
First you’ll set up the AC adapter. After you have it running, you’ll use it to power the relay. Initially the relay will just switch between two LEDs, but then you’ll modify the circuit to make the LEDs flash automatically. Finally you’ll rebuild the circuit on a breadboard, and say goodbye to alligator clips, for most of the time at least.
Preparing Your AC Adapter
An AC adapter plugs into the wall and converts the high-voltage AC supply in your home into a safe, low DC voltage for electronic devices. Any charger that you use with your cell phone, or iPod, or laptop computer is a special-purpose AC adapter that delivers only one voltage via a specific type of plug. I’ve asked you to buy a general-purpose adapter that delivers many different voltages, and we’re going to begin by getting rid of its plug.
1.
It’s important to make sure that your AC adapter is not plugged into the wall!
2.
Chop off the little plug at the end of its wire. See Figure 2-49.

Figure 2-49.
Preparing an AC adapter. First, cut off the little low-voltage plug and throw it away.
3.
Use a box cutter or utility knife or scissors to make a half-inch cut between the two conductors, and then pull the conductors apart a couple of inches.
4.
Use wire cutters to trim one of the conductors shorter than the other, so that after you strip away a little of the insulation, the exposed copper wires cannot easily touch each other. This is a precaution against short-circuiting your AC adapter and burning it out.
5.
Strip the two conductors using your wire strippers. Twist the copper strands between finger and thumb so that there are no loose strands sticking out. See Figure 2-50.

Figure 2-50.
Second, strip the wires, making one shorter than the other to reduce the risk of them touching. Color one of the adapter wires red with a marker, to identify it as the positive one.
6.
Make sure that the two wires are not touching each other, and plug your AC adapter into a wall outlet. Set your meter to DC volts and apply the meter probes to the wires from the adapter. If the voltage is preceded with a minus sign, you have the probes the wrong way around. Reverse them and the minus sign should go away. This tells you which wire is positive.
7.
Mark the positive wire from the adapter. If the wire has white insulation, you can mark it with a red marker. If it has black insulation, you can tag it with a label. The positive wire will remain positive regardless of which way up you plug the AC adapter into a wall outlet.
The Relay
The type of relay that I want you to use has little spiky legs on the bottom, in a standardized layout. If you buy some other kind of relay, you will have to figure out for yourself which pins are connected to the coil inside, which pins go to the poles of the switch inside it, and which go to the normally closed and normally open contacts. You can check the manufacturer’s data sheet for this purpose, but I strongly suggest you use one of the relays mentioned in the shopping list, so that you can follow the instructions here more easily.
I asked you to buy two relays so that you can use one for investigational purposes—meaning that you can break it open and take a look inside. If you do this very, very carefully, the relay should still be usable afterward. If not, well, you still have a spare.
The easiest way to open the relay is with a box cutter or utility knife. Figures 2-52, 2-53, and 2-54 show the technique. Shave the edges of the plastic shell containing the relay, beveling them until you see just a hair-thin opening. Don’t go any farther; the parts inside are very, very close to its housing. Now pop the top off. You can use needle-nosed pliers to nibble the rest of the shell away. Read the following section, “Fundamentals: Inside a relay,” and then apply power to the relay to see how it works.
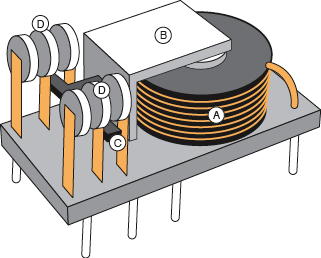
Figure 2-51.
This is one way that the parts inside a relay can be arranged. The coil, A, generates a magnetic attraction pulling lever B downward. A plastic extension, C, pushes outward against flexible metal strips and moves the poles of the relay, D, between the contacts.
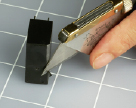
Figure 2-52.
To look inside a sealed relay, shave the top edges of the plastic package with a utility knife til you open a thin crack.

Figure 2-54.
If you are really, really careful, the relay should still work after you open it.
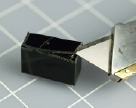
Figure 2-53.
Insert the blade of your knife to pry open the top, then repeat the procedure for the sides.

Figure 2-55
.
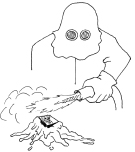
Figure 2-56.
Patience is essential when carving the edges of a relay package in order to open it. Faster methods such as a tomahawk or a flamethrower will satisfy the emotional needs of those with a short attention span, but results may be unpredictable.