Read Making It: Radical Home Ec for a Post-Consumer World Online
Authors: Kelly Coyne,Erik Knutzen
Making It: Radical Home Ec for a Post-Consumer World (30 page)

Trim away all the new growth except 3 little branches: 2 to form the horizontal arms and 1 central leader to be the trunk. Start training them into shape.
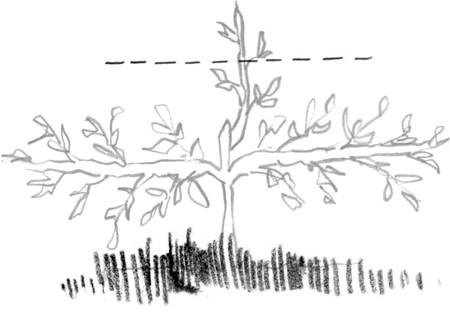
When the central leader shoots past the second tier of horizontal supports, cut it back to the bud nearest the level of the support, as you did in step one.

Allow free growth at the top. Meanwhile continue to encourage the “arms” on the first tier to grow straight.

Prune the flush of new growth at the level of the second tier into 3 branches, 2 to grow sideways and one to straight up, as before. Repeat these steps until the tree reaches the height you prefer.
SECOND PRUNING
In general, major pruning of trees is best done in the winter or early spring while the plant is dormant. In contrast, bending branches should be done in the spring, when growth is new and flexible. After a year’s growth, the whip should sport several new small branches.
Train the whip into the cordon pattern by choosing two branches from the new growth, one on either side of the trunk, to be attached to the lowest wire. Designate one of the central branches to be the trunk, which will continue growing upward. Any other branches should be pruned away. Tie the small side branches to the wire with twine or rubber tubing. Let the central branch—the trunk—continue to shoot upward unimpeded.
REPEAT
When the tree reaches the level of the second wire, prune it to the bud closest to the wire, just as you did in the first pruning. A burst of branching growth will emerge from the cut point. Prune and train that growth, again, just as you did the first year, by choosing two new branches to train on the second level of wire and leaving a central shoot to grow upward, toward the third wire.
Meanwhile, the branches on the lower tiers will be lengthening. As they grow, cut off any big side shoots that look like they want to be branches. Leaf clusters and short shoots not more than 3 or 4 inches long can remain. You want the tree to have greenery for photosynthesis, but you also want it to focus most of its growing energy outward along the wires. As the branches lengthen, tie them down to the wire at 8-inch intervals. You can use a bamboo cane as a brace to achieve a straighter branch. Monitor the ties as the tree grows to make sure they are not squeezing or scarring the branches.
Similarly, buds will appear along the length of the central branch or trunk—pinch those off. All of its growth should be directed straight up. Basically, during these first years all of your focus should be on forcing the tree to grow in a clean cordon shape.
When the whip reaches the third wire, once again cut it to the bud nearest the wire and allow it to put out branching growth from that point. Train two branches to the wire, and cut everything else back. This is where upward growth stops (unless you want a four-tier espalier). From now on, it won’t grown upward, only outward. Continue to diligently pinch off any new growth that doesn’t conform to shape.
As tempting as it is, don’t let the tree flower or fruit until the basic framework is established over all three tiers. Pinch off the flowers when they form. Fruiting takes a lot of energy that needs to be directed toward branch formation. The tree will not reach the third tier in less than 3 years. You should anticipate not having a fruit harvest for at least 4 years, perhaps as many as 7. This seems like a long time, but young fruit trees don’t bear much fruit in the first few years anyway, so espaliering doesn’t put you far behind.
The Magic of Fermentation
Vinegar, beer, and mead are all made by long-term fermentation processes, where friendly yeasts and bacteria turn one substance into another, as if by magic. Leftover wine or apple juice becomes vinegar, honey becomes mead, and barley becomes beer.
52>
Making Vinegar

PREPARATION:
10 min
WAITING:
2-3 months
Put broadly, vinegar is the natural end point of wine and fruit juice. When you make vinegar, you’re just stepping in to harness the bounty. If you’re wondering why you should bother making vinegar, you should know that homemade vinegar is better tasting than its store-bought counterparts, almost tasty enough to eat by the spoonful. Making vinegar is also a means of preserving excess, preventing waste, and eating well while saving money, all of which makes this one of our favorite kitchen projects.
HOW IT WORKS
Acetobacter
is a genus of acetic acid bacteria that convert alcohol into vinegar in the presence of oxygen. If you leave a bottle of wine, juice, or cider sitting open for a long time, it will likely turn to vinegar on its own. The bacteria eat the alcohol and produce acetic acid, which is the active component in vinegar. The acetobacter form colonies that appear first as clouding, then as floating cobwebs. You may have seen them floating in old bottles of vinegar. Eventually, a colony solidifies into a rubbery pancake that covers the surface of the liquid. This is what vinegar makers call the “mother.”
The mother is harmless and a sign that something good is happening in your bottle. She’s not something we’re used to seeing in our cupboards, though not so long ago every kitchen would have had a crock of vinegar topped with a vinegar mother.
The mother is what allows us to jump-start our own vinegar projects. The “leave it open and see what happens” school of vinegar making is a little haphazard and takes a long time. So to make vinegar, we’re going to add a mother, or a quantity of living vinegar containing acetobacter, to wine or apple juice or hard cider. But that’s about all we’re going to do, because you don’t have to
do
anything to make vinegar—you just have to be patient.
YOU’LL NEED
- The vinegar mother (see page
200
) - Organic, preservative-free apple juice or hard cider; or red wine (one varietal or a mix of leftovers)
- Clean, dry, widemouthed container

FINDING YOUR MOTHER
The best place to start would be with another vinegar maker who could give you a piece of a mother or a cupful of homemade, bacteria-rich vinegar. If you don’t know anyone who makes vinegar, the easiest thing to do is go to the health food market and buy an all-natural, unpasteurized, unprocessed bottle of vinegar. Bragg’s sells a cider vinegar that fits the bill. The vinegar you buy should be murky looking. That murk is a future mother. Understand this: The difference between a cup of murky all-natural vinegar and a slab of slimy mother is just time. If left alone, natural vinegar will form a mother. So one mother is not better than the other.
It’s harder to find, but if you want red wine vinegar, look for a bottle of unpasteurized red wine vinegar at health food stores, gourmet shops, or wineries. You can also buy wine vinegar starters at shops that sell wine- and beer-making supplies. Check your cabinets for old, forgotten bottles of red wine vinegar. They might be forming mothers—hold them up to the light and see if you see any clouding or string forms inside.
CONVERTING A MOTHER
If you want to make apple cider vinegar, it’s best to start with an apple cider mother. If you want a red wine vinegar, it’s best to get a red wine mother. It’s certainly possible to force a cider mother on red wine and vice versa, but sometimes they don’t take. The best way to convert a mother is to add a very little juice or wine to the mother—something like a 1:1 ratio. Let that develop for a couple of weeks, following the instructions in this project, then check to see if it looks like it’s doing anything. Good signs are an increase in the size of the mother or an increase in the cloudiness of the liquid if you’re using natural vinegar as a starter. As long as it’s not covered in mold, it’s probably okay. Add a little more liquid and let it sit some more. In this way, you’ll slowly convert the mother.
SELECTING A CONTAINER
The traditional container would be either a ceramic crock or little wooden barrel fitted with a spout at the bottom. We don’t have one of those. We make do with glass jars. One of those iced-tea dispensers with a spout on it would be a good option, too. Widemouthed vessels are best. Not only does vinegar need surface space for good fermentation, but a wide opening makes it easier to fish out the mother later. Vinegar doesn’t like light; that’s why it’s traditionally made in crocks. If you make it in a glass jar, keep the jar in a dark place. The size of the crock doesn’t matter much. It really depends on how much vinegar you need. If you’re just curious, a quart jar will do to start. Never use aluminum or plastic containers for making vinegar. Both of them react with vinegar.
Vinegar needs air, so you’ll need some cheesecloth or similar fine material and a rubber band to go over the mouth of your jar to keep out fruit flies. Don’t put a lid on it.
PUTTING IT TOGETHER
If you have a liquid mother (living vinegar), mix 1 part mother to 10 parts wine, cider, or juice. If you have a slime patty, just put the whole thing in your jar and add wine or juice to fill. Cover the jar with cheesecloth or some other fine, thin cloth and secure it with string or a rubber band. Put the jar aside to ferment at room temperature for 1 to 3 months.
The fermentation time will depend on many variables, so just watch and wait. The warmer the ambient temperatures, the faster the vinegar develops. If you began with a liquid mother, you’ll see scum forming on the surface, which will thicken and solidify. Don’t mistake it for mold! Be brave and patient. If you began with a solid mother, you should start to see her expand. Taste and sniff to chart progress. Half-finished vinegar won’t hurt you. Young apple cider vinegar is fruity and appealing, while young red wine vinegar tastes like bad wine. Finished vinegar is not at all sweet and has a distinct, eye-watering punch when you sniff it.
When you decide it’s done, strain the vinegar to remove any chunky bits. The vinegar mother will have formed several pancake layers. The one floating on top is the freshest. Save that one to make your next batch and compost the rest. You could also save a cup of finished vinegar for the next batch.
Transfer the finished vinegar to very clean, lidded bottles. You want to deprive the vinegar of oxygen so the acetobacter will stop working. The best bottles for this purpose are narrow-necked bottles (less surface area for oxygen exchange). All bottles should be filled to the very top. Filled like this, they can be stored in a cool, dark place for years.
Once you open a bottle, store it in the fridge if you’re not going to use it quickly. Refrigeration will keep the acetobacter quiet—they won’t make rubbery colonies in the bottle that may dismay your dinner guests, and they won’t be able to overdevelop the vinegar, either.
SOME HINTS REGARDING FINISHED VINEGAR
If your finished vinegar takes on the distinct odor of nail polish remover, don’t despair. Aerate it by passing it back and forth between two containers, let it rest a couple of days, and sniff it again. It should improve.
All new vinegar has a sharp bite. Vinegar will mellow and improve over time, like wine.
Don’t forget about your vinegar and let it sit abandoned for months and months, far past its finishing point. Eventually the acetobacter will run out of alcohol to make vinegar with. Then it will begin to entertain itself by turning the finished vinegar into carbon dioxide and water. You’ll be able to see and taste that it’s not vinegar anymore.