Passionate About Pizza: Making Great Homemade Pizza (17 page)
Read Passionate About Pizza: Making Great Homemade Pizza Online
Authors: Curtis Ide
Tags: #Baking, #Cookbook, #Dough, #Pizza

Again using the flat of your fingers or the palm of your hand, press and flatten the entire middle area of the dough circle right up to the edge you just defined. The dough may have a slight mound in the center; that is no problem. The center of the dough sometimes stretches more easily than the edges; the mound helps keep the center from getting too thin. Dust the dough (except for the edge) again with flour, spread it around, and then turn the dough over, being careful not to handle the edge, and dust the other side similarly. Now you are ready to begin stretching the dough.

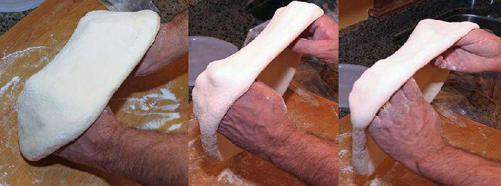
Lift the dough off the work surface and drape the circle over both your fists with your fists in the center. Allow the weight of the dough to do the stretching at first, and then pull your fists apart a little to stretch it further. You want to stretch the dough carefully and evenly, rotating it across your fists, so that it maintains its circular shape throughout the process. After it has stretched a little, take one fist out, then flip the dough over onto that fist so that the other side faces up, and bring your other fist back under the dough. Stretch from both sides to get an even thickness of dough. Continue stretching in this manner until the dough is about half its final size and uniformly thin. Be careful not to stretch the center too much because it stretches very easily and can get too thin. Practice and the softness of the dough will dictate how long to continue this step. This initial stretching thins the dough in preparation for enlarging it to the final size of the pizza. Frequently turn the dough over, sprinkle, and smooth flour on it to keep it from sticking to the surface.
With the dough still draped over your fists, move your fists together toward the edge of the dough. You stretch the dough by moving your fists apart a few inches and drawing the dough apart with your fists slowly to enlarge the circle. Move the right fist to where the left one was under the dough, and starting once again with both fists together, move your fists apart to stretch the dough. This should make the dough rotate across your hands. Continue moving the dough around and across your fists so that it stretches evenly. It is no longer necessary to flip the dough over; doing so will probably tear the dough.
As you stretch the dough keep an eye on the thickness (or thinness) of the dough all around the disk. If you find one area that is very thin, avoid stretching it further. If you find a thick area then concentrate your further stretching in that area. The center frequently stretches more quickly than the edges so you may need to confine your later stretching to the edges of the dough.

As the circle becomes larger and thinner, you can let the stretched dough drape onto the work surface and/or your forearms to keep from tearing it. You can stretch the edges of the dough while it sits on the work surface by gently working on the edges with your fingers under the dough while keeping the rim in the space between your fingers and thumb. By pulling your hands apart, you will be stretching the dough in the area between your hands.
Continue stretching until the dough is about the same size as the pizza peel. Be careful not to stretch the dough too thinly. If you poke a hole in it, just pinch the hole closed. If things get too bad, knead the dough back into a ball for a minute or so, let it rest and start the stretching process over again.
Working with Soft Dough

If the dough is very soft, you can let the dough drape onto the work surface to keep its weight from stretching it too much. This is especially useful when the dough has almost reached its final size. In fact, you can stretch soft dough to size while it sits on the work surface. Just slide your fists under the dough and move them apart just as you do when you support the dough and stretch it in the air. Keep moving your hands to stretch evenly.
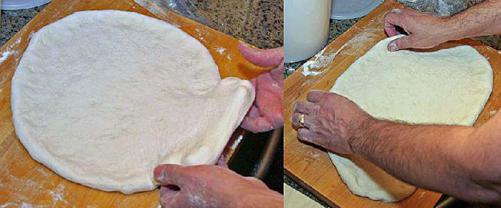
To stretch the edges, slide the fingers of both hands under the dough some inches apart. With your thumb cupped around the edge so as not to squash it, pick up your hands so that your fingertips rise up a little and move your hands apart to stretch the dough. Move your hands around the dough and stretch as needed to get the dough into shape. You can slide your hands, wrists, and forearms under the stretched dough to support it, if you wish.

Prepare the pizza peel by spreading a small amount of flour over its surface and sprinkle a little cornmeal where the pizza will rest; the cornmeal and flour allow the completed pizza to slide off the peel easily. I have found that a wooden pizza peel works best for uncooked pizza dough. Metal peels or other kitchen implements may work, but it will probably be harder to slide the pizza into the oven without losing some toppings if you do not use a wooden peel. You can use a pizza screen in place of a pizza peel for hand-stretched thin-style pizza. Lightly oil the pizza screen before placing the stretched dough onto the pizza screen.
Once the dough is close to the desired size, carefully lay the dough onto the prepared pizza peel or pizza screen. Carefully pick up one edge of the dough and slide your hand under the dough so it rests on the back of your hand, knuckles, and splayed fingers. Slide your other hand under the dough similarly. Adjust the positions of your hands under the dough to support it by your splayed fingers, hands, wrists, and forearms. Then move the dough from the work surface to the pizza peel, pizza screen, or pizza pan. Gently configure the dough into its final shape (remember not to squash the edge)!
Hand Stretching Individual Pizzas
A standard three-cup dough recipe will make four individual sized pizzas. Since you will be making multiple pizzas on the limited space of your baking stone, you should shape, assemble, and bake two first, then repeat the process for the other two pizzas. Let two pieces of dough rest in the refrigerator or on the work surface until the first two have started cooking, then assemble the other two and bake them as soon as the first two finish. Follow these same steps outlined below for each of the four pizzas.

When you are ready to begin stretching, you need to coat the dough disk with flour. Since the individual pieces are smaller and lighter, you might find it easier to use a slightly different method to flour the dough disk. You can place the dough ball into a pile of flour to coat one side of the dough with flour quickly. It may help if you place the flour in a bowl to contain it. Then pick up the dough and turn it over to coat the other side with flour. Voila, you have just coated both sides with a thin layer of flour! This method works especially nicely for dough that has high moisture content.
Using the palm of your hand, press and flatten the whole surface of the dough circle, including the edges and the center. Dust the dough again with flour and turn the dough over, and dust the other side as well. Now you are ready to begin stretching the dough. Note that if the dough is very slack you may not need to press the dough at all to flatten it. Rather, you can just start stretching. In fact, not pressing the dough prior to stretching preserves more air to allow more bubbles (or bigger bubbles) when the pizza cooks.

Stretch the dough by gently grasping the dough on opposite sides with your thumb and flat fingers. Slide the fingers of both hands under the dough. With your thumb cupped around the edge so as not to squash it, pick up your hands so that your fingertips rise up a little and move your hands apart to stretch the dough. Move your hands around the dough and stretch as needed to keep it evenly stretched. It should not take much effort, but keep stretching until it is a circle approximately eight inches in diameter. Frequently turn the dough over, sprinkle it with flour, and smooth it to keep it from sticking to the surface.
You can stretch individual pizzas into a variety of shapes. Ovals, rectangles, oblong circles are easy to make and they may fit on your pizza peel and stone more easily. Just pull the dough into the desired shape as it stretches, but be careful not to poke a hole in the dough or squash the edge of the dough.