The Mad, Mad, Mad, Mad Sixties Cookbook (27 page)
Read The Mad, Mad, Mad, Mad Sixties Cookbook Online
Authors: Rick Rodgers

8.
Transfer the cheesecake to a wire cake rack. Carefully run a thin, sharp knife around the inside of the pan. Let cool completely.
9.
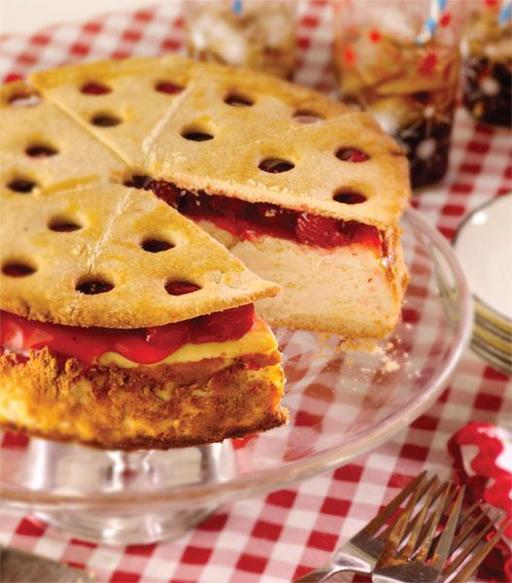
Meanwhile, to make the lattice topping, return the oven temperature to 350°F. Cover the dough on the baking sheet. Keeping the dough on the baking sheet, dust the top of the dough with the flour. Use the end of a ½-inch-wide plain pastry tip or an aspic cutter to punch a perforated design into the dough. Discard the trimmings. Using a sharp knife, score the lattice round into 10 or 12 wedges (depending on the size of cheesecake slices you want to serve), but do not cut through the dough or separate the wedges. Very lightly brush the top of the lattice with some of the beaten egg, being sure that the egg doesn’t run down onto the parchment paper. Bake until the lattice is golden brown, about 10 to 12 minutes. Let cool on the baking sheet. Cover with plastic wrap.
10.
Spread the cherry pie filling on top of the cheesecake and refrigerate until chilled and set, at least 2 hours or overnight. Run a sharp knife around the insides of the pan again, and remove the sides of the pan. Using a sharp knife, following the original scoring marks, cut the lattice into 10 or 12 wedges. Following their original sequence, place the lattice wedges on top of the cheesecake. Using a thin knife rinsed under hot water, cut into slices, keeping the wedges in place, and serve chilled.
NOTE
:
Professional bakeries like the Tip Toe Inn use a lattice cutter, a cylinder with raised tabs on a handle, to cut the pattern into the cookie dough. When the cylinder is rolled over the dough, it cuts slits that will open and form the lattice when the dough is stretched. This cutter is available at bakery supply stores and well-stocked kitchen supply shops. But as you will probably only use it for making this cheesecake, it isn’t worth the money and extra clutter in your kitchen drawer. It is much easier to use some other kind of tool for cutting the pattern into the dough. A pastry tip or aspic cutter work well, but you could even use the end of an apple corer.


MAKES 18 CUPCAKES
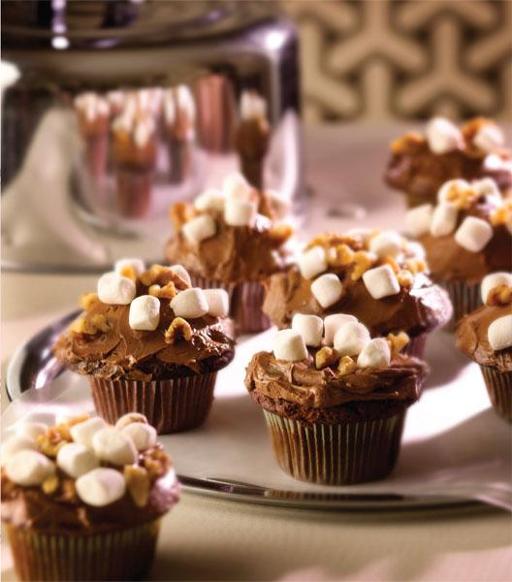
A well-known candy bar and ice cream flavor for years, Rocky Road became a popular cake creation in the creative Sixties. We think the fantastic combination of chocolate, marshmallow, and nuts would be great in any form, any time, but it’s practically perfect in every way for cupcakes.
CAKE
4 ounces unsweetened chocolate, finely chopped
1 cup full-fat sour cream, at room temperature
⅔ cup (about) water
1 teaspoon vanilla extract
2 cups cake flour (not self-rising)
2 cups sugar
½ cup (1 stick) unsalted butter, at very soft room temperature, plus softened butter for the pans
2 large eggs, at room temperature, beaten together
½ teaspoon baking powder
1 teaspoon baking soda
½ teaspoon salt
CHOCOLATE BUTTERCREAM
4 ounces unsweetened chocolate, finely chopped
1½ cups (3 sticks) unsalted butter, at room temperature
1 (7.5-ounce) jar marshmallow cream
½ teaspoon vanilla extract
1 cup mini marshmallows
¾ cup coarsely chopped walnuts

1.
Position a rack in the center of the oven and preheat to 350°F. Line 18 standard muffin cups with paper liners.
2.
In the top part of a double boiler over hot, not simmering, water, melt the chocolate. Remove from the heat and cool until tepid.
3.
Whisk the sour cream with enough water to measure 1½ cups, and add the vanilla. Sift the cake flour, sugar, butter, eggs, baking powder, baking soda, and salt together. Beat the butter in a large bowl with an electric mixer on high speed until creamy, about 1 minute. Gradually beat in the sugar and beat, scraping down the sides of the bowl occasionally with a rubber spatula, until light in color and texture, about 3 minutes. Gradually beat in the eggs. With the mixer on low speed, add the flour mixture in thirds, alternating with two equal additions of the sour cream mixture, and mix, scraping down the sides of the bowl as needed, until smooth. Spoon equal amounts of the batter into the muffin cups (an ice-cream scoop works well), filling them about three-quarters full. Smooth the tops.
4.
Bake until a wooden toothpick inserted in the center of a cupcake comes out clean, about 20 minutes. Transfer the pans to wire cake racks and cool for 10 minutes. Remove the cupcakes from the pans. Transfer to the racks and let cool completely.
5.
To make the buttercream, melt the chocolate in the top part of a double boiler over very hot, but not simmering, water. Remove from the heat and let cool until tepid, but still fluid.
6.
Beat the butter in a medium bowl with an electric mixer on high speed until completely smooth, about 1 minute. In four or five additions, gradually beat in the marshmallow cream. Beat in the vanilla. Beat in the cooled chocolate. Immediately spread the frosting over the cupcakes.
7.
Mix the marshmallows and walnuts in a medium bowl. Working over a rimmed baking sheet, press handfuls of the mixture onto the frosting. (The cupcakes can be prepared up to 1 day ahead, loosely covered with plastic wrap and stored at room temperature. Refrigeration could soften the marshmallows.)

MAKES 8 SERVINGS
This all-American cake, with its jaunty rings of pineapple and splotches of red cherries, was popular long before Hawaii was admitted to statehood. It was the perfect dessert for a Sixties housewife, as she was expected to have all kinds of canned goods on hand for cooking at the last minute. Serve the cake warm with a scoop of vanilla ice cream.
TOPPING
6 tablespoons unsalted butter
1 cup packed light brown sugar
7 canned pineapple rings (from a 20-ounce can), drained
7 maraschino cherries, stemmed
CAKE
1½ cups all-purpose flour
1½ teaspoons baking powder
¼ teaspoon salt
½ cup (1 stick) unsalted butter, at room temperature
½ cup sugar
2 large eggs, beaten
1 teaspoon vanilla extract
½ cup whole milk
1.
Position a rack in the center of the oven and preheat to 350°F.
2.
To make the topping, melt the butter in a heavy gauge, 9-by-2-inch heavy cake pan (or a 9-inch cast-iron skillet) over medium heat. Sprinkle in the brown sugar and cook, stirring occasionally, until the sugar is melted. Remove from the heat. Carefully arrange the pineapple rings in the pan, with 1 ring in the center and the remaining rings around it, and place a cherry in the center of each ring. Set aside.
3.
To make the cake, sift the flour, baking powder, and salt together. Beat the butter in a medium bowl with an electric mixer on high speed until creamy, about 1 minute. Gradually beat in the sugar, occasionally scraping down the sides of the bowl with a rubber spatula, and beat until the mixture is light in color and texture, about 3 minutes. Gradually beat in the eggs, then the vanilla. With the mixer on low speed, beat in the flour in thirds, alternating with two equal additions of the milk, scraping down the bowl as needed, and mix until smooth. Spread evenly in the pan.
4.
Bake until the cake is golden brown and top springs back when pressed in the center with your finger, about 30 minutes. Let cool in the pan for 2 minutes. Run a dinner knife around the inside of the pan. Place a serving plate over the pan. Use a thick kitchen towel to hold the pan and plate together and give them a sharp shake. Lift up and remove the pan. If any of the filling remains in the pan, just use a fork to transfer it to the cake. Let cool for about 15 minutes. Serve the cake warm or cooled to room temperature.