Ukulele For Dummies (70 page)
Read Ukulele For Dummies Online
Authors: Alistair Wood

Both types of bridge have a
saddle
: a strip â traditionally made of ivory but now thankfully plastic â on which the string sits and that's the start of the section of the string you play.
Slotted bridges
Slotted bridges are dead simple to use. Just tie a knot in one end of the string (as simple as making a loop and threading the end through) and thread it through the slot so that the knot holds the string in place.
Tie-on bridges
Tie-on bridges are a complete pain in the saddle-end. Here are the steps to take:
1. Thread the string through the hole.
Then bring it back up and thread it under the string, as shown in Figure 19-1.
2. Depending on how thick the string is, thread it back under itself on top of the bridge (see Figure 19-2).
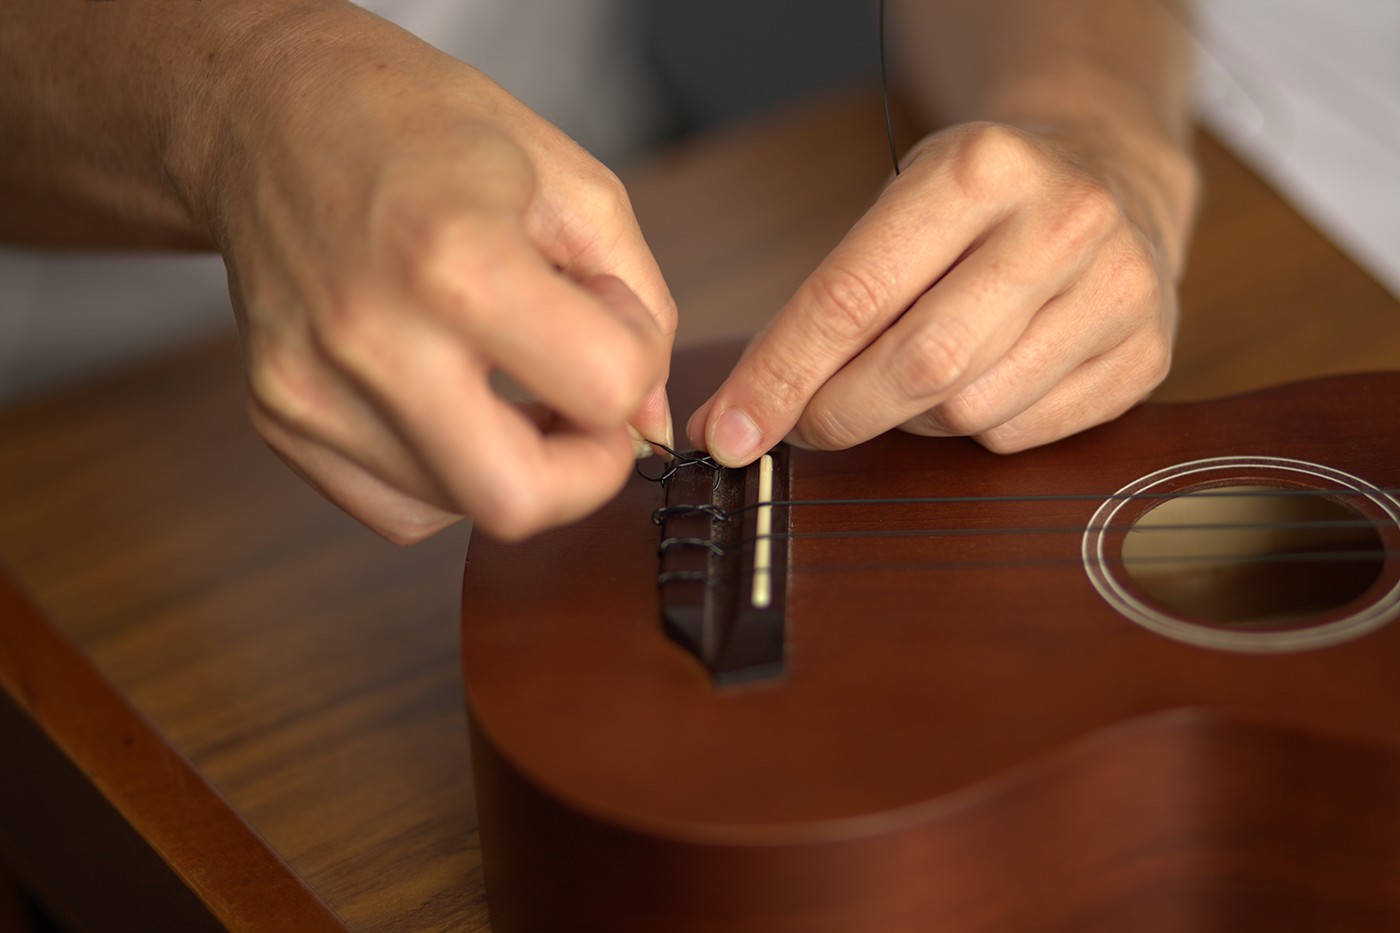
3. Thread the string under itself once more behind the bridge and pull it tight.
Then pray that it all holds together and looks like Figure 19-3.
 The last time the string passes under itself it has to be at the back of the bridge. If it's on top, the string probably refuses to hold its tuning.
Figure 19-1:
Attaching a string to a tie-on bridge, step 1.
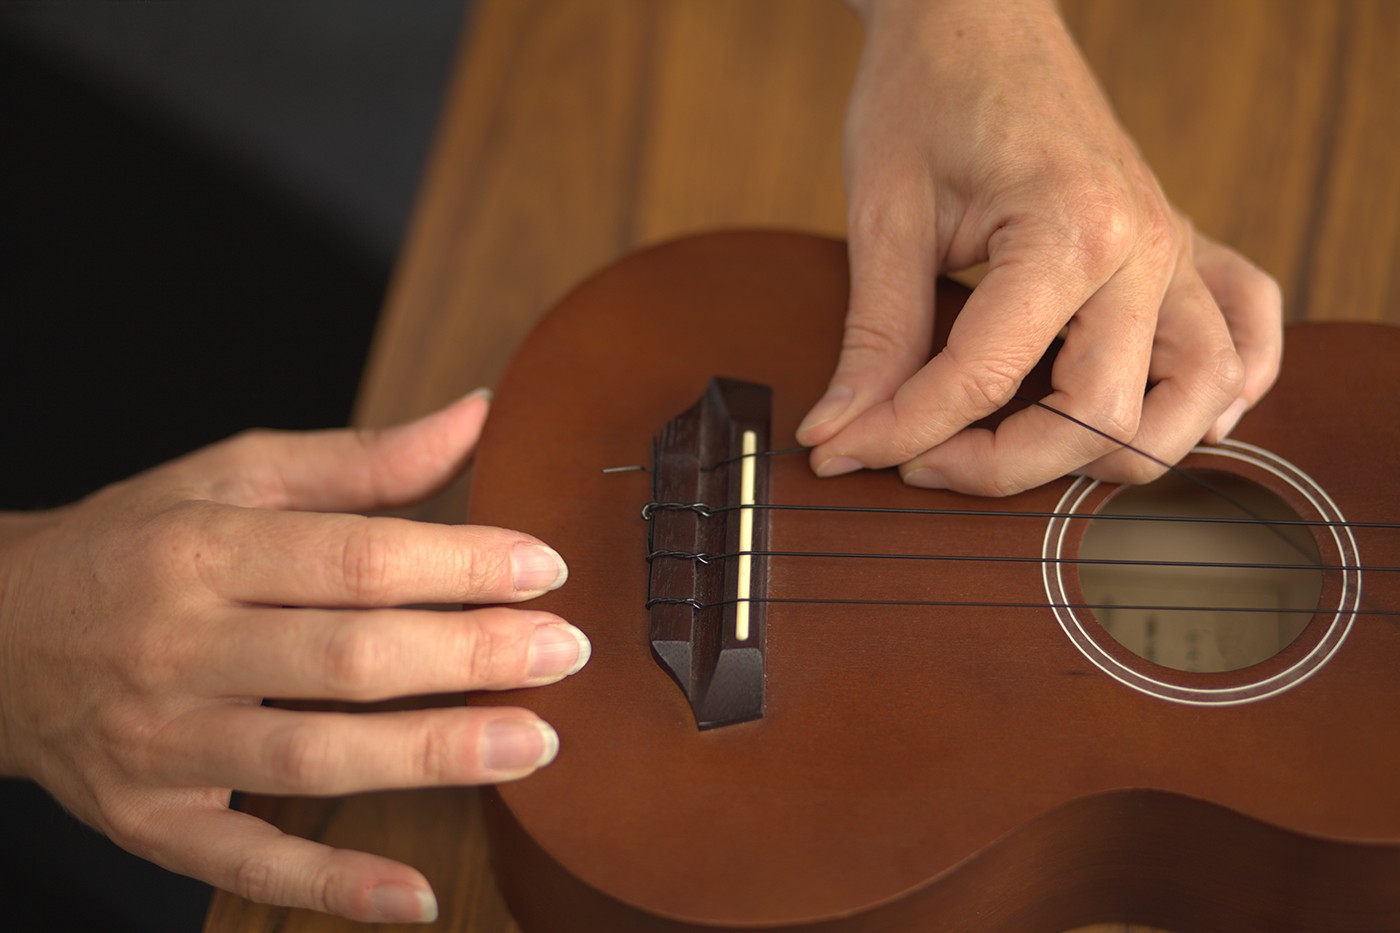
Figure 19-2:
Attaching a string to a tie-on bridge, step 2.
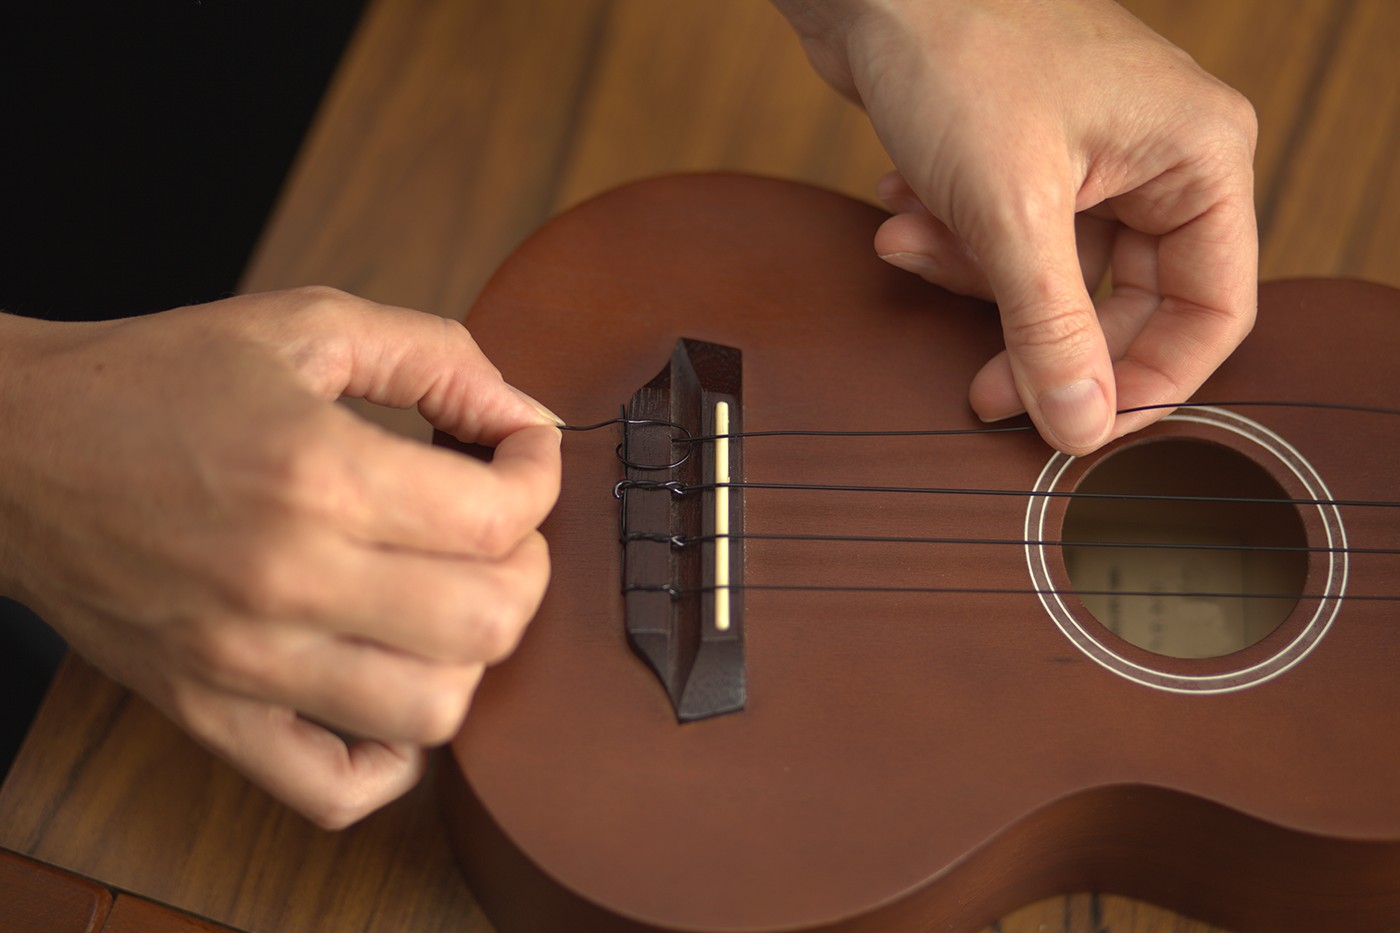
Figure 19-3:
Attaching a string to a tie-on bridge, step 3.
Looping the strings round the tuning pegs
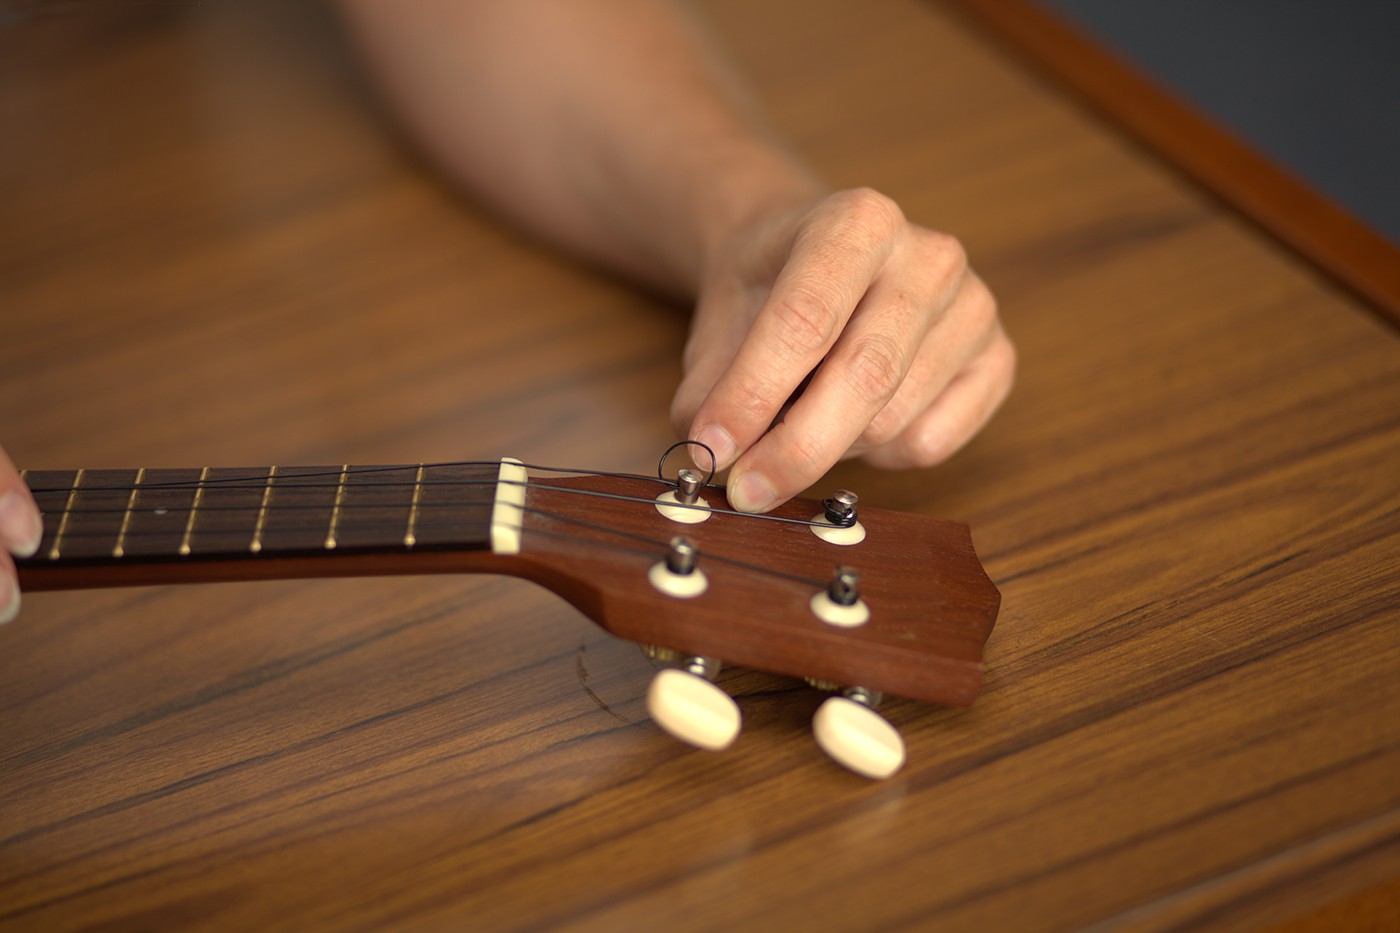
When you've attached the string to the bridge, thread it through the hole in the tuning peg and pull it tight. Ensure that the string doesn't slip too much by looping the string around the peg and threading through the hole in the same direction (as shown in Figure 19-4).
Pull the string taut before you start tuning. The more string you wrap around the tuning pegs, the messier the process becomes and the less likely your uke is to stay in tune.
 Make sure that the strings leave the tuning pegs on the inside. So turn the g- and C-string tuning pegs anticlockwise (so that the strings come out under the pegs) and turn the E- and A-string pegs clockwise (so that the strings come out over them). This method gives you the straightest line possible between the tuning pegs and the string's notch in the nut.
Figure 19-4:
Looping the string around the tuning peg.
Check that the string is sitting neatly in its notch in the nut and start tightening the tuning pegs. As the string does a full circuit make sure that it goes under the previous row. You want the string to come off the peg lower down so that it leaves the bridge at a steeper angle and is less likely to slip.
 Very recently, ukuleles have started to be made with classical guitar-style slotted headstocks. If your ukulele has one of these, the process of attaching the string is very similar to the above process. The only difference is that, after you thread the string through the hole, loop it around the string (to create a U-shape); the string then tightens down as you tune it up.
Stretching the strings
Ukulele strings take time to bed-in and keep in tune, and so make sure that you give them a stretch when you put them on to speed up the process. When the string is on and in tune, pull it away from the body and give it two or three little tugs. Read Chapter 2 for all you need to know about tuning.
The string is likely now to be out of tune. Tune it up and repeat the process until it holds its tuning (or until you're bored out of your brain-box).
Maintaining Your Ukulele
Playing it regularly is the absolute best thing you can do to keep your ukulele in good nick. Ukes don't wear out like pencils and so you don't need to save yours up like a glam dress for a big date. Ukuleles are meant to be played and a good uke
opens up
(sounds better) the more you play it.
Cleaning after playing
You can buy all sorts of fancy instrument-cleaning products, but none of them are really necessary. The sensible thing is simply to give your ukulele a quick wipe down with a soft cotton cloth (avoid anything harsher including paper towels), which prevents your sweat getting mixed with dust and gunking up your uke.
Storing your ukulele
Even if you never take your uke out of the house, I suggest you invest in a bag or case. Even the flimsiest one gives protection from dust and light dings (Chapter 18 contains all the gen on uke bags and cases).
Temperature is the big issue with storage. Avoid leaving your uke in direct sunlight, steer clear of heaters all together and avoid leaving it in a hot car. Cold is less of a problem, but if you're travelling by car keep your uke inside with you rather than sticking it in the boot.
Under normal circumstances, airlines let you take your ukulele with you on the plane. However, security concerns can mean that you're sometimes forced to check it in. So, if you're flying with your uke, definitely invest in a hard case for it.
Tackling humidity
Wood is a natural, breathing material and reacts to the surrounding environment. Therefore, you have to be careful if you live in a particularly dry or wet place:
 If the air is very dry, the wood on the uke can crack. Invest in a humidifier to avoid this problem. Just put this little device in your ukulele case and it keeps the conditions more uke-friendly. Humidifiers are simple and fairly inexpensive, and so if you've invested in a nice uke the investment is worthwhile.