Read The Complete Beginners Guide to Mac OS X El Capitan Online
Authors: Scott La Counte
The Complete Beginners Guide to Mac OS X El Capitan (14 page)

Note: You can also add accounts within the Mail, Contacts, Calendars, and Reminders apps by opening each app and clicking File > Add Account.
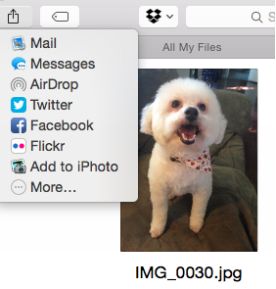
Twitter, Facebook, LinkedIn, Vimeo and Flickr
OS X El Capitan supports deep Twitter, Facebook, LinkedIn, Flickr and Vimeo integration. To get started, simply sign in to your account(s) from System Preferences > Internet Accounts. Select Twitter, Facebook, LinkedIn, Flickr, or Vimeo, and then enter your username and password. From now on, you’ll be able to use that account with the Share button throughout El Capitan and receive notifications in your Notifications Center.
Sound
As the name implies, the Sound menu is where all changes related to sound effects and sound in general can be modified. There are three tabs that you can switch between.
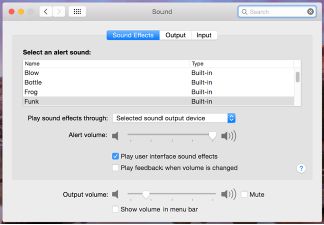
Sound Effects
The Sound Effects tab is where you can select an alert sound from the many different built-in options. By default, the following dropdown menu should be set to Selected sound output device to play the chosen sound effects through your standard speakers.
The next two checkboxes let you turn sound effects on or off for the user interface, and for volume control.
Lastly, you’ll be able to adjust the output volume of your speakers. This will affect the loudness of everything from sound effects to music that’s currently being played through the computer.
Input & Output
The input and output tabs are both very similar. Each will let you change the device for sound input or output (speakers or microphones), as well as adjust sound settings. In the Output tab, you can adjust the slider to move the balance left or right, and in Input, you can change the microphone’s input volume and enable or disable the built-in noise reduction feature in case you frequently use your Mac’s microphone in busy cafes.
Users & Groups
If your Mac is for family use and a couple of people will be using it, then this setting will come in handy.
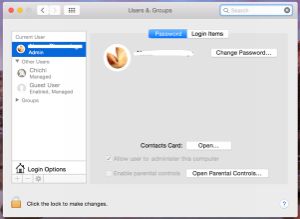
Along the left sidebar all existing users and groups (if you have any) will be laid out for you. To make a change to an existing user, first you need to choose the “Click the lock” icon and unlock it; unlocking lets you change settings to the user. You will also be asked for your password at this time—this is all a safety measure to ensure that if you accidentally left your computer unintended, someone couldn’t come along and lock you out of your own machine.
Below are a few things you’ll be able to do with each user (depending on the type of user it is admin, guest, child, etc.); some of the settings won’t be available.
- Selecting the Admin user account will let you change the login password, open up the Contacts card and enable parental controls. Clicking the Login Items will allow you to change the applications that start running automatically each time you log in. There has to be at least one admin user.
- Any other created users that you make will have options to enable parental controls, change password, or turn that account into another administrator account that has full control of the Mac.
- By default you will see a Guest user set up. If it’s selected, you can choose to disable the Guest user from being available as a login option. You can also set parental controls and allow guest access to your shared folders. If you do choose to keep the Guest user, keep in mind that there will be no password required, and all information and files created during that session will be deleted upon logging out.
- At the bottom of the left sidebar there is another option, called Login Options. This is where you’ll find different options such as automatic login, show password hints, and show the Sleep, Shut Down, and Restart buttons. You can also display your full name or user name at the top right of the menu bar by checking the box next to Show fast user switching menu and making a selection.
Create New Users
So you know how to manage the primary user, but what about creating additional users? That’s pretty simple. Just follow these steps (and make sure you have already hit that lock button to unlock the option).
- Click on the + button.
- From the New dropdown menu, choose from the following options: Administrator, Standard, Managed with Parental Controls, or Sharing Only.
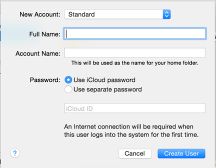
- Fill in the Full Name and Account Name fields. These don’t have to be real names. Mickey Mouse can have a user name if you want.
- You can choose to have the new user log in using an existing iCloud account and password, or create a whole new password.
- If you selected Use iCloud Password, you will be prompted to enter the associated iCloud ID.
- If you instead choose to opt for a newly-created password, you will be asked to enter it twice to verify it.
- Once finished, click the blue Create User button. If you chose to use an iCloud ID, you will be asked to enter the password. If you made a new password, you don’t need to do anything else.
Removing Existing Users
Just because you added a user, that doesn’t mean they’re there forever. You can delete them at anytime. But remember, deleting those deletes all the settings they’ve set up—so if you create again, everything will be gone.
- To remove current users, select the user that you’d like to delete.
- With that user highlighted, click on the – button.
- A prompt will appear asking if you are really sure you’d like to remove the user from the computer.
- You can also choose from one of three radio buttons: save the home folder, leave the home folder alone, or delete the home folder.
- Once you’ve made a decision, click the blue Delete User button to confirm your choice and make the changes happen.
Creating Groups
If the computer is being used in a place where there are dozens of users (a classroom or library, perhaps), then creating a group would be a good option for you.
- At the bottom of the left sidebar, click the + button.
- From the New dropdown menu, select Group
- In the Full Name field, create and enter a name for your group.
- Click the blue Create Group button to confirm.
- The new group will be created, and you will be able to check boxes next to each existing user to designate who will be a part of this group. If you have existing groups, you can also select entire groups to be a part of yet another group.
Parental Controls
If kids are using your computer, then Apple has Parental Controls to help you make sure the kids don’t get into trouble. It’s a pretty powerful app, but it does have a few limits—if you want ultimate protection, then there are also several paid apps like NetNanny (
www.netnanny.com
). Parental controls is also good for guests—if you don’t mind if people use your computer, but you
only
want them to use the Internet and have no access to anything else, then you could set it up like that.
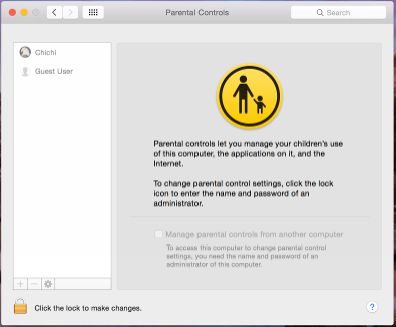
To use Apple’s Parental Controls, first make sure you have created a user account for your child. Next go to System Preferences and Parental Controls.
If the padlock on the lower left corner is locked, then click it to unlock it and type in your password.
You can now set up parental controls for each child users. You can make it as restrictive as you want. The first tab lets you pick what apps they can use. You could block all apps except games, for instance. The next tab lets you control web usage. By default, Apple will
try
to filter out adult content. If this is a young child, then a better option might be picking the web pages they can access—you could, for instance, block every Internet website except Disney. The next tab is People. This lets you select who they can email and message—you could limit them to only emailing parents and grandparents, for instance. The second to last tab lets you pick time limits. You can pick when they use the computer and for how long. And finally the last tab lets you turn off the camera so they can do video chatting, hide profanity from the dictionary, etc.
Accessibility
Accessibility helps you adjust the computer if you have any kind of impairment or disability. It lets you change things like making the display larger, having a voiceover that describes what’s on your screen, and put captions on videos when available.
To open Accessibility, click System Settings and Accessibility. On the left side of the box that comes up will be all the various things you can change. Clicking on each one will create more options.