Bread Machine (105 page)

1
1
/
2
teaspoons fine sea salt
Yellow cornmeal, for sprinkling
 To make the sponge, place the water, starter, and yeast in the bread pan. Add the flours on top. Program for the Dough cycle; press Start. Set a kitchen timer for 10 minutes. The sponge will be very wet and sticky. Don’t be tempted to add more flour. When the timer rings, press Stop and unplug the machine. Let rest at room temperature in the machine for 24 hours.
 The next day, stir down the sponge by running the Dough cycle for 3 minutes.
 To make the dough, sprinkle the yeast over the sponge. Add the flour and the salt. Program for the Dough cycle and press Start. The dough will be shiny, very moist to the point of being slightly sticky, and soft. Don’t be tempted to add more flour. When the machine beeps at the end of the cycle, press Stop and unplug the machine. Gently deflate the dough with your finger. Set a timer and let the dough rest for another 1
1
/
2
hours in the warm environment of the machine.
 Line a baking sheet with parchment paper and sprinkle with cornmeal. Turn the dough out onto a lightly floured work surface. Divide the dough into 2 equal pieces. Using a dough card, gently knead each piece into a ball. Place the balls on the baking sheet a few inches apart. Cover with a clean tea towel and let rise at room temperature until doubled in bulk, about 1 hour.
 Twenty minutes before baking, place a baking stone on the middle rack of the oven, if desired, and preheat to 425°F.
 Sprinkle the top of each loaf with flour and rub in to coat. Slash an X into the tops, no more than 14 inch deep, with a small sharp knife. Bake for 35 to 40 minutes, or until the crusts are deep brown, very crisp, and sound hollow when tapped with your finger. The loaves will be full and high. I insert an instant-read thermometer into a soft crease on the side; it should read about 200°F. Remove the loaves from the oven and place on a rack. Let cool completely before slicing.

Technique: How to Position a Loaf and Bake It in the Oven
Baking is the process that turns your dough into an edible food. The heat quickly penetrates the mass, encouraging the last gasp of fermentation and raising the temperature inside the loaf, which kills the yeast. You will see a rapid increase in the size of the loaf once it begins baking, this is called oven spring. This is why some loaves that look kind of scraggly going into the oven look very nice when they are finished baking. The starch sets and the natural sugars in the flour caramelize, giving you the brown color of the crust.
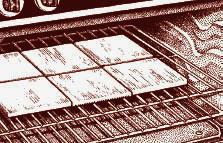
The first thing to do when preparing to bake a loaf in the oven is to make sure the oven rack is in the center or lower third of the oven. Professional bakeries bake country breads on the floors of brick ovens; you can simulate their setup by placing a ceramic baking stone or tiles on the oven rack for the baking sheet to rest on. Alternatively, the loaves will turn out well using just a baking sheet and no stones. Shaped loaves are often shoveled into the oven with a wooden paddle called a peel, but none of my baking instructions in this book require the use of a peel. When you place the bread on a baking sheet, you are assured that it will be in the correct position, usually centered, on the baking sheet. There is many a tale about the home baker who used a peel and had the bread land somewhere in the oven other than on the stone or had their bread stick to the peel and become shaped like a horseshoe.
The next preparation step is to set the oven temperature specified in the recipe.
The type of flour and size of the loaf determine how long a loaf will bake. The larger the loaf, the longer the bake off. Smaller loaves can be baked at a higher temperature for a short time because of the small proportion of inner crumb. That is why baguettes and rolls can bake at 450°F, but a large round bakes at 375°F.
When is the bread done? First, consider the length of time it has been in the oven. I usually set a timer for 10 minutes less than the baking time called for in the recipe. When the timer rings, I begin to check for doneness. I look at the color of the crust first. If it is too pale, the loaf is definitely underdone. You can raise the temperature of the oven, or just let it bake longer. The crust on country breads should be firm to hard when you tap it with your finger. I take it as a good sign if it is hard, since it will soften slightly as it cools (as the water vapor in the middle of the hot loaf evaporates out to the crust), but that crisp crust is often hard to get in a home oven. A crispy crust means the bread will be nice and chewy for the eater. The slash marks you made will be torn open by the rising into an uneven, rustic pattern. Tap the loaf, and listen for a hollow sound. A thud means it is not baked on the inside. To be absolutely sure the loaf is baked, you can measure the temperature with an instant-read thermometer. When it registers 190° to 200°F, the loaf is done.
Use thick oven mitts to transfer the finished loaves from the oven to the top of the stove or a rack. I often let a large loaf cool right on the baking sheet. When the loaf first begins to cool, you will hear some crackling noises as the crust contracts.
