Build Your Own ASP.NET 3.5 Website Using C# & VB (8 page)
Read Build Your Own ASP.NET 3.5 Website Using C# & VB Online
Authors: Cristian Darie,Zak Ruvalcaba,Wyatt Barnett
Tags: #C♯ (Computer program language), #Active server pages, #Programming Languages, #C#, #Web Page Design, #Computers, #Web site development, #internet programming, #General, #C? (Computer program language), #Internet, #Visual BASIC, #Microsoft Visual BASIC, #Application Development, #Microsoft .NET Framework

Figure 1.5. Managing your database server
Figure 1.6. Changing server settings with SQL Server Management Studio
Licensed to [email protected]

Introducing ASP.NET and the .NET Platform
11
That’s it. Your machine is now ready to build ASP.NET web projects and SQL
Server databases. Now the fun starts—it’s time to create your very first ASP.NET
page!
Writing Your First ASP.NET Page
For your first ASP.NET exercise, we’
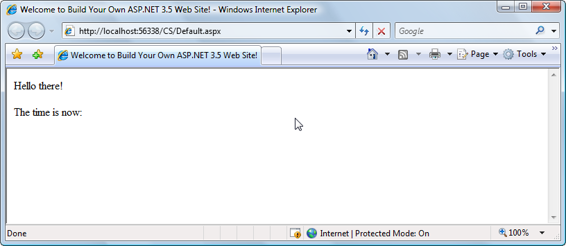
ll create the simple example shown in Figure 1.7.
We’ll go though the process of creating this page step by step.
Figure 1.7. An exciting preview of your first ASP.NET page!
To create this page in Visual Web Developer, you’ll need to follow a few simple
steps:
1. Start Visual Web Developer, and choose
File > New Web Site
(or hit the default
keyboard shortcut,
Shift+Alt+N
).
2. Choose ASP.NET Web Site for the template and File System for the location
type. This location type tells Visual Web Developer to create the project in a
physical folder on your disk, and execute that project using the integrated web
server.
3. Choose the language in which you prefer to code your pages. Although ASP.NET
allows you to code different pages inside a project in different languages, for the
sake of simplicity we’ll generally assume you work with a single language.
4. If you chose C# for the language, type
C:\LearningASP\CS\
for the folder location
where you want to store the files for this exercise. If you prefer VB.NET, choose
Licensed to [email protected]


12
Build Your Own ASP.NET 3.5 Web Site Using C# & VB
C:\LearningASP\VB\
. Y
ou can choose any location you like. Figure 1.8
shows the C# version of the selection.
Figure 1.8. Starting a new ASP.NET Web Site project with Visual Web Developer
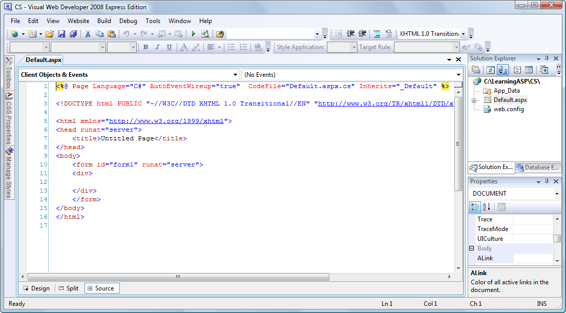
Figure 1.9. Your new project in Visual Web Developer
5. After clicking
OK
, Visual Web Developer will create the project with a basic
structure. Your project contains an empty
App_Data
folder, a basic
Default.aspx
file, and a basic configuration file,
Web.config
—
see Figure 1.9. W
e’ll discuss each Licensed to [email protected]


Introducing ASP.NET and the .NET Platform
13
of them in detail a bit later on, but right now, let’s dive in and create our first
ASP.NET web page.
The main panel in the Visual Web Developer interface is the page editor, in which
you’ll see the HTML source of the
Default.aspx
web page. Edit the title of the page
to something more specific than Untitled Page, such as
Welcome to Build Your
Own ASP.NET 3.5 Web Site!
:
Loading the
Default.aspx
page in a web browser now would open an empty page;
this makes sense, since we didn’t add any content to this page! Let’s modify the
page by adding the highlighted:
Although our little page isn’t yet finished (our work with the Label control isn’t
over), let’s execute the page to ensure we’re on the right track. Hit
F5
or go to
Debug
menu.
How a Web Server Control Works
You’ve just added a Web Server Control to the page by adding an
element to the page. You’ll learn all about Web Server Controls in
Chapter 2, but
for now you need to learn how this simple control works so that you can understand the exercise. Licensed to [email protected]


14
Build Your Own ASP.NET 3.5 Web Site Using C# & VB
The Label control is one of the simplest controls in .NET, which lets you insert
dynamic content into the page. The asp: part of the tag name identifies it as a
built-in ASP.NET tag. ASP.NET comes with numerous built-in tags, and
The runat="server" attribute value identifies the tag as something that needs
to be handled on the server. In other words, the web browser will never see the
and converts it to regular HTML tags
before
the page is sent to the browser. It’s
up to us to write the code that will tell ASP.NET to replace this particular tag with
something meaningful to the user loading the page.
The first time you do this, Visual Web Developer will let you know that your project
isn’t configured for debugging, and it’ll offer to make the necessary change to the
configuration (
Web.config
) file for you—see
Figure 1.10
. Confirm the change by clicking
OK
.
Figure 1.10. Enabling project debugging in Visual Web Developer
If Script Debugging is not enabled in Internet Explorer, you’ll get the dialog shown
in
Figure 1.11. Check the
Don’t show this dialog again
checkbox, and click
Yes
. Figure 1.11. Enabling script debugging in Internet Explorer
Licensed to [email protected]

