Building Web Sites All-in-One For Dummies® (30 page)
Read Building Web Sites All-in-One For Dummies® Online
Authors: Claudia Snell

⢠Creates a default background color of white for the whole site (
#ffffff
).
Setting class and ID selectors
The other types of styles are class and ID selectors. Class selectors can be applied to many elements in your HTML document. Each ID selector can be applied to only one element on a page. There are also differences in how these types of styles are applied.
Class selectors
Class selectors
are enhancements to your default styles. You create them if you want to have more than one style of paragraph. For instance, suppose you set your default paragraph to use black, Verdana type with a margin of 5 pixels, but you also want to have a special paragraph type available to use to emphasize a point. You would create the following styles:
p {color:#000000; font-family: Verdana, Arial, sans-serif;}
.special {color: #ffffff; background-color: #333333; margin: 5px;}
The first line, as you might already realize, establishes your defaults for paragraphs on your Web page. In the second line,
.special
is a class selector. This line tells the Web browser that when you assign the
special
class to a paragraph, the font of that paragraph should be white (
#ffffff
), and the background for that paragraph should be dark gray (
#333333
).
_fmt.jpeg) Notice that the selector starts with a period this time. This is important. This is the proper grammar because
Notice that the selector starts with a period this time. This is important. This is the proper grammar because
this is a class selector.
You'll see that ID selectors have their own syntax (or grammar). You must use this syntax correctly and apply the styles according to that syntax, or they won't work properly.
In your HTML, you would use the following code to create a paragraph with the default styles:
A regular paragraph would look like this
And you would use this code to create a paragraph with the class styles you set up in your CSS:
A special paragraph would look like this
In this example, the
.special
class can be applied to any element, such as a bullet in a list, a table cell, a paragraph, or any other element. You can also create the
.special
class for use just with paragraphs like this:
p.special{color: #ffffff; background-color: #333333;}
 You might notice that the preceding example has no
font-family
property. You don't need to specify a new property unless you want to use a value that's different from the default. A good practice is to declare your font values in either the
body
selector or the
p
selector of your CSS. Then the fonts will be the same throughout your document, unless you indicate otherwise. If you decide you'd like to use a different font on a particular element, create a class and declare a new value for the font-family property. When you apply the class to an element in your HTML document, it ignores the default setting you made in the body selector in favor of the class values.
 The general rule is that the
property: value
pair closest to the element wins â sort of. The more-specific styles take precedence over less-specific ones. So, a general paragraph selector will lose out to a more specific class selector, which in turn will lose out to an ID selector.
In cases where nothing has been declared, the next value is used. So, using our example, the .
special
paragraph would change its font color to white and its background color to dark gray, but would keep the
font-family
as specified in the
font-family
was declared. Other things can affect how styles interact, but discussing those is beyond the scope of this chapter. You can find more information at the W3C Web site at
www.w3.org/Style/CSS
.
Notice that, in these example styles, the class selector looks a little different than the tag selector. In this case, we're using the HTML tag itself to select content for styling. So, if you use a tag selector of
p
, all paragraphs will pick up the style. You don't need to apply any extra code (other than the proper paragraph tags) in the HTML document, unlike the class and ID selectors, which require that you add some extra code so the browser knows where to apply the style.
 So, to refresh where we are, with tag selectors, you just start with the tag. Class selectors start with a
.
(period) â this is an important thing to remember. The syntax rules of CSS must be followed carefully, or the CSS won't take effect for the particular selector or property that is incorrect.
ID selectors
An
ID selector
is the third way that styles can be applied to content on your site. In general, you use these as a group of styles that affect several pieces of your content that work together, such as navigation or sidebar content. There can only be one instance of each ID tag per HTML document. ID tags are useful for creating content groups with accompanying CSS that all work as a unit. An example of this in action is a CSS menu. By using HTML bulleted lists and a group of ID selectors, a designer can create a CSS menu that is easy to update, works well for all users, and is easy on the download times.
When you look at the code of an HTML document that works with CSS, you might see code that looks like this:
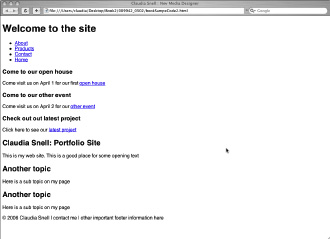
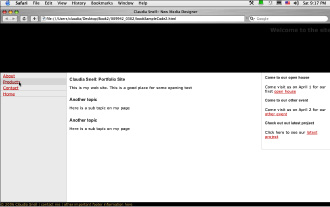
The Listing 3-1: ID Selector Information to Create a Bullet List Menu Bar #navBar ul a:link, #navBar ul a:visited {display: block;} #navBar ul {list-style: none; margin: 0; padding: 0;} #navBar{ float: left; width: 20%; height:450px; margin: 0px; padding: 0px; background-color: #eeeeee; border-right: 1px solid #cccccc; border-bottom: 1px solid #cccccc; } #mainNav{ position: relative; margin: 0px; padding: 0px; border-bottom: 1px solid #cccccc; font-size: 90%; color:#000000; } #mainNav h3{ padding: 10px 0px 2px 10px; } #mainNav a { display: block; border-top: 1px solid #cccccc; padding: 2px 0px 2px 10px; } #mainNav a:hover{ background-color: #dddddd; } The preceding code, when applied to a bulleted list, will create a menu bar that interacts with users when they roll their cursor over the “button” areas. The visual cue of this effect helps users understand that they have their cursor over a link. These styles ⢠Set the display of the list items to “block.” This means that the element will be seen as a block element within the document with line breaks before and after it. ⢠Remove the bullet1s and set the margins and paddings of the list items to 0. ⢠Specify the position, color, borders, and size of the navigation bar. ⢠Set the borders and display attributes of the links. The last style sets the color of the background of the links when the user's cursor is over it. Note the new syntax introduced here. ID selectors are indicated by starting with a In Figures 3-2 and 3-3, you can see that the difference between a basic HTML bulleted list and one with CSS can be very dramatic. Figure 3-2: Figure 3-3:
“mainNav”
and
“navBar”
sections of this HTML example use an ID selector for its style information: It's marked in HTML with the
tag, which encapsulates the content to be included in the style in the code. In this sample, two sets of ID selectors are used together to create the effect of
rollover buttons
(buttons on a Web site that change appearance when you place your cursor over them), but without using JavaScript or graphics (the usual way of creating this effect). The ID selector information for this particular example looks like Listing 3-1.
#
. Also notice that ID selectors are implemented in the HTML with
”>
content
. There is no need to apply styles to each element between the
tags. Everything contained between the
tags is seen as part of the whole. The browser understands that an
heading occurring within the
”>
tags is to be styled according to the
#mainNav h3
properties and values set in the style sheet. Again, if no style is set for an element, the default values are used.
An HTML bulleted list without CSS.
CSS styles convert the HTML bulleted list to a menu with rollovers.
Other books