Building Web Sites All-in-One For Dummies® (34 page)
Read Building Web Sites All-in-One For Dummies® Online
Authors: Claudia Snell

_fmt.jpeg) Any elements that remain outside the box are deleted â completely. Make sure you don't cut off anything unless you mean to. Duplicating the image you're cropping and then working on the copy is a good idea; that way, you'll always have the original to go back to.
Any elements that remain outside the box are deleted â completely. Make sure you don't cut off anything unless you mean to. Duplicating the image you're cropping and then working on the copy is a good idea; that way, you'll always have the original to go back to.
A more precise way to use the Crop tool is to set dimensions that you want your cropped document to be.
1.
Open the photo you're cropping and then click the Crop tool.
Notice how the options available in the panel at the top of the screen change as you choose different tools â this is a
context-sensitive
panel. It allows the interface to make a lot more tools available to you without cluttering up the screen.
2.
At the top of the screen, type a number in the Width text box and another in the Height text box; also, enter a number in the Resolution text box.
If, for example, you want to make a 75-x-75-pixel icon from a 600-x-400-pixel photo, type
75 px
in the Width text box and
75 px
in the Height text box. A resolution of 72 dpi works because computer monitors don't require a higher resolution; see the sidebar information earlier in this chapter about bitmaps and resolutions.
3.
Click and drag the Crop tool over the area you want your image cropped to.
Everything outside that area will be chopped off.
When you click and drag your crop area, the result is a perfect 100-x-100-pixel square at 72 dpi. Make sure you place your box over the area you want to keep; everything else will be lost when the crop is finalized. You finalize the crop by pressing Enter/Return, or by clicking the check mark at the top right of the panel at the top of the screen.
Move around the crop area until you have the perfect image framed in the crop area, and then either press Enter/Return or click the check mark in the contextual menu at the top of the screen. To remove the settings, just click the Crop tool and then choose Clear from the menu. See Figure 4-7 for an example of this technique.
Figure 4-7:
Cropping to exact dimension and resolution.

The Slice tools
With the Slice tools (the tool in the Tools panel that looks like a small knife), you can take a large graphic and cut it into smaller graphics to be exported from Photoshop as graphics and an HTML document. This is useful when you design an entire interface and you need to break it up into the separate graphics that make up the working HTML interface. Figure 4-8 shows a Photoshop file that's been sliced. See Chapter 7 of this minibook for more information about using this tool.
Figure 4-8:
A sliced Photoshop file ready for export.

The Brush and Pencil tools
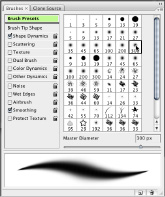
Use the Brush and Pencil tools to paint or draw in your document. Select one of the tools â for example, the Brush tool â and a menu appears at the top of the screen. (See Figure 4-9.) You can choose what color to paint with, the style and size of brush, and many other options.
The Eraser tool
The Eraser tool does exactly that â it erases parts of a layer. To use it, select the layer you want to erase things from, click the Eraser tool, customize its size and other properties in the menu at the top of the screen, and start erasing.
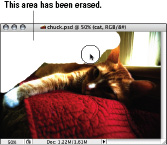
_fmt.jpeg) Things that are erased are gone forever (see Figure 4-10). The Eraser tool is a
Things that are erased are gone forever (see Figure 4-10). The Eraser tool is a
destructive tool
â what it erases is really gone. We highly recommend that you duplicate the layer and make the extra layer invisible before you start erasing so you have a backup. Refer to the “Layers and the Layers panel” section for instructions on making a layer invisible.
Figure 4-9:
The Brush tool has many options to help you work with your graphics.

Figure 4-10:
If you erase part of a layer, it is gone.

 An alternative to using the Eraser tool is to use layer masks. When you use a
layer mask,
part of the layer becomes invisible. It's still there, but it's hidden from view. When you use a layer mask, what you “erase” doesn't go away forever. This option offers a nondestructive way to alter your images.
The Paint Bucket and Gradient tools
The Paint Bucket and Gradient tools color an entire layer or an entire selected area with the color of your choice. The Paint Bucket will just dump the color into the layer or selected area, filling it entirely. The paint brushes allow you to, well, actually
paint
the color in where you like. The Gradient tool fills the area with a
gradient fill;
you can select one from the context-sensitive menu or customize the gradient in the dialog box that opens when you double-click a preset.
Putting the Paint Bucket tool through its paces
To use the Paint Bucket tool, follow these steps:
1.
Select or create a layer or select an area of a layer.
2.
Double-click the foreground color tile, select a color from the Color Picker (shown in Figure 4-11), and then click OK.
The foreground/background color tiles are at the bottom of the tool panel. They are two overlapping colored squares: The top one is foreground, and the other is background.
When you select a color from the Color Picker, your cursor looks like an eyedropper.
The new color is shown in the top half of a rectangle at the top/center of the dialog box. The original color is shown in the bottom half for comparison.
Figure 4-11:
Choosing a color to fill a layer with.

3.
Click the Paint Bucket tool and then click inside the work area or selected area.
The chosen area is filled with the color you pick in Step 2.
Experimenting with the Gradient tool
Gradients have different types â different ways of displaying. Although you have several to choose from, two common ones are
â¢
Linear:
A
linear gradient
displays from left to right, top to bottom, or diagonally â in a linear way, from one color to the other.
â¢
Radial:
A
radial gradient
displays in a circular fashion from one color to the other. One color is a round circle, and the gradient radiates outward around it.