Building Web Sites All-in-One For Dummies® (52 page)
Read Building Web Sites All-in-One For Dummies® Online
Authors: Claudia Snell

 Throughout the course of the beta test, address issues when they come up. If you come across usability issues, tweak your design. Exterminate any bugs as soon as they are reported. After correcting the issue, contact the person(s) who reported the bug and ask them whether your tweak resolved the problem.
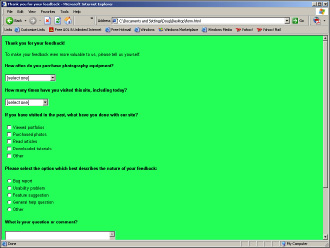
E-mail is an excellent way to get feedback, but forms enable the designer to create a set of structured questions. With this type of survey, you can target questions that show how often the tester visits similar sites and how often he uses the product or service. Figure 10-1 shows a mini-survey form for beta testers of a hypothetical photography Web site.
Figure 10-1:
Send me your answer; fill in a form, mine forever more. . . .

Follow up with beta testers
After the test is over, you have a lot of data that shows you the best features of the site as well as issues that need attention. However, you can gain some closure, so to speak, by doing a follow-up survey. Send an e-mail to all test participants and ask them about their overall experience with the test site â and, most importantly, whether they liked it and found the content relevant and useful.
In addition to the basic questions, find out how often each participant used the site. You can count on the answers being somewhat inflated (numbers inflated 20 to 30 percent would be the norm), unless you have a meticulous tester who logged everything concerned with the test. When you're compiling your results, you know that the answers from the power users carry more weight than those of casual users.
Another set of pertinent questions is how the testers like specific features or areas of the site. Find out how often they used specific sections of the site plus how they liked the navigation system and any interactive features on the site. If the site includes forms and features, such as a search engine, make sure you get feedback on those as well.
Another set of questions should address the issues most reported by testers. The answers to these questions can enable you to find out whether your beta test tweaks took care of the issues.
Finally, ask your testers to rate the site compared with their experience on similar sites. You can ask users to rate the site on a scale from 1 to 10, or ask them to sum up their experience in a short paragraph. Again, you'll weigh the pertinence of each answer based on how often the tester visited the site.
Tweak your design
The responses from your beta testers enable you to perform last-minute tweaks on the site before it goes live. The issues raised by the beta testers might be related to design, content, or both. If it's design, you have to put on your thinking cap to figure out the best way to overcome the issues. If it's content, your client has to belly up to the table and do some editing. The worst-case scenario would be there are too many issues to resolve given the current design. If this is the case, postpone the launch and address the issues, perhaps with a major redesign. If so, you'd be wise to do another beta test before launching.
Going Live
After tweaking the site based on your response from beta testers or from your checklist, you're ready to go live. If you did your test on the server, it's a simple matter of transferring the files from the beta test folder to the
root
folder of the Web site. If you did all your testing on your local machine, upload the pages and related files to the server. You can use an application (such as Adobe Dreamweaver) to upload your content, or you can use an FTP client. The FTP client is the application you use to upload files to the Web server. We use a combination of Dreamweaver and the FileZilla FTP client to handle all of our file-transfer needs. We cover both applications in the upcoming sections.
Using Dreamweaver to upload content
Dreamweaver features a sophisticated set of commands that enable you to connect to a Web server and upload files to the server (
Put
in Dreamweaver-ese, as in,
put the files on the server
) or download files from the server (
Get
in Dreamweaver-ese, as in,
get the files from the server
). To upload pages using Dreamweaver, follow these steps:
1.
If the Files panel is not visible, choose Window
â
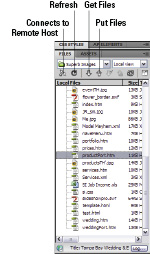
Files to open the Files panel. (See Figure 10-2.) Alternatively, press F8.
The Files panel shows the local files associated with the site on which you're working.
Figure 10-2:
The default layout of the Files panel.

2.
Click the Connects to Remote Host button.
Dreamweaver connects to the remote server using the credentials you supplied when you set up the site.
3.
Click the Expand/Collapse button.
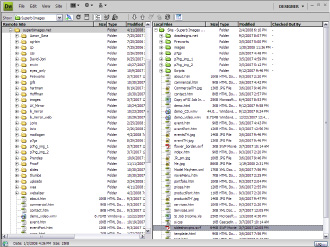
Dreamweaver increases the size of the panel and splits the panel into two panes. The pane on the left shows the files on the remote server, and the pane on the right shows the files on the local machine. (See Figure 10-3.)
Figure 10-3:
Remote on the left, local on the right. Roger.

4.
Select the files you want to upload to the server from the Local Files window.
If you're uploading edited pages, you don't need to select files, such as images, that are associated with the files you're uploading unless they've changed.
5.
Click the Put Files button.
Dreamweaver opens the Dependent Files dialog box. (See Figure 10-4.) This dialog box enables you to upload files associated with the page, such as images and so on.
6.
Click Yes.
Dreamweaver uploads the selected files, along with all files associated with the selected file.
Alternatively, click No if you know that the files associated with the file you're uploading have not been changed and no new files have been linked to the file.
Figure 10-4:
Include associated files with the upload, or not.

You can also upload a page you're editing by clicking the File Management icon (looks like two arrows, one pointing up and one pointing down) and then clicking Put. Alternatively, you can press Ctrl+Shift+U (Windows) or
Ã
+Shift+U (Mac).
You can also download files from the remote server by following these steps:
1.
Choose Window
â
Files to open the Files panel. Alternatively, press F8.
The Files panel shows the local files associated with the site on which you are working.
2.
Click the Connects to Remote Host button.
Dreamweaver connects to the remote server using the credentials you supplied when you set up the site.
3.
Click the Expand/Collapse button.
Dreamweaver increases the size of the panel and splits the panel into two panes. The pane on the left shows the files on the remote server, and the pane on the right shows the files on the local machine.
4.
Select the files you want to download to the server from the Remote Site window.
You don't need to select files associated with the files you're downloading, unless they're not already present on your computer.
5.
Click the Get Files button.
Dreamweaver displays the Dependent Files dialog box. Refer to Figure 10-4.
6.
Click Yes.
Dreamweaver downloads the selected files into the applicable site's folders on your local machine.
You can also upload a page you're editing by clicking the File Management icon (looks like two arrows, one pointing up and one pointing down) and then clicking Put. Alternatively, you can press Ctrl+Shift+U (Windows) or
Ã
+Shift+U (Mac).
Uploading pages with an FTP client
Dreamweaver file management is a wonderful thing. However, if you're working on documents for which you haven't set up a site in Dreamweaver, an FTP client is the ideal solution. An FTP client also comes in handy when you want to download files from a server â for example, when you're doing a site makeover. Quite a few FTP applications are available. We use FileZilla. It's free as of this writing, and is flexible enough to upload an entire Web site. You can download a copy of the FileZilla FTP client from
http://filezilla-project.org
. To upload files using FileZilla, follow these steps:
1.
Launch the application.
The FileZilla interface is shown in Figure 10-5.
2.
Navigate to the folder where you stored the files you want to upload.
The window on the left side of the interface shows the files on your local machine. Click the down arrow to the right of the current folder window in the Local Site window to access your system's directory structure. The window below Local Site displays individual files.
3.
Enter the host URL, username, and password in the appropriate fields.
You don't have to change the default port. Figure 10-6 shows the proper nomenclature for the site URL. Some Web host companies are different. If you enter the URL and are not able to connect, refer to your Web hosting company's technical support.