Building Web Sites All-in-One For Dummies® (97 page)
Read Building Web Sites All-in-One For Dummies® Online
Authors: Claudia Snell

8.
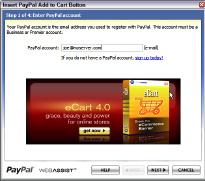
Enter the e-mail address of the PayPal account to which the sale will be credited. (See Figure 2-8.)
Figure 2-8:
Add the e-mail address for the PayPal account.
9.
Click Next.
The second page of the Insert PayPal Add to Cart Button Wizard appears.
10.
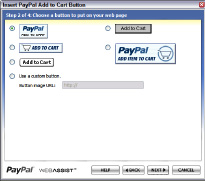
Choose the desired button style from the dialog box shown in Figure 2-9.
You can choose one of the preset styles, or choose a custom button. If you choose the latter option, the Button Image URL field becomes active. In this field, enter the URL where the button image is stored.
Figure 2-9:
Choose a button style.
11.
Click Next
The third window of the Insert PayPal Add to Cart Button Wizard appears.
12.
Enter the product information.
The product information you enter indicates which product to ship to the customer. You need to use a unique product name for each item. Select Yes or No for the options to request a shipping address from the customer and to include a comments field at checkout time. After the customer pays for the purchase, this information is sent to the e-mail address entered in Step 8. Figure 2-10 shows the dialog box for Step 3 of 5 of the Insert PayPal Add to Cart Button Wizard.
13.
Click Next.
The fourth page of the Insert PayPal Add to Cart Button Wizard appears, as shown in Figure 2-11.
14.
If desired, enter the URL to the success page, which usually thanks the visitor for his purchase.
This step is optional. Many designers create a Thank You page for a successful purchase.
15.
Click Finish.
And that's all you need to do to add the button to one page. Figure 2-12 shows the completed page with the PayPal button added. Of course, now you have to add the button to other pages of your online store.
Figure 2-10:
Enter product information.
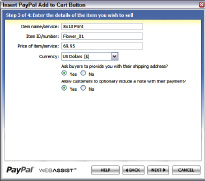
Figure 2-11:
Entering the URL for a success page.
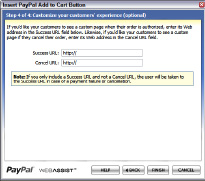
Figure 2-12:
Click the button and send me the money, honey.

Using a Shopping Cart
If the site you're designing will be hosted at a secure server, integrate the items for sale with a credit card authorization package, as discussed in Chapter 1 of this minibook. However, if you attempt to integrate the items for sale with the authorization package
without
a little help from a friend, you're a card-carrying geek â also known as a Web developer. This means writing code, baby. The thought of writing code sends shivers down most Web designers' spines, but you have an alternative. Enter the shopping cart.
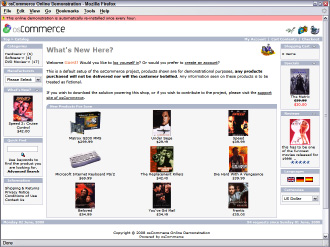
You can find shopping cart applications online. In fact, the service hosting the site might include a shopping cart application. Figure 2-13 shows an example of the type of features you can get with a Web hosting shopping cart application. Figure 2-14 shows a demo of an online shopping cart created using a Web hosting service's shopping cart application.
Another solution is to purchase an e-commerce shopping cart template that integrates with Web design software, such as Dreamweaver or FrontPage. A full-featured shopping cart template gives you complete control with features such as the ability to calculate shipping, integration with a product search page, the ability to add unlimited product features such as size and color, the ability to integrate with popular credit card authorization packages, and much more.
Figure 2-13:
Choosing a shopping cart application.
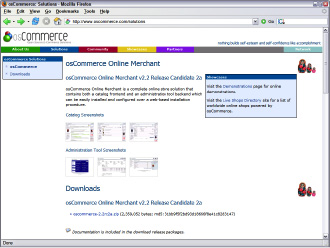
Figure 2-14:
An online shopping cart. Cha-ching!
You can find a plethora of shopping cart templates by going to your favorite search engine and typing the name of your Web design software followed by
shopping cart template
. When you review the results, look for a template that has all the features you need. Many templates let you design a store from scratch using a generic template that you can integrate with your existing design. These templates include the PHP or ASP code you need to create a functional shopping cart that you can integrate with a credit card authorization package. Figure 2-15 shows an e-commerce store that was created using a shopping cart template.
Creating a mailing list form
If your client wants to keep customers updated about new products, changes to the Web site, and so on, the easiest way to accomplish this is to have customers opt-in to a mailing list. You can easily do this by creating a form, such as the one in Figure 2-16.
For more information on creating forms, see Book VI, Chapter 1.
Figure 2-15:
We're only in it for the money.
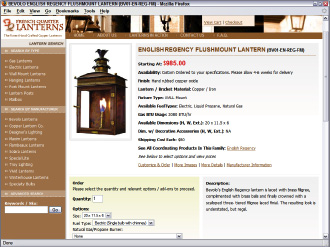
Figure 2-16:
Send me your answer, fill in a form. . . .
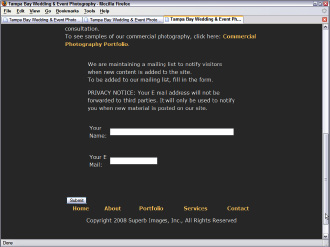
The form itself is pretty straightforward. What makes the form tick is the form action. When the customer clicks the Submit button, a PHP page is summoned. The form action for the HTML form (see Listing 2-1) summons a PHP page that sends the form results to the database. We show you the code for the PHP page in the next section of this chapter.