Read Canning and Preserving For Dummies Online
Authors: Amelia Jeanroy
Canning and Preserving For Dummies (4 page)

Canning methods to avoid
Older canning methods are unreliable and, for that reason, aren’t used or recommended today for home-canning. Occasionally, these methods are “revived” as being faster and easier than water-bath or pressure canning, but using any of the following methods is like playing Russian roulette with your food safety. Just because your grandmother used one of the following methods doesn’t make it safe to use today. If you see instructions that require you to use any of the following methods, do yourself a favor and pass by that recipe.
Oven method:
In this method, filled jars are placed in a hot oven. The method is unsafe because your food’s internal temperature most likely won’t become hot enough to destroy microorganisms and other bacteria that cause spoilage. There’s just no guarantee that the food in the jars will reach the temperature you set your oven at. There’s also a chance that your jars may explode from the sudden temperature change when your oven door is opened.
Open-kettle method:
In this method, food is cooked in an open pot and transferred to sterilized jars. The two-piece caps are quickly added in hopes of sealing the jars as the food cools. This process produces a low vacuum seal that may be broken as gas from spoiling food builds up in the jar. This occurs because your food isn’t heated to destroy microorganisms. There’s also a chance your food may become contaminated when transferring it into the jars.
Steam method:
This method uses a shallow, covered pan with a rack in the bottom. After the filled jars are placed in the pan, steam circulates around the jars. This method is unsafe because the jars aren’t evenly heated and the steam isn’t pressurized to superheat the food and destroy microorganisms. Don’t confuse this method with pressure canning.
Microwave oven:
All microwave ovens heat differently. Because of this, there’s no way to set standards for processing times that achieve a high temperature to penetrate the jars and destroy microorganisms that cause food spoilage.
Dishwasher:
Because there’s no way to know the exact temperature of different dishwashers and because temperature fluctuates throughout the cleaning cycle, dishwasher canning is a no-no. You can’t rely on it to produce a safely canned product. You can, however, use a dishwasher to wash your jars and let them sit in the hot dishwasher until you’re ready to fill them.
Aspirin:
Don’t laugh at this, but at one time, aspirin was used as a substitute for heat processing. It does contain a germicidal agent that acts as a preservative, but this agent doesn’t destroy the enzyme that causes deterioration in food and food spoilage.
Wax or paraffin seal:
Using wax or paraffin was once thought of as a safe way to seal canned goods. It has been proven to be unreliable. and dangerous botulism spores can still develop.
About freezing food
Freezing foods is the art of preparing and packaging foods at their peak of freshness and plopping them into the freezer to preserve all that seasonal goodness. Freezing is a great way to preserve foods that can’t withstand the high temperatures and long cooking of conventional canning methods.
The keys to freezing food are to make sure it’s absolutely fresh, that you freeze it as quickly as possible, and that you keep it at a proper frozen temperature (0 degrees).
 The quality won’t get better just because you throw it in the freezer. Properly packaging food in freezer paper or freezer containers prevents any deterioration in its quality. Damage occurs when your food comes in contact with the dry air of a freezer. Although freezer-damaged food won’t hurt you, it does make the food taste bad. Here are three things to help you avoid freezer burn:
Reduce exposure to air:
Wrap food tightly.
Avoid fluctuating temperatures.
Keep the freezer closed as much as possible. Know what you want to remove before opening the door.
Don’t overfill your freezer.
An overly full freezer reduces air circulation and speeds freezer damage.
For information and instructions on freezing a variety of foods, go to Part IV.
About drying food
Drying is the oldest method known for preserving food. When you dry food, you expose the food to a temperature that’s high enough to remove the moisture but low enough that it doesn’t cook. Good air circulation assists in evenly drying the food.
An electric dehydrator is the best and most efficient unit for drying, or dehydrating, food. Today’s units include a thermostat and fan to help regulate temperatures much better. You can also dry food in your oven or by using the heat of the sun, but the process will take longer and produce inferior results to food dried in a dehydrator. Go to Part V for drying instructions for fruits, vegetables, and herbs.
Key Tricks to Successful Canning and Preserving
Canning and preserving methods are simple and safe, and they produce food that’s nutritious, delicious, and just plain satisfying to your taste buds. Becoming a successful food preserver takes time, effort, and knowledge of the rules. Follow these tips for achieving success as a home canner and preserver:
Start with the freshest, best products available.
Preserving doesn’t improve food quality. If you put garbage in, you get garbage out.
Know the rules and techniques for your canning or preserving method before you start your work.
Don’t try to learn a technique after you’ve started your processing.
Work in short sessions to prevent fatigue and potential mistakes.
Process no more than two items in one day, and work with only one canning method at a time.
Stay up to date on new or revised guidelines for your preserving method.
This book is a great start. You can also go to Web sites like
www.freshpreserving.com
, created by the makers of Ball canning supplies. Here you can find tips and directions for canning just about anything.
Use the correct processing method and processing time to destroy microorganisms.
The
recipe will tell you what method to use, but it helps if you understand the difference between high- and low-acid foods and how the canning methods for each differ. Go to Chapter 3 for details.
Know the elevation you’re working at.
Adjust your processing time or pressure when you’re at an altitude over 1,000 feet above sea level. For accurate information on how to adjust for your altitude, refer to Chapter 4 for water-bath canning conversions and Chapter 9 for pressure canning conversions.
Put together a plan before you start your preserving session.
Read your recipe (more than once). Have the proper equipment and correct ingredients on hand to prevent last-minute shortages and inconvenient breaks (make a list of what you need and check off items as you gather them).
Test your equipment.
If you’re using a pressure canner or an electric dehydrator, test out the equipment to ensure everything’s working properly. And always check the seals on your jars.
Use recipes from reliable sources or ones that you’ve made successfully before.
Follow your recipe to the letter. Don’t substitute ingredients, adjust quantities, or make up your own food combinations. Improvisation and safe food preservation aren’t compatible. This also means you can’t double your recipe. If you require more than what the recipe yields, make another batch. Always use the size jars that are recommended in the recipe as well. Trying to use a larger or smaller jar may throw off the yield and final result.
Now you’re ready to take your food to its final destination in the preservation process. Whether you choose canning, freezing, or drying, proceed down your canning and preserving road with confidence.
Chapter 2
Gathering Your Canning and Preserving Gear
In This Chapter
Checking out your everyday kitchen utensils and equipment
Exploring and using canning and preserving gear
Viewing your options for packaging food for your freezer
Tracking down gear for drying
How many times have you heard the phrase, “Use the right tool for the job”? At no time is this truer than when you’re canning and preserving. The majority of the items discussed in this chapter won’t break the bank, but they’ll make your canning and preserving tasks more efficient. The faster you process your fresh ingredients, the better the quality and flavor of your final product.
In this chapter, you find a list of the tools and utensils you need to complete your tasks. Some tools, like a jar lifter or a lid wand, are only used for canning. Other tools, like pots, pans, and knives, are used throughout the year for everyday tasks. Purchase good-quality tools and equipment; their quality and durability will pay for themselves many times over.
If your local stores aren’t familiar with the canning and preserving items you’re looking for or you’re having trouble locating them, head to Chapter 22, where you can find a list of sources for canning and preserving supplies.
Assorted Basic Tools
The tools that make canning and preserving easier are many of the very same tools that are in most well-stocked kitchens. When a recipe recommends a tool for canning, there’s a practical reason for doing so. Using the proper tool for the job decreases the chance of a jar failing to seal or being able to harbor bacteria. It can also reduce the chance of mishaps and injuries.
Key basic tools and utensils
If you’re serious about any work in the kitchen, these basic tools are indispensable. Purchase the best quality you can afford. Good-quality items will grow old with you.
Knives:
You need three basic knives: a paring knife, a multipurpose knife with a 6-inch blade, and an 8-inch (some people prefer a 10-inch) chef’s knife. When purchasing quality knives, look for two options: stamped or forged blades and blades made of stainless or high carbon steel (tempered steel knives are no longer the epitome of high quality cutlery). Ceramic is another high quality knife, but these high priced knives are easier to damage than their steel counterparts. Also, if you select knives that are balanced, the knife will do the work for you.
Properly caring for your knives protects your investment. Keep your knives razor-sharp. Store them in a block or a magnetic knife storage strip so they don’t touch each other. Hand-wash them (dishwashers are notorious for being hard on dishes, and knives take the brunt of banging around with the other silverware).
Measuring cups:
Accuracy in measuring ingredients is essential to achieve the correct balance of ingredients for canning. There are two types of measuring cups: those for measuring dry ingredients, like flour, sugar, and solid fats, and those for measuring liquid ingredients (see Figure 2-1).
Liquid measuring cups are made from glass, plastic, or metal. With glass measuring cups, you can easily see the amount of liquid in the cup.
Measuring spoons (see Figure 2-2):
These come in graduated sizes from 1/8 teaspoon to 2 tablespoons.
Note:
Don’t use adjustable measuring spoons for canning foods; they move too easily and could give the wrong measurement.
 To avoid having to stop and clean your measuring spoons whenever you measure the same amount of wet and dry ingredients, have two sets handy, one for dry ingredients and the other for wet ingredients.
Figure 2-1:
Measuring cups for dry and liquid food products.

Spoons:
You need at least a couple of cooking spoons made of nonreactive metal (like stainless steel) that won’t change the taste of acidic foods they come in contact with. Some choices for nonreactive metals are stainless steel, anodized aluminum, glass, or enameled cast iron. You can also use an assortment of different-sized wooden spoons (see Figure 2-2).
Rubber spatulas (refer to Figure 2-2):
These are available in a variety of colors and sizes, from flat to spoon-shaped. Use heat-resistant ones for cooking items containing sugar. Check that the end does not easily come off the handle, a common problem with less-expensive spatulas.
Tongs:
Tongs are handy for all types of kitchen chores, especially moving large pieces of food into and out of hot water. Try the spring-loaded variety in different lengths. Don’t overlook a locking mechanism. It keeps the tongs closed when you’re not using them.
Ladle:
Use a ladle that’s heatproof with a good pouring spout.
Potholders:
Protect your hands from hot items. Have twice the amount of potholders available that you think you’ll need.
 Potholders often get wet during canning. Have enough on hand so that you don’t have to use wet potholders. Heat quickly transfers through a wet potholder (in the form of steam), causing a severe burn.
Kitchen towels and paper towels:
Use these for cleaning your jar rims and as a pad for your cooling jars.
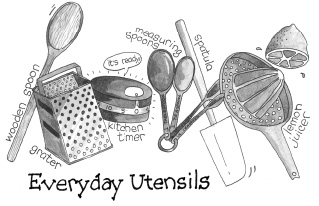
Figure 2-2:
Mis-cellaneous kitchen tools: wooden spoon, box grater, timer, measuring spoons, rubber spatula, and lemon juicer.
Graters:
A box grater (refer to Figure 2-2) gives you four or more options for shredding and grating. A microplane grater (see Figure 2-3) is an updated version of a
rasp
(a woodworking tool) that’s perfect for removing the zest from citrus fruit.
Zester (see Figure 2-3):
Before the microplane grater, a zester was the tool for removing citrus fruit
zest
(just the skin without the bitter white part). It’s still an asset when you need a small amount of zest (a teaspoon or less), but for larger amounts, use a microplane grater.
Scissors:
Use scissors instead of knives to open food packages. Avoid cross-contaminating bacteria by washing your scissors after opening meats.
Timer (refer to Figure 2-2):
Choose a timer that’s easy to read, easy to set, and loud enough to hear if you leave the room. Consider getting two to ensure accuracy.
Waterproof pens and markers:
Select ones that don’t rub off.
Labels:
You can make labels from masking or freezer tape, customize your own on your home computer, or order small quantities from a company like My Own Labels (see Chapter 22).
Cutting board:
A good cutting board protects your knives while providing you with a movable work surface.
Candy thermometer:
A candy thermometer accurately registers the temperature of candy and sugar. In canning, it’s used to check the temperature of cooked items. Some candy thermometers have marks indicating the gel point for jelly (220 degrees). Purchase a candy thermometer that’s easy to read with a base to support the thermometer so the bulb portion doesn’t touch the bottom of your pan. If this occurs, your temperature reading won’t be accurate. Many come with a clip attached to keep the bulb off of the bottom.
Figure 2-3:
Microplane grater and zester.

If you can, store a second thermometer in a handy location. If you accidentally break one while canning, you will have a backup.