Canning and Preserving For Dummies (7 page)
Read Canning and Preserving For Dummies Online
Authors: Amelia Jeanroy

 Be wary of using secondhand stoneware crocks. These crocks were often made with leaded glaze that will leach into your foodstuff. Because you do not often know the history of used items, this is an item that is best purchased new and not secondhand.
Tools and Equipment for Freezing Food
Some of the items required for this simple form of food preservation are already in your kitchen. For a more detailed list, check out Chapter 13.
A freezer:
Usually, the freezer attached to your refrigerator is large enough for freezing food. But if you’re serious about freezing lots of food, you may want to invest in a separate freezer unit.
Rigid containers:
These can be made of plastic or glass. Use only containers approved for the cold temperatures of a freezer. Plastic containers should be nonporous and thick enough to keep out odors and dry air in the freezer. Glass containers need to be treated to endure the low temperature of a freezer and strong enough to resist cracking under the pressure of expanding food during the freezing process.
Freezer bags:
Use bags made for freezing in sizes compatible with the amount of your food.
Freezer paper and wraps:
This laminated paper protects your food from freezer burn, which results when air comes in contact with your food while it’s in the freezer. Tape this paper to keep the wrap tightly sealed. Heavy-duty aluminum foil is another great freezer wrap and requires no taping.
 For extra protection against freezer damage, wrap food items in foil and place them in a freezer bag.
Tools and Equipment for Drying Food
Dehydrating food is a long, slow process of removing moisture from your food while exposing it to low heat. Here are some items you’ll want to have for this process, which is explained in Chapter 16:
An electric dehydrator:
This machine dries your food in an enclosed chamber while it circulates warm air around your food.
A conventional oven:
If your oven maintains a low temperature and you can stand to be without it for up to 24 hours, use it for drying before making the investment in an electric food dehydrator.
Oven thermometer:
An oven thermometer tells you if your oven temperature is low enough to dry your food without cooking it (see Chapter 16 for detailed instructions for checking your oven’s temperature).
Trays and racks:
These are used for holding your food while it’s drying. They’re included with an electric dehydrator. For oven-drying, use mesh-covered frames or baking sheets. For sun-drying, clean screens are necessary, along with clean cheesecloth to keep hungry bugs off the food as it dries.
Chapter 3
On Your Mark, Get Set, Whoa! The Road to Safe Canning and Preserving
In This Chapter
Putting your fears of home-canned food to rest
Determining your processing method by your food’s acidity
Making the acquaintance of food-spoiling microorganisms and enzymes
Recognizing the signs of food spoilage
The desire and determination to produce a delicious, safe-to-eat product without the risk of food poisoning is one thing longtime canners and people new to canning have in common. The canning and preserving techniques used today provide you with these results as long as you follow the proper steps and procedures for preparing, processing, and storing your food.
Before you begin your canning and preserving journey, take a stroll through this chapter, which introduces you to microorganisms, enzymes, and other potentially dangerous situations that cause food spoilage. You can also find info on how to prevent and identify food spoilage. The technical portion of this chapter shouldn’t deter you from canning. Rest assured, after reading this information, you’ll have no fear about preparing and serving your home-canned and -preserved food.
Dispelling Your Fears of Home-Canned and -Preserved Food
Preventing food spoilage is the key to safe canning. Over the years, home-canning has become safer and better. Scientists have standardized processing methods, and home-canners know more about using these methods. When you follow up-to-date guidelines exactly, you’ll experience little concern about the quality and safety of your home-canned and -preserved foods.
The following sections offer some tips for handling, preparing, and processing your food.
Preparing your food properly
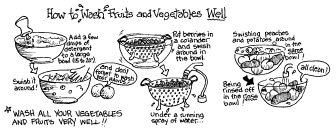
Use fresh, firm (not overripe) food. Wash and prepare your food well to remove any dirt and bacteria: Wash it in a large bowl filled with water and a few drops of detergent and then rinse it in a separate bowl of fresh water (see Figure 3-1). Can fruit and vegetables as soon as possible after they’re picked.
No, you don’t have to wash berries individually: Put them in a colander and submerge the colander, berries and all, in the wash bowl; then rinse them off with a running spray of water.
Figure 3-1:
How to wash fruit and vegetables well.
Packing your jars with care
How you fill the canning jars is also important:
Don’t overpack foods.
Trying to cram too much food into a jar may result in underprocessing because the heat can’t evenly penetrate the food.
Make sure your jars have the proper headspace.
Headspace
is the air space between the inside of the lid and the top of your food or liquid in your jar or container (see Figure 3-2). Proper headspace is important to the safety of your preserved food because of the expansion that occurs as your jars are processed or your food freezes.
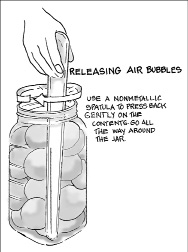
Make sure you release the air bubbles from the jar before sealing the lid.
No matter how carefully you pack and fill your jars, you’ll always have some hidden bubbles.
Figure 3-2:
Headspace.

The all-important headspace
When you’re canning food, too little headspace in your canning jars restricts your food from expanding as it boils. Inadequate space for the expanding food may force some of it out of the jar and under the lid, leaving particles of food between the seal and the jar rim. If this occurs, your jar won’t produce a vacuum seal.
Leaving too much headspace may cause discoloration in the top portion of your food. Excess headspace can keep your jar from producing a vacuum seal if the processing time isn’t long enough to exhaust the excess air in the jar.
Always use the headspace stated in your recipe. If your recipe doesn’t give you a headspace allowance, use these guidelines:
For juice, jam, jelly, pickles, relish, chutney, sauces, and condiments, leave headspace of 1/4 inch.
For high-acid foods (fruits and tomatoes), leave headspace of 1/2 inch.
For low-acid foods (vegetables, meats, fish, and poultry), leave headspace of 1 inch.
 Headspace is also important when you’re freezing food because frozen food expands during the freezing process. If you fail to leave the proper headspace in your freezer container, the lid may be forced off the container, or the container may crack or break. When your frozen food comes in direct contact with the air in your freezer, the quality of your food deteriorates and the food develops freezer burn (go to Chapter 13 for more on freezing food). On the other hand, too much air space allows excess air in your container. Even though your food doesn’t come in direct contact with the air in the freezer, the excess space in the top of the container develops ice crystals. When your food thaws, the excess liquid reduces the food’s quality.
If you don’t trust yourself to eyeball the headspace, use a small plastic ruler (about 6 inches long) to measure the correct headspace in the jar.
Releasing air bubbles from your jars
The most important thing to do when you’re filling your jars is to release trapped air bubbles between the food pieces. This may seem unimportant, but air bubbles can play havoc with your final product:
Jar seals:
Too much air in the jar from trapped air bubbles produces excessive pressure in the jar during processing. The pressure in the jar is greater than the pressure outside the jar during cooling. This imbalance interferes with the sealing process.
Liquid levels:
Air bubbles take up space. When there’s trapped air between your food pieces before sealing the jars, the liquid level in the jar drops when the food is heated. (For releasing air bubbles, see Figure 3-3.) In addition, floating and discolored food results from packing your food without the proper amount of liquid in the jars. Snuggly packed food eliminates air and allows enough liquid to completely cover the food with proper headspace (refer to Figure 3-2).
Never skip the step of releasing air bubbles.
Choosing the right canning method and following proper procedures
Always use the correct processing method for your food. Process all high-acid and pickled food in a water-bath canner. Process all low-acid food in a pressure canner. To find out how to determine whether a food has a low or high acidity level, head to the next section. (You can find out about the different canning methods in Chapters 4 and 9.) In addition to choosing the right canning method, follow these steps to guard against food spoilage:
Figure 3-3:
Releasing air bubbles from your filled jars.
Don’t experiment or take shortcuts. Use only tested, approved methods.
Never use an outdated recipe. Look for a newer version. Do not update the directions yourself. Check the publishing date at the beginning of the recipe book. If it is more than 5 years old, find a newer version.
If your elevation is higher than 1,000 feet above sea level, make the proper adjustments in processing time and pressure for your altitude. See the section “Adjusting your altitude” for information on altitudes and processing times.
If you’re pressure canning, allow your pressure canner to depressurize to 0 pounds pressure naturally; don’t take the lid off to accelerate the process.