DIY Projects for the Self-Sufficient Homeowner: 25 Ways to Build a Self-Reliant Lifestyle (12 page)
Authors: Betsy Matheson
Tags: #Non-Fiction

Decorating a garden is much like decorating a room in your home—it’s nice to have pieces that are adaptable enough that you can move them around occasionally and create a completely new look. After all, most of us can’t buy new furniture every time we get tired of the way our living rooms look. And we can’t build or buy new garden furnishings every time we want to rearrange the garden.
That’s one of the reasons this trio of planter boxes works so well. In addition to being handsome—especially when flowers are bursting out of them—they’re incredibly adaptable. You can follow these plans to build a terrific trio of planter boxes that will go well with each other and will complement most gardens, patios, and decks. Or you can tailor the plans to suit your needs. For instance, you may want three boxes that are exactly the same size. Or you might want to build several more and use them as a border that encloses a patio or frames a terraced area.
Whatever the dimensions of the boxes, the basic construction steps are the same. If you decide to alter the designs, take a little time to figure out the new dimensions and sketch plans. Then devise a new cutting list and do some planning so you can make efficient use of materials. To save cutting time, clamp together parts that are the same size and shape and cut them as a group (called gang cutting).
When your planter boxes have worn out their welcome in one spot, you can easily move them to another, perhaps with a fresh coat of stain, and add new plantings. You can even use the taller boxes to showcase outdoor relief sculptures—a kind of alfresco sculpture gallery.

Whether you build
only one or all three, these handy cedar planters are small enough to move around your gardens and inside your greenhouse or garden shed.
Building Planter Boxes
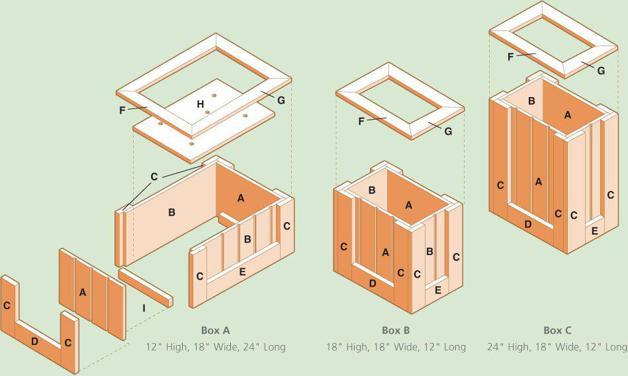
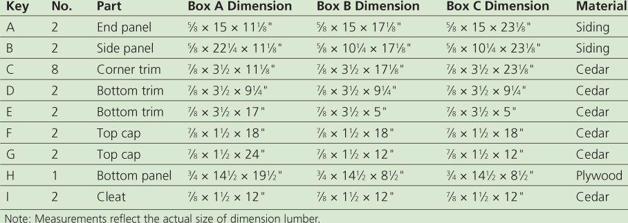
CUTTING LIST
TOOLS AND MATERIALS
Tape measure
Circular saw
Straightedge
Drill
Finishing sander
Miter box and backsaw
(3) 8-ft. cedar 1 × 2s
(6) 8-ft. cedar 1 × 4s
4 × 8-ft. sheet of 5/8" T1-11 siding
2 × 4-ft. piece 3/4" CDX plywood
1-1/4" galvanized deck screws
1-5/8" galvanized deck screws
6d galvanized finish nails
Exterior wood stain
Paintbrush
Landscape fabric
How to Build Planter Boxes
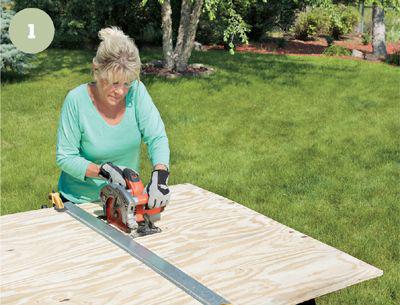
1 Cut all the
wood parts to size according to the Cutting List on
page 43
. Use a circular saw and a straightedge cutting guide to rip siding panels (if you have access to a tablesaw, use that instead). You can make all three sizes, or any combination you choose.
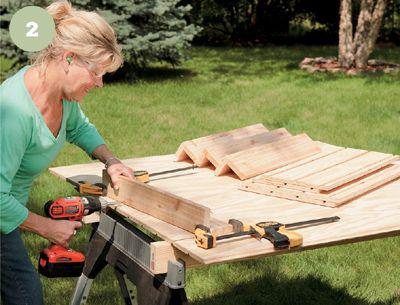
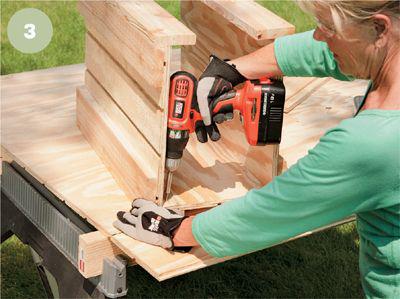
2 Assemble the box
frame. Place the end panel face down and butt it against a side panel. Mark the locations of several fasteners on the side panel. Drill counterbored 3/32" pilot holes in the side panel at the marked locations and fasten the side panel to the end panel with 1-5/8" deck screws. Fasten the opposite side panel the same way. Attach the other end panel with deck screws.
3 Attach the corner
trim. Position one piece of corner trim flush to the corner edge and fasten to the panels with 1-5/8" galvanized deck screws driven into the trim from the inside of the box. Place the second piece of trim flush to the edge of the first piece, creating a square butt joint. Attach to the panel with 1-5/8" galvanized deck screws. For extra support, end nail the two trim pieces together at the corner with galvanized finish nails.
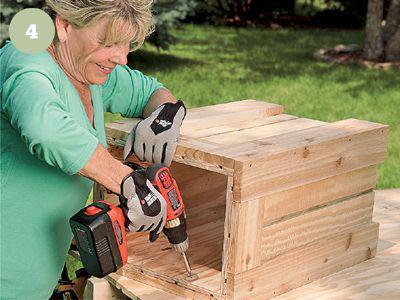
4 Attach the bottom
trim. Fasten the bottom trim to the end and side panels, between the corner trim pieces and flush with the bottom of the box. Drive 1-1/4" deck screws through the panels from the inside to fasten the trim pieces to the box.
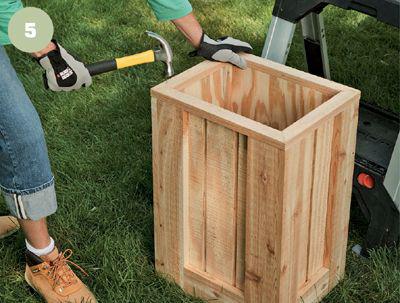
5 Attach the cap
pieces. Cut 45° miters at both ends of one cap piece using a miter box and backsaw or a power miter saw. Tack this piece to the top end of the box, with the outside edges flush with the outer edges of the corner trim. Miter both ends of each piece and tack to the box to make a square corner with the previously installed piece. Once all caps are tacked in position and the miters are closed cleanly, attach the cap pieces using 6d galvanized finish nails.
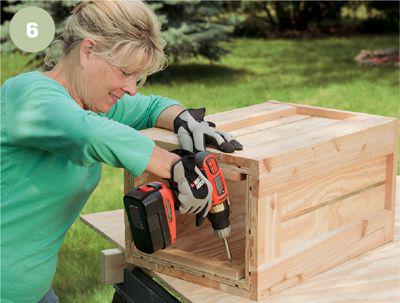
6 Install the cleats
to hold the box bottom in place. Screw to the inside of the end panels with 1-5/8" deck screws. If your planter is extremely tall, fasten the cleats higher on the panels so you won’t need as much soil to fill the box. If doing so, add cleats on the side panels as well for extra support.
