DIY Projects for the Self-Sufficient Homeowner: 25 Ways to Build a Self-Reliant Lifestyle (16 page)
Authors: Betsy Matheson
Tags: #Non-Fiction

Transplant your seedlings into the garden on a cloudy day or in late afternoon to avoid excessive drying from the sun. Remove seedlings gently from their containers, holding as much soil as possible around the roots (containers that are pressed from peat are not intended to be removed). Place each into a hole in your garden, spreading the roots carefully, then pack soil around the seedling to hold it straight and strong. Thoroughly soak all seedlings with a very gentle water spray after they’ve been planted. If you have a rain barrel or another source for untreated water, this is a perfect application for it: The chlorine in most municipal water can be harmful to delicate plants.

Utilizing a greenhouse is a great way to extend and diversify
your garden, enabling you to grow more food for a longer period of time—and perhaps even grow foods that wouldn’t otherwise survive in your climate. A greenhouse can be a decorative and functional building that adds beauty to your property, or a quick and easy temporary structure that serves a purpose and then disappears. The wood-framed greenhouse in this project is somewhere between these two types. The sturdy wood construction will hold up for many seasons. The plastic sheeting covering will last one to five seasons, depending on the material you choose, and is easy to replace when it starts to degrade.
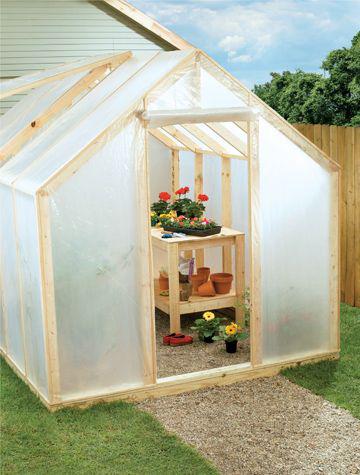
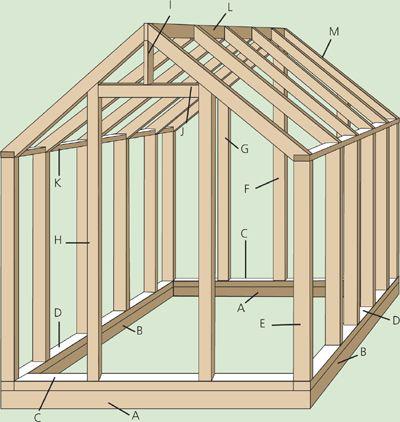
A wood-frame
greenhouse with sheet-plastic cover is an inexpensive, semipermanent gardening structure that can be used as a potting area as well as a protective greenhouse.
The five-foot-high kneewalls in this design provide ample space for installing and working on a conventional-height potting table. For a door, this plan simply employs a sheet of weighted plastic that can be tied out of the way for entry and exit. If you plan to go in and out frequently, you can purchase a prefabricated greenhouse door from a garden center or greenhouse materials provider. To allow for ventilation in hot weather, we built a wood-frame vent cover that fits over one rafter bay and can be propped open easily.
Where to Site Your Greenhouse
When the first orangeries (early greenhouses) were built, heat was thought to be the most important element for successfully growing plants indoors. Most orangeries had solid roofs and walls with large windows. Once designers realized that light was more important than heat for plant growth, they began to build greenhouses from glass.
All plants need at least six (and preferably 12) hours of light a day year-round, so when choosing a site for a greenhouse, you need to consider a number of variables. Be sure that it is clear of shadows cast by trees, hedges, fences, your house, and other buildings. Don’t forget that the shade cast by obstacles changes throughout the year. Take note of the sun’s position at various times of the year: A site that receives full sun in the spring and summer can be shaded by nearby trees when the sun is low in winter. Winter shadows are longer than those cast by the high summer sun, and during winter, sunlight is particularly important for keeping the greenhouse warm. If you are not familiar with the year-round sunlight patterns on your property, you may have to do a little geometry to figure out where shadows will fall. Your latitude will also have a bearing on the amount of sunlight available; greenhouses at northern latitudes receive fewer hours of winter sunlight than those located farther south. You may have to supplement natural light with interior lighting.
To gain the most sun exposure, the greenhouse should be oriented so that its ridge runs east to west (see illustration), with the long sides facing north and south. A slightly southwest or southeast exposure is also acceptable, but avoid a northern exposure if you’re planning an attached greenhouse; only shade-lovers will grow there.
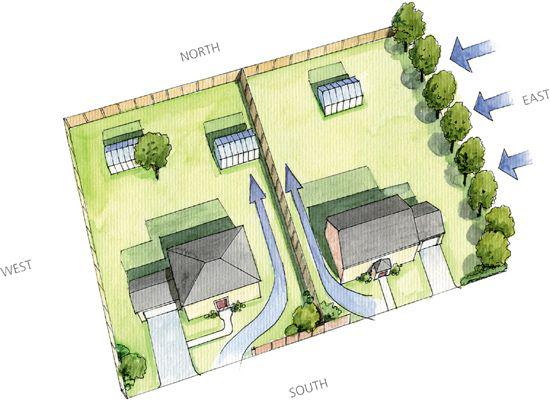
The ideal greenhouse
location is well away from trees but protected from prevailing winds, usually by another structure, a fence or a wall.
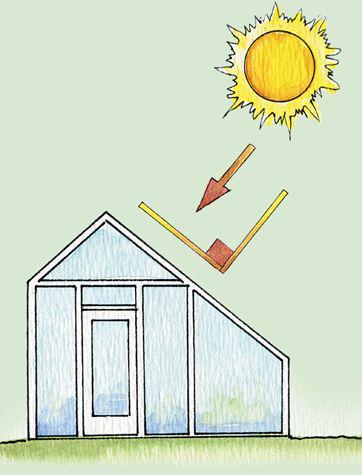
For maximum heat gain,
orient your greenhouse so the roof or wall with the most surface area is as close to perpendicular to the sunrays as it can be.
Building a Greenhouse
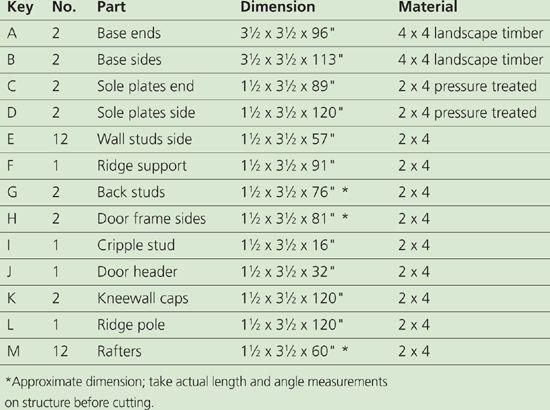
CUTTING LIST
TOOLS & MATERIALS
(1) 20 × 50-ft. roll 4 or 6-mil polyethylene sheeting or greenhouse fabric, tack strips
(12) 24"-long pieces of No. 3 rebar
(4) 16-ft. pressure-treated 2 × 4
(2) exterior-rated butt hinges
(1) screw-eye latch
(8) 8" timber screws
Reciprocating saw
Level
Carpenter’s square
Drill with a nut driver bit
Eye and ear protection
Metal cutoff saw
Maul or sledgehammer
Speed square
3" deck screws
Exterior panel adhesive
Caulk gun
Hammer
Jigsaw or handsaw
Miter saw
Circular saw
Utility knife
Pneumatic nailer
Scissors
Scrap 2×4
Pencil
How to Build a Gabled Greenhouse
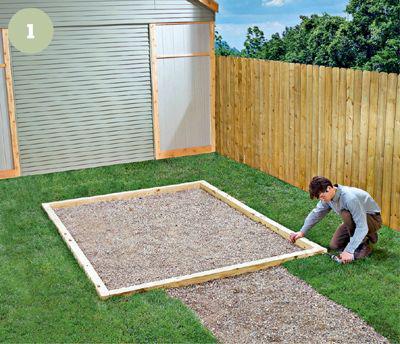
1 Prepare the installation
area so it is flat and well drained; then cut the base timbers (4 × 4 landscape timbers) to length. Arrange the timbers so they are flat and level and create a rectangle with square corners. Drive a pair of 8" timber screws at each corner, using a drill/driver with a nut-driver bit.
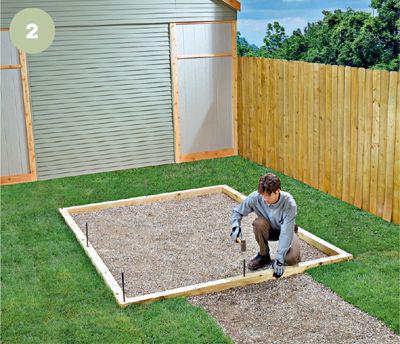
2 Cut 12 pieces
of No. 3 rebar (find it in the concrete supplies section of any building center) to 24" in length to use as spikes for securing the timbers to the ground. A metal cutoff saw or a reciprocating saw with a metal cutting blade can be used to make the cuts. Drill a 3/8" guide hole through each timber near each end and in the middle. Drive a rebar spike at each hole with a maul or sledgehammer until the top is flush with the wood.