Make: Electronics (31 page)
Authors: Charles Platt

Battery
After you complete
Experiment 15
at the end of this section of the book, if you want to use the project on a practical basis, you’ll need a 12-volt battery. Search online for “12v battery” and you’ll find many sealed, rechargeable lead-acid batteries that are designed for alarm systems, some measuring as small as 1×2×3-inch and costing under $10. You need a charger with it, which will probably cost you about $10.
Switches and relays
You will need the same DPDT relay and the same SPDT toggle switch that were mentioned in
Chapter 2
shopping list.
For
Experiment 15
, you’ll need magnetic switches that you can apply to doors or windows, such as the Directed model 8601, available from dozens of sources online.
Also you will need a DPDT pushbutton switch, ON-(ON) type, with solder terminals. Examples are model MPG206R04 by Tyco or model MB2061SS1W01-RO by NKK (with optional cap). Or search eBay for “DPDT pushbutton.”
Diodes
Buy at least half-a-dozen red 5 mm LEDs rated for approximately 2 volts, such as the Optek part number OVLFR3C7, Lumex part number SSL-LX5093IT, or Avago part HLMP-D155. Buy half-a-dozen similar green LEDs at the same time.
In addition, you’ll need a signal diode, type 1N4001 (any brand will do). Figure 3-30 shows an example, highly magnified. They’re cheap, and likely to be useful in the future, so buy 10 of them.
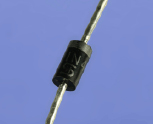
Figure 3-30.
This 1N4001 diode is about 1/4 inch long and can handle up to 50 volts.
Loudspeaker
To complete the project in
Experiment 15
, you’ll need a loudspeaker small enough to fit inside your project box but louder than the 1-inch speaker that you used previously. It should be 2 inches or 2.5 inches (50 to 60 mm) in diameter. If you can find a 100Ω speaker, it will give you more output, but an 8Ω speaker will be acceptable.
Experiment 12: Joining Two Wires Together
Your adventure into soldering begins with the prosaic task of joining one wire to another, but will lead quickly to creating a full electronic circuit on perforated board. So let’s get started!
You will need:
- 30-watt or 40-watt soldering iron
- 15-watt pencil-type soldering iron
- Thin solder (0.022 inches or similar)
- Medium solder (0.05 inches or similar)
- Wire strippers and cutters
- “Helping hand” gadget to hold your work
- Shrink-wrap tubing, assorted
- Heat gun
- Something to protect your work area from drops of solder
 Soldering Irons Get Hot!
Please take these basic precautions:
Use a proper stand (such as the one incorporated in your helping hands) to hold your soldering iron. Don’t leave it lying on a workbench.
If you have infants or pets, remember that they may play with, grab, or snag the wire to your soldering iron. They could injure themselves (or you).
Be careful never to rest the hot tip of the iron on the power cord that supplies electricity to the iron. It can melt the plastic in seconds and cause a dramatic short circuit.
If you drop a soldering iron, don’t be a hero and try to catch it. Most likely you will grab the hot part, which hurts. (I speak from experience.) When you burn your hand, you will instinctively let go of the iron, so you may as well let it drop freely without the intermediate step of burning yourself while it’s on its way to the floor. Naturally, you should pick it up quickly after it does hit the floor, but by then you will have gained the necessary time in which to make a sensible decision to grab it by the cool end.
Always bear in mind that others in your home are more at risk of hurting themselves on a soldering iron than you are, because they won’t know that it’s hot. Most soldering irons have no warning lights to tell you that they’re plugged in. As a general rule, always assume that a soldering iron is hot, even if it’s unplugged. It may retain sufficient heat to burn you for longer than you expect.
Your First Solder Joint
We’ll start with your general-duty soldering iron—the one rated for 30 or 40 watts. Plug it in, leave it safely in its holder, and find something else to do for five minutes. If you try to use a soldering iron without giving it time to get fully hot, you will
not
make good joints.
Strip the insulation from the ends of two pieces of 22-gauge solid wire and clamp them in your helping hand so that they cross each other and touch each other, as shown in Figure 3-31.
To make sure that the iron is ready, try to melt the end of a thin piece of solder on the tip of the iron. The solder should melt instantly. If it melts slowly, the iron isn’t hot enough yet.
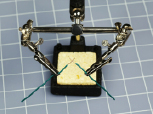
Figure 3-31.
A helping hand work aid is shown here holding two wires with their stripped ends touching. The magnifying glass has been hinged out of the way.
Now follow these steps (shown in Figures 3-32 through 3-36):
1.
Make sure the tip of the soldering iron is clean (wipe it on the moistened sponge in the base of your helping hand if necessary), then touch it against the intersection of the wires steadily for three seconds to heat them. If you have hard tap water, use distilled water to wet the sponge to avoid a buildup of mineral deposits on the tip of your soldering iron.
2.
While maintaining the iron in this position, feed a little solder onto the intersection of the wires, also touching the tip of the soldering iron. Thus, the two wires, the solder, and the tip of the iron should all come together at one point. The solder should spread over the wires within another two seconds.
3.
Remove the iron and the solder. Blow on the joint to cool it. Within 10 seconds, it should be cool enough to touch.
4.
Unclamp the wires and try to tug them apart. Tug hard! If they defeat your best attempts to separate them, the wires are electrically joined and should stay joined. If you didn’t make a good joint, you will be able to separate the wires relatively easily, probably because you didn’t apply enough heat or enough solder to connect them.
The reason I asked you to begin by using the higher-powered soldering iron is that it delivers more heat, which makes it easier to use.
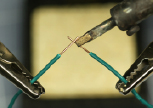
Figure 3-32
.

Figure 3-33
.
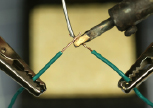
Figure 3-34
.
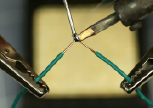
Figure 3-35.
This and the preceding three figures illustrate four steps to making a solder joint: apply heat to the wires, bring in the solder while maintaining the heat, wait for the solder to start to melt, and wait a moment longer for it to form a completely molten bead. The whole process should take between 4 and 6 seconds.
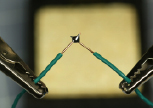
Figure 3-36.
The completed joint should be shiny, uniform, and rounded in shape.