Make: Electronics (28 page)
Authors: Charles Platt

Implementing the Wish List
I’ve compiled a wish list that seems likely to make the project at least five times as complicated as it is already. Well, that’s what tends to happen when you go beyond little demo circuits and try to design something that will be useful in everyday life. Suddenly you find yourself having to accommodate all kinds of circumstances and situations.
Actually, I can and will show you how to take care of all the enhancements on the wish list, but I’m thinking that they will require us to get a little more serious about electronics projects in general first. If you’re going to build something ambitious, you’ll want to make it more permanent, and probably more compact, than a breadboard with components pushed into it.
You will need to know how to connect everything permanently with solder, on a piece of perforated board that you can install in a neat little project box with switches and lights on the outside.
I’m going to deal with soldering and packaging in the next chapter. After that, we’ll get back to the alarm project.
Larger versions of all schematics and breadboard photos are available online at this book's website:
http://oreilly.com/catalog/9780596153748
.
Larger versions of all schematics and breadboard photos are available online at this book's website:
http://oreilly.com/catalog/9780596153748
.
Larger versions of all schematics and breadboard photos are available online at this book's website:
http://oreilly.com/catalog/9780596153748
.
3.
Getting Somewhat More Serious
I don’t know how far you’ll want to delve into electronics, but I do know that I’ve shown you about as much as I can with just a handful of components, some wires, a breadboard, and a few tools. To continue, you’ll need:
- Some more tools and supplies
- Basic soldering skills
- Additional knowledge about:
- Integrated circuits
- Digital electronics
- Microcontrollers
- Motors
The tools are not particularly exotic or expensive, and the soldering skills are easily acquired. Learning to join wires with solder is far easier than mastering high-level crafts such as jewelry making or welding.
As for additional areas of knowledge about electronics, they are no more challenging than those that I have covered already.
By the end of this section, you should be able to transplant components from a breadboard onto perforated board, where you will solder everything together, and then mount the board in a little box with switches and warning lights on the front, for everyday use.
Shopping List: Experiments 12 Through 15
Tools
Each of the following tools is rated Essential, Recommended, or Optional. The Essential tools will take you through this chapter of the book. If you supplement them with the Recommended tools, they should be sufficient to get you to the end of the book. The Optional tools will make your work easier, but whether they’re worth the money is for you to decide. Remember that URLs for manufacturers and sources of supply are all listed in the appendix.
I am assuming that you already have some commonly used workshop basics, such as an electric drill.
Essential: Pencil-type 15-watt soldering iron
Examples are RadioShack part 64-2051, McMaster-Carr catalog item 7016A34, or Xytronic model 252. See Figure 3-1. Soldering irons rated at 15 watts are less common than those that deliver 25 watts or more. Still, the 15-watt size is desirable for the small-scale work you’ll be doing, and greatly reduces the risk of damaging components by inflicting excess heat.
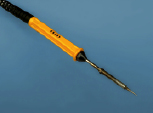
Figure 3-1.
The low wattage of this pencil-style soldering iron enables you to use it safely on sensitive components, and the sharp tip helps to apply heat selectively.
When comparing prices, remember that a plated tip, which costs a little more, will last longer, will be easier to keep clean, and will conduct heat more reliably than a plain copper tip. If the manufacturer’s specification doesn’t mention a plated tip, the soldering iron probably doesn’t have one.
Essential: General-duty soldering iron, 30 to 40 watts
Although most of the projects in this book entail small, heat-sensitive components and thin wire, at some point you’re likely to want to make a solder joint with larger components and/or thicker wire. A 15-watt soldering iron will be unable to deliver enough heat. You should consider having a larger soldering iron in reserve, especially because they are relatively inexpensive.
Personally, I like the Weller Therma-Boost, shown in Figure 3-2, because it has an extra button that delivers more heat on demand. This is useful when you want the iron to get hot quickly, or if you are trying to solder very thick wire, which absorbs a lot of heat.
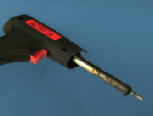
Figure 3-2.
This higher-wattage soldering iron delivers the additional heat necessary for thicker wire or larger components. The discoloration quickly occurs as a result of everyday use and has no effect on the capability of the iron, as long as the tip of it is clean.
If you can’t find or don’t like the Weller, almost any 30-watt or 40-watt soldering iron will do. Check eBay or your local hardware store.
Essential: Helping hand
The so-called “helping hand” (or “third hand”) has two alligator clips that hold components or pieces of wire precisely in position while you join them with solder. Some versions of the “helping hand” also feature a magnifying lens, a wire spiral in which you can rest your soldering iron, and a little sponge that you use to clean the tip of your iron when it becomes dirty. These additional features are desirable. Helping hands are available from all electronics hobby sources. Examples are the catalog item HH55 from Elenco or model 64-2991 from RadioShack. See Figure 3-3.
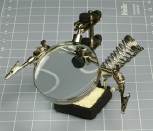
Figure 3-3.
The helping hand is fitted with two alligator clips to hold your work. The metal spiral is a safe place to holster a hot soldering iron, and you use the sponge to wipe its tip.
Essential: Magnifying lens
No matter how good your eyes are, a small, handheld, powerful magnifying lens is essential when you are checking solder joints on perforated board. The three-lens set in Figure 3-4 is designed to be held close to your eye, and is more powerful than the large lens on a “helping hand.” The folding lens in Figure 3-5 stands on your workbench for hands-free operation. Both are available from RadioShack and similar items are stocked by art supply stores and hobby shops. Plastic lenses are quite acceptable if you treat them carefully.

Figure 3-4.
As long as you treat it carefully, a cheap set of plastic magnifying lenses is perfectly acceptable. Handheld magnification is essential for inspecting the solder joints that you make on perforated board.
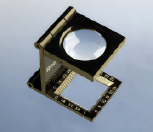
Figure 3-5.
This kind of folding magnifier can stand on your desktop and is useful for checking part numbers on tiny components.
Essential: Clip-on meter test leads
The probes that came with your multimeter require you to hold them in contact while you make a reading. This requires both hands, preventing you from doing anything else at the same time.
When you use a pair of “minigrabber” probes with little spring-loaded clips at the end, you can attach the Common (negative) lead from your meter to the negative side of your circuit and leave it there, while you touch or attach the positive probe elsewhere.
The Pomona model 6244-48-0 (shown in Figure 3-6) from Meter Superstore and some other suppliers is what you need. If you have trouble finding it or you object to the cost, you may consider making your own by buying a couple of “banana plugs” (such as RadioShack part 274-721) that will fit the sockets on your meter, and then use 16-gauge or thicker stranded wire to connect the plugs with IC test clips, such as Kobiconn 13IC331 or RadioShack “mini hook clips,” part number 270-372C. See Figures 3-7 and 3-8.
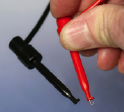
Figure 3-6.
These “minigrabber” add-ons for meter leads make it much easier to measure voltage or current. Push the spring-loaded button, and a little copper hook slides out. Attach it to a wire, release the button, and you have your hands free for other tasks. It’s a mystery that meters are not supplied with these grabbers as standard equipment.
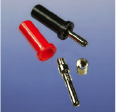
Figure 3-7.
To make your own minigrabber meter leads, first attach a banana plug to a wire by sliding the wire through the cap, into the plug, and out through a hole in
the side.
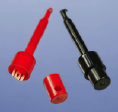
Figure 3-8.
Then screw a collar over the protruding piece of wire, and screw on the cap. The other end of the wire is soldered to a probe.