Making Artisan Cheese (15 page)
Read Making Artisan Cheese Online
Authors: Tim Smith

Whichever rennet you choose, you must be certain that you dilute it in ¼ cup (60 ml) of cool, unchlorinated water before adding it to the milk. This practice encourages the proper distribution of rennet throughout the milk.
Rennet: Liquid or Tablet Form?
Rennet comes in two forms: a liquid and a tablet. Both are effective, and each one has certain benefits and drawbacks. Tablets have an indefinite shelf life, which make them ideal for the person who is not making cheese on a frequent basis. The drawback with the tablets is that they are not the most precise way of measuring, and they are not easily rehydrated in water. Conversely, liquid rennet is very precise to measure, which makes it simple to use, but it has a shelf life of only a year when kept in the refrigerator.
Equipment
Getting started in more advanced cheese making requires additional tools. Most of these tools are available at one of the cheese-making supply companies listed in the Resources section on
page 172
.
Depending on your skill level and inclination, you may want to make do with what you have around the house. This is not too absurd if you think about it, because for hundreds of years, cheese was made with tools that would be rejected by today’s modern sanitation requirements. Again, simple common sense is all you need. Be certain that you keep your equipment clean before and after you make your cheese. When using plastic materials, stick with food-grade plastic, also known as polypropylene. If you have any doubt about whether a tool is food safe, then don’t use it. It is better to err on the side of caution than to ruin your cheeses.
Any new project is the opportunity to buy a new tool.
—TOM MAGGLIOZI OF
NATIONAL PUBLIC RADIO’S
SHOW
CAR TALK
Cheese Press
The cheese press is the essential tool needed to make hard cheeses. A wide variety of presses is available through cheese-making supply houses. One that is most interesting is the Wheeler-style press from New England Cheese Making Supply. It has a stately, rustic look about it that says, “I’m a cheese press.” The others worth looking at are the CHEESEYPRESS and the SEESEYPRESS from Jack Schmidling Products.
If you want to make your own press, there are countless sources of patterns and instructions. New England Cheese Making Supply offers such information. There is also an interesting example on the Web from David Fankhauser. He has made a press using chopsticks, industrial-strength rubber bands, and a cooking pot. Truly an inventive guy!
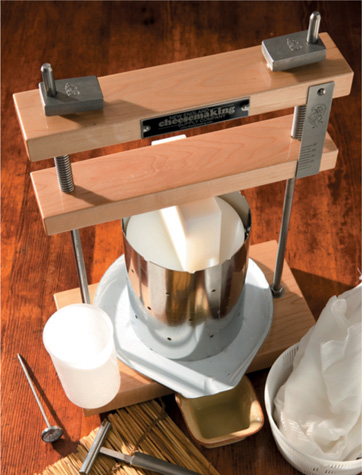
A cheese press is a simple device that applies pressure to cheese that is inside a perforated mold. As the pressure is increased, watery whey drains out and is discarded, and the wheel of cheese solidifies and takes on its permanent shape.
Curd Knife
This tool is simply a long knife that can reach to the bottom of the pot to cut your curds. Ideally you are looking for a thin blade that will cut in clean lines. Specially made curd knives are available from cheese-making suppliers (see Resources,
page 172
), or you can experiment with a similarly shaped kitchen knife, such as a ham slicer.
Cheese Board
Cheese boards are cutting boards that you will need for drying your cheese after it comes out of the cheese press. Sterilize the board with a steam bath for twenty minutes before each use. Do not use a plastic board, because it will not absorb any of the moisture from the cheese.
pH Testing Equipment
As mentioned earlier, knowing the proper acidity of milk is essential for the success of your cheese. There are several ways to measure this. The easiest and least expensive way is to purchase those famous pH strips that everyone used in high school science class. They are cheap and effective. If you are inclined to more precise measurements, you
should look at the various gadgets that are available. One of the more interesting tools to come out is an instant-read pH tester. Battery-operated with an LCD display, it can give you a reading in a matter of seconds. No fuss, no muss—it is ideal for the striving “cheese head,” and it makes a great gift.
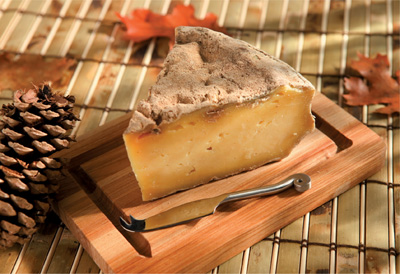
A simple cutting board of unfinished wood is the best material to use for drying cheese, because it absorbs excess moisture from the base of the cheese.
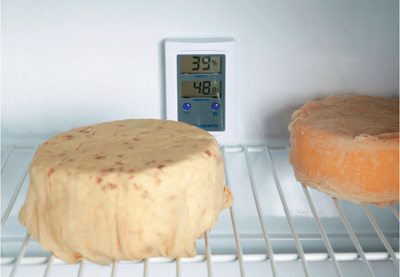
The ideal environment for ripening cheeses is a cave, and for centuries it was the only way to ripen cheeses. But for the home cheese maker, a dedicated refrigerator, such as an inexpensive under-the-counter model—or for bigger batches, a full-sized “garage” fridge— will do an admirable job of cheese ripening.
Ripening Cave
It is essential that you create the right environment in which your cheese can mature. It would be a shame to take all of the time and effort that went into making a cheese and then blow it because the cheese was not properly ripened. Remember that cheese is a living, breathing organism and must be handled accordingly. Let’s look at what it takes to ripen a cheese at home.
THE MODERN CHEESE CAVE, A.K.A HOME REFRIGERATOR
Throughout history, cheeses were ripened in cool, dark places, such as caves or cellars. If you ever walk into a cave, one thing you will notice is just how darn damp it is. Cold and clammy, caves are ideal for ripening cheese, because cheeses prefer an average temperature of 45°F to 60°F (7°C–16°C), with a relative humidity of anywhere from 75 to 95 percent. Looking at these criteria, you can immediately see that there is going to be a problem with using your kitchen refrigerator as a ripening cave. The fridge at home, which is likely set at about 40°F (5°C), is too cold to allow the starter culture to develop properly.
The best alternative is to look into purchasing a small refrigerator for your cheese ripening. In choosing your home “cave,” it is better to start large rather than small. If a full-sized Subzero is out of the question, however, a medium-sized refrigerator will do; it all depends on what amount of cheese you are planning to make. Even one of those small college-dorm refrigerators will work, but keep in mind that they are small, so you will be limited in what you can make and how long you can store it.
REFRIGERATOR THERMOSTAT
Once you have decided on your cave, your next purchase should be a refrigerator thermostat (see Resources, on
page 172
). This nifty little contraption allows you to override the thermostat inside the refrigerator and has a temperature range of 30°F to 80°F (–1°C–27°C). Because no refrigerator manufacturer would ever dream of setting a unit at 60° F (16°C), an external thermostat is a must.
HUMIDISTAT
Getting moisture into your cave is easy; a small pan of water will do. However, knowing that your cheeses are being properly hydrated is a different story. If you put the effort into making cheese and building a cave, you better make sure that your cheeses flourish during ripening. In order to do this, you need a humidistat—an inexpensive and readily available tool found at hardware stores or on the Web.
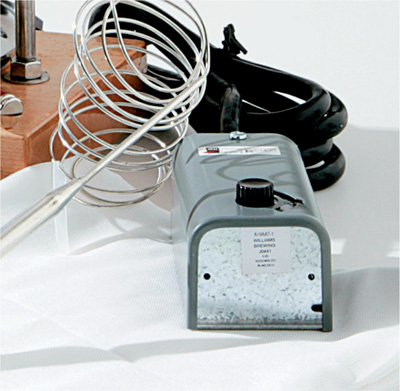
A refrigerator thermostat will allow you to set the temperature at the exact level needed to ripen the cheeses of your choice.
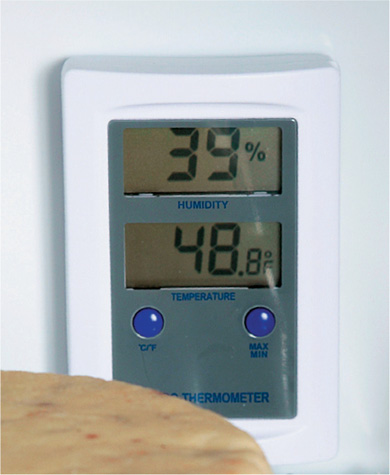
A humidistat will give you an accurate reading of the humidity in your ripening cave. The one pictured here includes a thermometer.
Cheese Molds
The shape of a cheese is a direct result of the mold. Molds are perforated plastic forms that are used to hold the curd for draining. Cheese-making suppliers have a wide variety of shape and size choices, which are most often based on the traditional shapes called for in the recipes. A cheaper alternative is to use any of the ubiquitous food-grade plastic tubs. Take a medium-sized deli cup with a series of holes punched through (by you), and voilà, you have a cheese mold.