Pro Puppet (18 page)
Authors: Jeffrey McCune James Turnbull

We can now add this new module to our nodes, leaving them looking like this:
class base {
  include sudo, ssh, puppet
}
node 'puppet.example.com' {
  include base
  include puppet::master
}
node 'web.example.com' {
  include base
  include apache
  apache::vhost { 'www.example.com':
    port => 80,
    docroot => '/var/www/www.example.com',
    ssl => false,
    priority => 10,
    serveraliases => 'home.example.com',
  }
}
node 'db.example.com' {
  include base
  include mysql
}
node 'mail.example.com' {
  include base
  include postfix
}
We’ve added thepuppetmodule to thebaseclass we created earlier. This will mean it’s added to all the nodes that includebase. We’ve also added thepuppet::masterclass, which adds the additional resources needed to configure the Puppet master, to thepuppet.example.comnode.
In this chapter, you’ve been introduced to quite a lot of Puppet’s basic features and language, including:
- How to structure modules, including examples of modules to manage SSH, Postfix, MySQL and Apache.
- How to use language constructs like selectors, arrays and case statements
- A greater understanding of files and templates
- Definitions that allow you to manage configuration, such as Apache VirtualHosts
- Variable scoping
You’ve also seen how a basic Puppet configuration in a simple environment might be constructed, including some simple modules to manage your configuration. Also, Puppet Forge contains a large collection of pre-existing modules that you can either use immediately or modify to suit your environment.
In the next chapter, we’ll look at how to scale Puppet beyond the basic Webrick server, using tools like Mongrel and Passenger and allowing you to manage larger numbers of hosts.
- Puppet Documentation:
http://docs.puppetlabs.com - Puppet Wiki:
http://projects.puppetlabs.com/projects/puppet/wiki - Puppet Forge:
http://forge.puppetlabs.com

We’ve introduced you to installing and configuring Puppet. In this chapter, we show how you might integrate Puppet into your organization’s workflow. This will allow you to use Puppet to make changes and manage your infrastructure in a logical and stable way.
To do this, we introduce a Puppet concept called “environments.” Environments allow you to define, maintain and separate your infrastructure into appropriate divisions. In most organizations, you already have some of these divisions: development, testing, staging, pre-production and others. Just like a set of production, testing, and development systems, which are separated from one another to effectively isolate risky changes from production services, Puppet environments are designed to isolate changes to the configuration from impacting critical production infrastructure.
In this chapter we also build upon the concept of modules, which we introduced in
Chapters 1
and
2
. We show you how to configure environments on your Puppet masters and how to control which agents connect to which environment. Each agent can connect to a specific environment that will contain a specific set of configuration.
Finally, we exercise the workflow of making changes using our version control system, testing those changes in a safe and easy way using environments, then promoting the tested changes to the production environment in Puppet.
In order to demonstrate all of this to you, we create another host for the Example.com Pty Ltd organization we first introduced in
Chapter 1
. This new host is calledmailtest.example.com. This host has been introduced to allow Example.com to test changes to their email server without impacting the production mail server. You can see the new node in
Figure 3-1
.
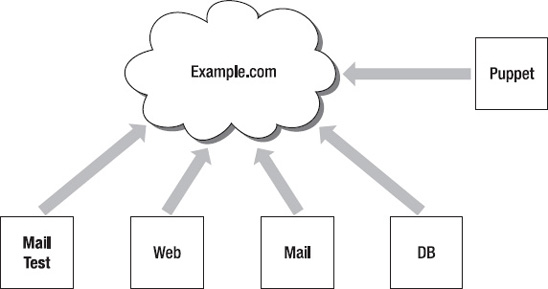
Figure 3-1.
The Example.Com Pty Ltd network
To get started, we’ve installed the Red Hat Enterprise Linux operating system onmailtest.example.comin order to match the operating system Puppet already manages onmail.example.com. As we already have configuration to manage themail.example.comhost, we don’t need to create any new manifests - we can re-use the existing ones to configure our newmailtest.example.comhost.
 Note
Note
This chapter starts to demonstrate the power of Puppet for re-using configuration: Rather than starting a new configuration from scratch, we can use existing Puppet manifests to create a new mail server.
To configure Puppet environments, you need to add them to the Puppet master’s configuration. If you add each environment to the Puppet master, then each Puppet agent can request a specific environment when requesting a catalog from the master.
The first step to configure your Puppet master and agents to use environments is to add a stanza in the/etc/puppet.confconfiguration file on the Puppet master for each environment you want to support. Let’s do this now, by creating the three environments shown in
Listing 3-1
.
Listing 3-1.
Puppet Master environments in puppet.conf
[main]
  modulepath = $confdir/modules
  manifest = $confdir/manifests/site.pp
[development]
  modulepath = $confdir/environments/development/modules
  manifest = $confdir/environments/development/manifests/site.pp
[testing]
  modulepath = $confdir/environments/testing/modules
  manifest = $confdir/environments/testing/manifests/site.pp
As you can see, each environment section of the puppet configuration file defines two settings,modulepathandmanifest. Themodulepathsetting defines the path to the modules that will apply to each environment, and themanifestoption specifies thesite.ppfile that applies to that environment. Recall from
Chapter 1
thatsite.ppis the file that tells Puppet which configuration to load for our clients. These settings allow each environment to have a distinct set of modules and configuration.
Note
When setting up environments, the Puppet master process should be restarted in order to activate configuration changes. As described in
Chapter 1
, the restart process depends on how Puppet is installed on the master. Most systems include aninitscript to accomplish this task.
In
Chapters 1
and
2
, we introduced you to building modules to store your Puppet configuration. In order to fully utilize environments, your Puppet manifests should be organized into modules. In this chapter, we use the modules we’ve created to manage our production environment, themainenvironment defined in
Listing 3-1
.
Once you’ve defined the multiple environments on the Puppet master server, you need to populate these new search paths with the Puppet modules and manifests you’ve already created in production. In the “Version Controlling Your Modules” section of
Chapter 2
, our hypothetical company configured Puppet modules using the Git version control system. We’ll expand on the file organization and introduce a strategy to manage and migrate changes between Puppet environments.
Note
If you have not yet installed Git and would like to do so now, please refer back to the Git installation information in
Chapter 2
.
We will use Git to make sure each of our three new environments;main(or production),developmentandtestingwill receive an identical copy of ourproductionenvironment. The version control system will also allow us to easily keep these three environments synchronized when necessary, while also allowing them to diverge when we want to try out new changes. Three environments with identical modules and manifests will allow us to quickly make changes in the development or testing environment without impacting the production environment. If we’re satisfied, we can easily merge the changes into production.
Note
Many organizations with multiple people committing changes to the Puppet configuration will benefit from a code review process. Information about the code review process used by the Puppet development community is available at:http://projects.puppetlabs.com/projects/puppet/wiki/Development_Development_Lifecycle.
In
Chapter 2
, we initialized the/etc/puppet/modulesdirectory as a Git repository. Once a Git repository exists, it may be cloned one or more times. Once there are multiple clones, changes to any of the repositories may be fetched and merged into any other repository.
Let’s create a clone of the/etc/puppet/modulesGit repository for thedevelopmentandtestingenvironments now.
First, you need to create the directory structure necessary to contain the new module search path:
$ cd /etc/puppet
$ mkdir –p environments/{development,testing}
Next, clone the original module repository you created in
Chapter 2
into your development environment:
$ cd /etc/puppet/environments/development
$ git clone ../../modules
Initialized empty Git repository in /etc/puppet/environments/development/modules/.git/
This command makes a new copy of the Git repository, called a “clone,” and automatically sets up a reference to the repository we cloned from. This reference, named “origin,” refers to the original repository this repository was cloned from. The origin is actually the repository in the production Puppet environment, so you can add another name to be clear when you fetch updates:
$ cd /etc/puppet/environments/development/modules
$ git remote add production /etc/puppet/modules
$ git remote –v
production      /etc/puppet/modules (fetch)
production      /etc/puppet/modules (push)
As you can see, we’ve added a remote reference to the production environment module repository in the development environment’s module repository. This remote reference allows Git to fetch changes.