SAS Urban Survival Handbook (30 page)
Read SAS Urban Survival Handbook Online
Authors: John Wiseman
Tags: #Health & Fitness, #Reference, #Survival, #Fiction, #Safety, #Self-Help, #Personal & Practical Guides, #General, #Survival Skills

- ◑ DON’T even start to use the tool if you are tired, drunk or feeling ill.
- ◑ If you’re working outside, check it is not raining or likely to rain while you are working. DON’T work standing on wet or damp ground. Wear rubber-soled boots. The risk of ELECTROCUTION is always present.
- ◑ Make sure you are protected by an RCD/RCB/ELCB (see SAFETY FIRST:
Electrocution
). - ◑ Check that the drill bit/saw blade/attachment is firmly fixed.
- ◑ Consider whether you are using the correct tool for the job.
- ◑ If the appliance has a chuck key, remove it before switching on—likewise, spanners and Allen keys!
- ◑ Clear the area where you intend to work. Prepare a solid surface to work on. Clamp the work if possible.
- ◑ Don’t wear jewellery, loose clothing—gloves should fit and be kept away from anything which might entangle them. Tie long hair back out of the way.
- ◑ Get ready the correct forms of protection: safety glasses, a face mask or respirator, ear protectors (at least).
- ◑ Clear children and pets out of the work area.
- ◑ Check that the flex, plug and extension lead are in good condition. Fully unwind extension leads. Don’t carry the tool by the flex.
- ◑ Make sure (if drilling into a wall, for example) that there are no concealed electrical cables or water or gas pipes.
- ◑ If a tool has a fitment for dust/debris extraction, fit it—or use the connector to attach a vacuum cleaner. Use only a cylinder or drum vacuum cleaner—pointing the ‘exhaust’ out of the work area, preferably outside. Small dangerous particles travel straight through domestic vacuum cleaners (see
Wood dust
). - ◑ If the tool has a guard, make sure it is attached.
- ◑ Ensure the area is WELL VENTILATED.
- ◑ Make sure the power tool is switched off (or locked off—if that option is available) BEFORE plugging in and switching on at the socket.

WARNING
Lock-on buttons on power tools are good for allowing you to ease your grip slightly—BUT ... if you do have an accident, the tool will carry on working and could do a lot of damage. If you’re too tired to hold the on/off trigger down, perhaps you’re too tired to be using the tool!
While you work
- ◑ DON’T block the ventilation holes on the tool.
- ◑ DON’T force the tool, let it dictate the pace of working.
- ◑ DON’T use the tool for jobs it was not intended to do.
- ◑ Keep an eye on where the flex is at all times. It should NOT be anywhere near the cutting/drilling/sanding site.
- ◑ Keep fingers away from the site—even gloves may become entangled, causing you to lose control of the tool.
- ◑ If you need to replace the bit/blade/attachment—SWITCH OFF and unplug the tool first.
- ◑ Make sure nothing around you can fall—vibrations can cause such an accident. Noise may prevent you from hearing what is happening.
- ◑ Never work over your head.
- ◑ Never work with the flex stretched tight. Use an extension cable (fully unwound) or move nearer the socket.
- ◑ Don’t do anything which feels very awkward.
- ◑ Don’t operate leaning at an angle on a ladder—or balancing on chairs, stools or trestles.
- ◑ Keep the area well ventilated to let dust out.
- ◑ Don’t work in your shadow!
- ◑ Keep your fingers away from the ‘lock-on’ button. On most tools these buttons are a very BAD idea.
- ◑ DON’T move about holding the tool while it is switched on.
- ◑ CONCENTRATE!
When you’ve finished
- ◑ Remove dusty goggles so that you can see what you’re doing—but not your mask.
- ◑ Switch off the tool and lay it down carefully when all moving parts come to rest.
- ◑ Go to the socket, switch off and unplug flex.
- ◑ Coil extension cables safely.
- ◑ Remove the bit/blade.
- ◑ Brush the tool over to remove dust and debris (keeping your mask on).
- ◑ Damp down any dust/shavings before sweeping up. A vacuum cleaner will recirculate dangerous particles—even wood dust should not be breathed in (see Wood dust).
- ◑ When the air is clear remove your mask.
- ◑ Store tool in a safe place away from children.
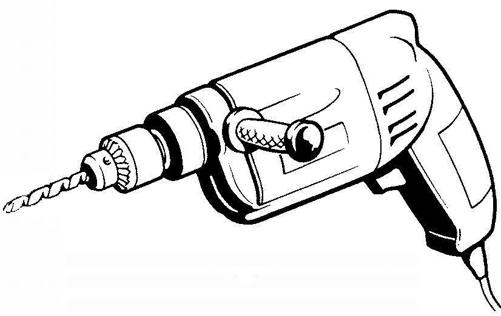
POWER DRILLS
Drills are the most popular power tools. Most accidents occur when a drill bit slips or snaps, or when a bit is too blunt and requires heavier pressure to make it do the job. Accidents also occur when the bit ‘breaks through’ the material being drilled. ALWAYS switch off the drill when changing bits.
There are many attachments for drills, but these are not recommended—especially circular saw and lathe attachments (these may cause overheating, or damage the chuck bearings). It is advisable to buy specific power tools for specific jobs. Drills work best as DRILLS.
When drilling wood, avoid using too much pressure and ALWAYS prepare for the moment the drill breaks through the other side of the workpiece. A cleaner exit hole—and a way of avoiding the ‘surprise’—is to have a piece of waste wood under the drilling site. You should still feel when you have broken through to the other side.
Always anchor the workpiece—use clamps if possible—or use a drill stand, which gives you a lot more control.
When drilling metal, use toughened steel (high-speed steel/ tungsten) bits. Work at slower speeds, despite the ‘high-speed’ label on the bits. Always drill a pilot hole. Keep the bit oiled. Wear eye protection and avoid the sharp hot swarf.
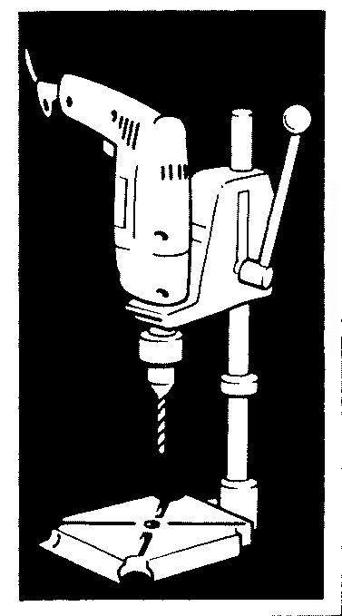
Choose a drill with a sturdy steadying handle and variable speeds. For finer control of vertical drilling, and safety, always use a drill stand.
The only exception to the ‘no-attachments-on-drills’ rule-rotary and drum sanders (safer still with a variable speed drill). For fine work, there’s no substitute for hand finishing (unfortunately).
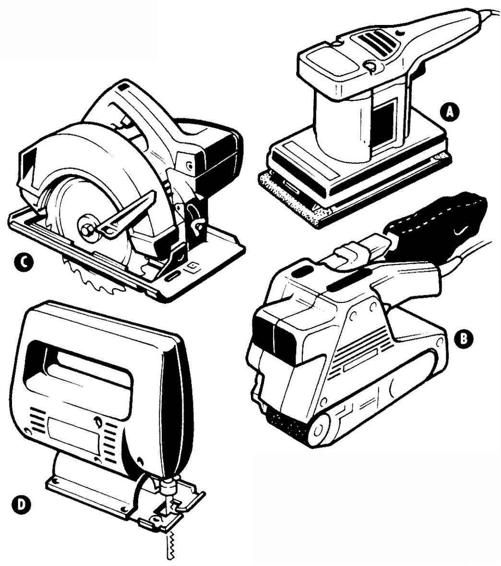
Orbital (A) and belt (B) sanders generate a LOT of dust-ALWAYS wear a mask and goggles. Circular saws (C) and jigsaws (D) demand concentration, especially at high speeds. ALWAYS switch off when changing blades.
Breaking through may be sudden and tear the metal. Always clamp a block of wood underneath the drill site to absorb the impact, or make a ‘sandwich’ of wood either side of the metal you wish to drill.
If drilling small pieces of metal, they MUST be anchored firmly—clamped or in a vice. Follow advice above to avoid the metal seizing the bit and spinning round, possibly causing a severe injury to your hands.
You will need a full range of drill bits. There are types for—at least—wood, metal, glass and tiles. DON’T believe that one set will do all jobs—it won’t.
Choosing a drill
- ◑ Look for a drill with more than one speed. At slower speeds, the drill has more turning power (torque)—at higher speeds it produces cleaner holes in wood.
- ◑ ‘Hammer action’ is a useful option. You need it for drilling masonry, but read the instructions carefully and be sure to wear eye protection.
- ◑ ‘Reverse action’ can be a useful feature, especially at slow speeds for ‘unscrewing’.
- ◑ Hold the drill, feel its weight and balance. If other or additional handle options are available, try those too. At least one extra steadying handle is a good idea.
- ◑ Lock-on buttons may NOT be a good idea, especially if placed where they could be activated by accident. Lock-OFF buttons are a better idea.
SANDERS
The ONLY attachments recommended for power drills would be the simplest sanders. These are very useful when conventional sanders are too bulky to do a job safely. But they are only as good as the drill they are attached to. A variable-speed drill would make them safer.
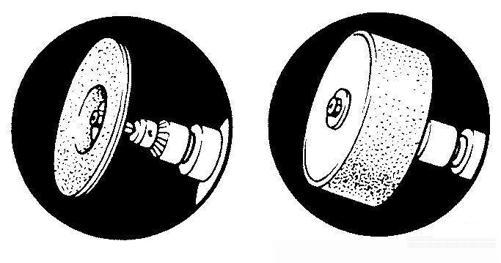
Rotary sanders
consist of a circular rubber plate, to which you attach sandpaper discs, with a central shaft which is gripped by the drill chuck. Avoid options with a metal backing plate which is almost as big as the rubber disc. These could be more dangerous. Rotary sanding discs should not be used flat—they would be impossible to control—nor at too steep an angle, when they might ‘run away with you’.
Drum sanders
are similar and should be used with equal care. In this case, a small plastic ‘drum’ has a strip of sandpaper wrapped round it.
Sanding tools generate a LOT of dust and debris, including grit particles from the sandpaper. You MUST wear eye and breathing protection (at least)—wood dust is a long-term health hazard (see Wood dust). There is also a fire/explosion risk from dust in the air. Ventilate the work area—preferably have dust/debris collectors fitted directly to the tool—and an extractor fan.
DON’T use sanders with wet waterproof sandpapers unless specifically recommended by the manufacturer.
Belt sanders
There are numerous sizes available. Try the weight and see if you think you could manage to work with it. The belt will move at very high speed, possibly taking you with it—or swerving off into a cable or YOU. You will need both hands to operate it. Don’t exert a lot of downward pressure. The weight of the tool and the grade of sandpaper should do the work. Only buy a large belt sander if you intend to use it professionally—these are better hired (large ones are called ‘floor sanders’).