Sew Fast Sew Easy: All You Need to Know When You Start to Sew (13 page)
Read Sew Fast Sew Easy: All You Need to Know When You Start to Sew Online
Authors: Elissa K. Meyrich

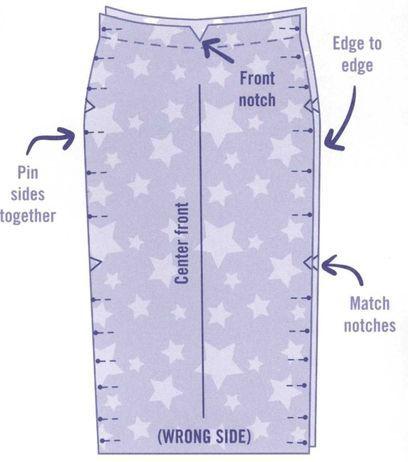
Step 5: Pin front to back at side seams
Pin the side seams together so that the side seams are
edge to edge and meeting
at the notches that you clipped. (Don’t worry if the front is bigger than the back. It is supposed to be that way.)
Step 6: Sew side seams
Make sure to start sewing from the very top of the seams and sew straight to the bottom of the skirt, using your magnetic seam guide to help you sew a straight
5/8
-inch seam allowance. The stitch length on your sewing machine should be set at the largest stitch. You are now sewing a “machine baste stitch.” This is a temporary stitch. After you have custom-fitted your skirt (next chapter), adjust your stitch length back to a normal stitch length of 2.5.
Step 7: Sewing the seams
Sew together all three seams (center back and two side seams) of the skirt along the
5/8
-inch seam allowance. Keep your eye on the seam guide to help guide you in sewing a straight line along the seams. SEW SLOOOOWLY! USE THE FOOT CONTROL ON YOUR SEWING MACHINE! (
Suggestion
: To get used to the machine, practice sewing on a piece of scrap fabric before you start sewing your skirt.)
Now you can try on your skirt by tying the elastic around your waist. You are ready to learn how to custom fit your skirt.

Finishing Up Your Skirt
GETTING THE CORRECT FIT, PUTTING IN THE ELASTIC, PRESSING, AND HEMMING
There are four steps to follow.
Step 1: Putting your skirt on so it is hanging on you the correct way
Step 2: Pinning your taper line on one side of your skirt
Step 3: Taking your skirt off and marking the pins that are your new taper line. Create your new taper line and trace it with a tracing wheel and tracing paper over to the other side of the skirt.
Step 4: Sewing up your skirt on the new taper line. Then check to see if the skirt fits the way you want before trimming away any of the excess fabric. All done!
Step 1: Putting your skirt on properly to check fit
In order to get anything to fit you properly you have to remove the clothes you’re wearing and put on the item you have just sewn. Since the elastic is not in your skirt (yet), you are going to have to pin the elastic around your waist. Make sure the elastic fits comfortably. It should not be too loose or too tight. Then mark the location of the pin with tailor’s chalk on the back and front of the elastic. When you pin the elastic on to your waistline, check to make sure it’s not twisted.
Now make sure you have your skirt on properly. Check to see that the center front of the skirt is hanging from the center front of your body. Check to see that the center back is hanging directly on the center back of your body. Check to see that the side seams are on the sides of your body.

Step 2: Creating a new taper line
Now it is time to look in the mirror and see how much you want to taper your skirt. Fit is a philosophy. What is too loose for one person is too tight for another. Remember that the more you taper the skirt, the more it becomes necessary to have the center back slit so that you can walk and step into a car or up onto a bus. Tapering is always flattering, even to a very curvaceous figure. There is nothing more unflattering than a dumpy-looking skirt.
After you have checked to see if you adjusted your skirt to hang properly, take a look in the mirror. Now take pins and with your fingers pinch in any excess fabric at your fullest hip. Turn sideways and look at the mirror. Make sure you are not pulling the skirt too tight over your hips and behind area. If you want a tight look, then adjust the pins at your hips for an even tighter fit.
Now face the mirror and look at the side seams of your skirt. Suddenly you will see an outline of your leg showing through the skirt. (In this next fitting technique, you will only pin your taper line on ONE side of your skirt.) Create your taper by following your leg.
Remember
: Don’t pin so close to your leg that you will not be able to walk. Pin the taper line down the side seam of your skirt starting from the fullest hip where you put your first pin.

Once you have pinned your taper line, it is time to check the waist to see how much, if any, excess fabric you can take in and still pull your skirt down over your hips.
Unpin the elastic and using both hands at your side seams, pinch the sides of your skirt at the waistline and start to pull the skirt down over your hips. Can you pull it down too easily? Can you take off some fabric? Put a pin to mark that point.
Step 3: Marking your new taper line
Now that you have stepped out of your skirt, it’s time to lay it on a table and mark with chalk where your pins are.
Turn your skirt inside out to the wrong side. Take your tailor’s chalk and carefully rub a mark where the pins are in your skirt. Now you can remove the pins. The marks of the pin form your new taper line. Be careful to connect the chalk marks so they form a smooth new sewing line.
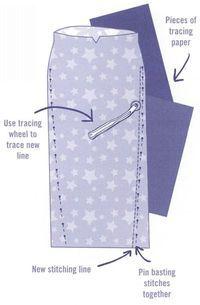
With your tracing paper and tracing wheel, trace the chalk marked line to the other side of your skirt. This method makes your new taper line (or anything else you may alter using this method) balanced and even on both sides. Start by folding the skirt in half with the two side seams of the skirt right on top of each other. Make sure the side seam that you ruled your new taper line is on top facing you. To be exact and prevent the seams from moving, pin the sewing lines of the two side seams together. Then slip a piece of tracing paper directly underneath all the pinned side seams.
Take your tracing wheel and roll it along the new taper line. Apply pressure to the tracing wheel so it marks the new taper line on the opposite side of your skirt. Unpin the skirt side seams. You should have the new taper line marked out.
Step 4: Sewing your new taper line
It’s time to sew along these new taper lines. Remember, you don’t need your seam guide since you are going to sew along the new taper lines you marked. (After you have sewn on your new taper lines always check to see if you like the new fit. Only then can you cut away the excess fabric.)
With your ruler follow along the new seam line you just sewed and mark a new seam allowance of Dinch. Trim the excess fabric away. You don’t want any bulk along your seams.
Finishing Off the Seams of Your Skirt
Set your sewing machine to a zigzag stitch or an overcast stitch. Using a piece of scrap fabric, test the zigzag stitch width to see if you like the stitch closer together or wider apart. Some fabrics, such as chiffon or linen, will fray less with a closer zigzag; on others, such as wool or denim, a wider stitch works better. When sewing the zigzag stitch over the raw edges make sure to zig onto the fabric and zag over the raw edge so that the threads on the sewing machine actually cover the raw edge of the fabric. Do this on all your raw seams so they don’t fray away.

Putting the Elastic into Your Skirt
Fold back the top of your skirt at the fold line printed on your pattern. Your fold width is actually 2 inches wide. Press this 2 inches down toward the inside of your skirt so that it really forms a crease. You are now preparing the
casing
, which is what your elastic is going to be sewn into.