Sew Fast Sew Easy: All You Need to Know When You Start to Sew (14 page)
Read Sew Fast Sew Easy: All You Need to Know When You Start to Sew Online
Authors: Elissa K. Meyrich

PRESS YOUR CASING

Make sure to sew your elastic together
(to form a circle). Overlap the elastic, matching the chalk marks you made in your fitting. Sew across the elastic at least three times. This will make the elastic secure so it won’t come apart. To sew in the elastic you must change your all-purpose foot to a zipper foot. A zipper foot helps you to get closer to the side of the elastic while sewing it in the casing.
Take the elastic and slip it around the pressed casing at the top of the skirt. Naturally the elastic will be smaller than the skirt. Make sure the elastic is placed inside the pressed casing close against the creased edge.
Start at a side seam of the skirt and insert the casing with the elastic into your sewing machine. Place the zipper foot along side the bottom edge of the elastic and begin to sew the elastic into the casing.
USING THE ZIPPER
FOOT OF YOUR
MACHINE, SEW THE
ELASTIC INTO THE
CASING OF THE SKIRT

As you sew along the elastic you will notice there is more skirt fabric than elastic. Keep sewing until you notice you have too much skirt fabric and not enough elastic. Then turn the sewing machine hand wheel so that the needle is fixed into the skirt. Pick up the presser foot lifter. Using your hands, hold the skirt casing and pull the elastic out toward you. You will see the skirt casing start to gather up behind the zipper foot but you will have enough elastic to continue to sew the casing until you have gone full circle around the skirt. After you’ve completed this, cut the loose threads and with both hands stretch the elastic to its fullest. This will even out the gathers all around the elastic waist. Now you are ready for the pressing and hem.
Believe it or not the key to making your sewing projects look great is doing a careful job of pressing all your sewn seams flat. If you take the time to do this properly, your project will look very professional. It’s best to press the seams you’ve already sewn before hemming your skirt.
TOOLS
A steam iron
. A good iron that has a lot of steam and is not light in weight is the best. Fill the iron with ½ cup water and turn the indicator to steam. After a few seconds check to see if the iron is creating steam. Most irons will spit out water when they are just turned on or off, so be careful to not let it spit water on your fabric. Always iron a scrap piece of the fabric you are going to press first to make sure that you have the right heat setting so you will avoid damaging your fabric or burning a hole in it.
A manila file folder
. Cut it into a strip 2 inches by 10 inches. This strip of hard paper works well to make your seams lay flat. Just insert the 2-by-10-inch strip of file folder paper in between your seam allowance and the body of your garment. The paper also aids in protecting the body of your skirt from getting an imprint of the seam allowance.
THE PRESSING STEPS
Turn your skirt to the wrong side. Always start to press out your seams flat on the ironing board. Do not lay your skirt on the double on top of the ironing board. Pull it onto the ironing board so you can press one seam at a time. Now gently go over each seam until it lays crisp and flat.
PUCKERS ON YOUR SEAMS
Sometimes the seams you sew on your garment will pucker. There are many reasons why this happens—a dull needle, improper tension on your sewing machine, or you might be pulling your fabric as you sew. These puckers can easily be pressed out by first laying the seams on the double one on top of the other. Steam press the seams flat to smooth out the puckers, then press the seams flat open.
A GOOD STEAMING TECHNIQUE TO USE ON CORRECTIONS OR ALTERATIONS
If you have to rip out a seam, pick it open with your seam ripper and steam those seams flat on the ironing board. Avoid stretching the picked-open seams. By carefully pressing the seams flat you will shrink the ripped-open seams back into place and make it easier to sew those seams together again.
When you look at the clothes in your closet you will notice that the
hem
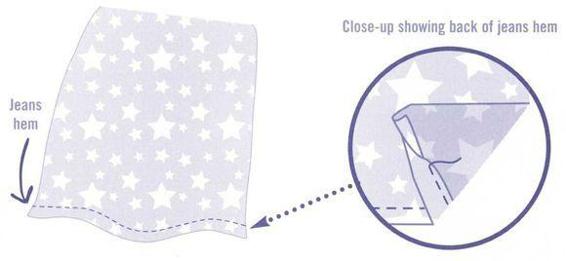
on each garment in sewn in a different way. For instance, a denim skirt usually just has a turned-up hem with a lockstitch on it. Skirts that are made out of knit fabrics sometimes have two stitches running parallel to each other. The type of hem you use will depend on your fabric.
MARKING YOUR HEMLINE
Even though you may be home alone you will be able to mark a hemline on most styles of skirts and pants. The ones you will need assistance on are the bias skirt and the circle skirt.
Step 1:
Put your skirt on and adjust it so it is sitting on your body properly, the side seams on the sides of your body and the center back of your skirt resting on the center back of your body.
Step 2:
Stand in front of the mirror with a few pins in your hand. Just bend up the amount of hem that you think will look right and pin it up. All you need is two pins to hold your hem in place. Now have a look in the mirror to see if you like the length. Once you have decided on the proper length make sure to keep the pins in and take the skirt off. Lay the skirt down on a table, taking care that it lays smooth and flat.
Step 3:
Using a tape measure, start from the top of the waistline and measure down to the bottom of the hem that you marked with pins. Using the measurement you took, move along the front of the skirt and pin up the hemline.

Now you can bend under the hem on the wrong side of your skirt and pin. Turn your skirt on the side, matching side seams, then check to see if the seams are even. Your posture has a lot to do with how a skirt hangs on you. So if you tilt forward or have a more sizable behind, your hemline might pick up higher in the back. You can compensate for this by dropping your hemline by ½ inch in the back.

PRESSING THE HEMLINE
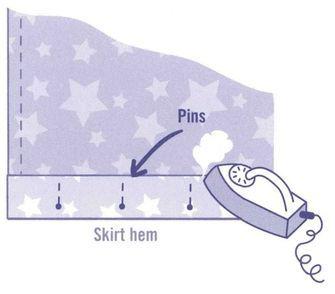
After you have marked your hem and checked to see if it is even, you can press your hemline. Make sure not to press the pins that are holding your hem in place.
PREPARING THE HEM
On the inside of your skirt it is important that your hem be trimmed off to an even length. A standard hem should be approximately 2½ inches wide. Sometimes you might not have enough left over; if this happens, then even it off to the width of fabric that you have left.
At this point you should decide what kind of hem to use on your skirt. On a dressmaker hem, which is 2½ inches wide, you will want to sew on
hem tape
. On a sportswear hem you can leave 1¼ inches. On sheer fabrics you can zigzag the edge of your hem or use a
rolled hem
finish on your overlock machine. In this case, you will need no extra seam allowance. This is also true if you do a
baby hem
with a rolled hem foot. Cut the hem where you marked your hemline.
It is very easy and fun to use a zigzag stitch on your sewing machine, but first experiment on a piece of scrap fabric from your skirt to get the right zigzag stitch width and length. On your sewing machine, set your stitch pattern to zigzag. Then adjust the stitch down to a small length. Test your stitch before sewing it on the bottom edge of your skirt. It is important to make sure you zig in the skirt and zag over the raw edge of the hem. It will make a dainty finish and look especially nice on silk or chiffon.
Another hemming option is to sew a baby hem. There are two ways to do this. The first way is to leave approximately % inch for the hem. Carefully press and fold the hem by turning the raw edge up and then turn under so that the raw edge is hidden. The hem should be pressed toward the wrong side of the skirt. Keep turning and pressing the hem, making it very small, no larger than ¼ inch. Do this with an iron on the ironing board. Sew the pressed hem using a normal size straight stitch on your sewing machine. The second way is to use a baby hem foot on your sewing machine. This technique takes some practice in using the foot to turn your baby hem.
For a “jeans hem,” leave 1-inch for your hem. Carefully press up and under your hem so the raw edge doesn’t show. It should end up being approximately ½ inch when pressed. Press the hem toward the wrong side of your skirt. This hem is prepared and sewn just like the baby hem but will finish ½ inch wide.