Sew Fast Sew Easy: All You Need to Know When You Start to Sew (6 page)
Read Sew Fast Sew Easy: All You Need to Know When You Start to Sew Online
Authors: Elissa K. Meyrich

BOOK: Sew Fast Sew Easy: All You Need to Know When You Start to Sew
10.79Mb size Format: txt, pdf, ePub
5.
Have a clutch. Some machines automatically disengage the bobbin winder. On other machines, you have to disengage the clutch by turning the stop-motion knob. This apparatus stops the sewing machine needle from moving up and down while winding a bobbin.
6.
Have a dial for stitch length in order to make the stitch longer or shorter. Better models also have a dial for stitch width so that you can make the stitch wider or narrower. Think of stitch width as zigzag stitches spreading out or bunching tightly together.
7.
Have a dial to click or turn to each stitch pattern.
8.
Have
feed dogs.
They pull the fabric through the machine while it is sewing. You do not have to pull the fabric; the machine will do this for you.
9.
Have a free arm. The machines that were made after the 1950s have an accessory tray that can be removed. When you remove it, it makes the machine a free arm. Its purpose is to allow you to sew small areas that are hard to get to, like cuffs on a shirt.
10.
Have a shank bar. The shank bar is where the shank adapter screws on in order to attach sewing feet. Most machines made today are low shank. But older models can be high shank. It is important to know whether your machine is high or low shank so that you can always buy additional sewing feet that will fit your machine.
11.
Have sewing feet. Most machines come with an all-purpose foot already on the shank bar; however, there are many feet that you can buy to help you to sew different finishes or use as sewing guides. For example, a Teflon foot will help you sew leather and plastic. Remember it’s your hands and sewing feet that will help you to sew any project easier and better.
Be extra careful to thread your machine properly. Otherwise, it will not sew.
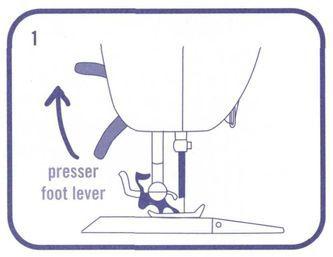
1.
Raise foot with presser foot lever.
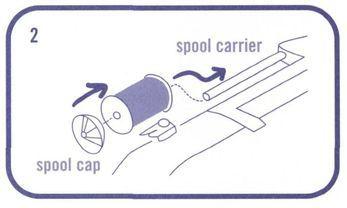
2.
The spool carrier holds the thread for you. A spool cap keeps your thread from falling off. Place spool on the spool carrier and grab end of thread.
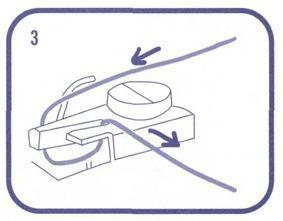
3.
Pull your thread across the machine, around bobbin thread guide (may be different than the one pictured here), and continue to thread the machine. Follow the threading instructions.
4.
Make sure to pull the thread through the tension discs. (On older machines made in the 1950s you can actually see the tension discs, but on today’s new models they are hidden within the machine.) The tension controls the flow of the thread through your machine. For example, if the tension is too loose or your thread isn’t passing through the tension area, it will cause the sewn stitches on whatever you are making to be loose or even loopy. If the tension is too tight it will cause your sewn stitches to pucker.
5.
You must make sure to pass the thread into the take-up lever and then down and around through the thread guides.
STEPS 3, 4, 5
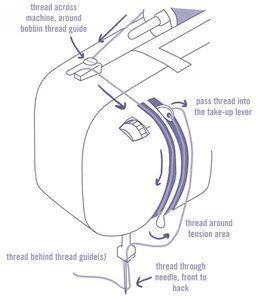
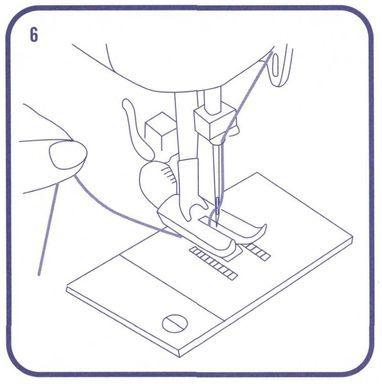
6.
Slide the thread through the thread guide and then thread into the needle eye. Pull your thread towards the back of the machine and make sure it is under the all-purpose foot.
7.
A bobbin is a second source of thread to create the lockstitch. It is necessary to take thread from your spool and wind it onto a bobbin. Machines generally have a one-step or two-step bobbin-winding mode located on the top or side of your machine. Check your sewing machine’s manual for more information on how to wind your bobbin.
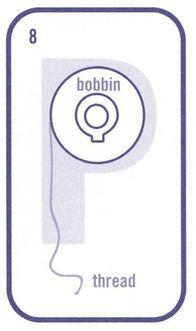
8.
Now that you have wound your bobbin, it’s time to insert your bobbin into its case. Most machines have bobbin cases that are either top-loading or side-loading. Follow your machine’s instruction book. No matter what kind of machine you have, make sure you create a “P” shape with your bobbin thread and then drop it into the bobbin case.
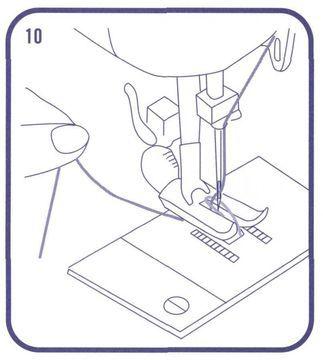
9.
The most important thing to do now is bring the bobbin thread up so that it is coming out of the needle plate. Think of this as fly fishing. Use your left hand to hold the thread coming from the needle. With your right hand turn the handwheel towards you.

10.
As you’re doing that, keep gently tugging (as you would in fly fishing) the thread in your left hand until the bobbin thread has come up from under the needle plate in a loop shape. It will be looped around the top thread you’re holding with your left hand.
Other books
The Stars Shine Down by Sidney Sheldon
Orange Blossoms & Mayhem (Fantascapes) by Bancroft, Blair
The Confession by Domenic Stansberry
Hunger of the Wolf by Stephen Marche
His Prairie Princess (Prairie Brides 1) by Morgan, Kit
Cambodian Book of the Dead by Tom Vater
The Morgue and Me by John C. Ford
Nantucket Red (Nantucket Blue) by Leila Howland
The Wrong Goodbye by Chris F. Holm
Parker's Folly by Doug L Hoffman