Sew What! Bags: 18 Pattern-Free Projects You Can Customize to Fit Your Needs (19 page)
Read Sew What! Bags: 18 Pattern-Free Projects You Can Customize to Fit Your Needs Online
Authors: Lexie Barnes

CUT YOUR FABRIC
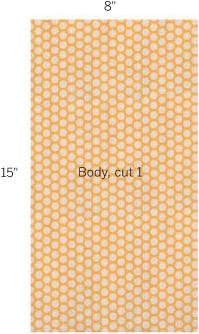
1.
DECIDE YOUR SIZE
. We made our tiny tote pretty tiny — just big enough to hold keys, a cell phone, and some lip gloss. Follow our size, or modify it to hold your own “basics.” For the body of the bag, decide on the width and add an inch for seam allowances; double the height and add 3" for the two folded top edges. For the handles, multiply the desired height of the bag by two, add enough inches for your desired strap length, include a few more inches for seams, and cut two strips of fabric of total length.
2.
CUT YOUR FABRIC
. Mark the pieces for the body and the straps on the wrong side of the fabrics. Cut one piece of fabric for the body of the bag and two strips of fabric of total length.
MIX IT UP!
You can make your entire tote from one fabric, or make the body from one fabric and the handle from another. Feel free to play with color, patterns, and textures — and thread color! If you want the colors to blend in, match your thread to the dominant color in your fabric. Or add some flair by letting the thread pop out a bit. Use a light or contrasting colored thread and see how fun your little tote can be!
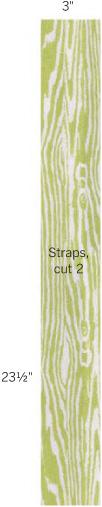
3.
MAKE THE STRAPS
. Stitch the ends together to create one large loop. Fold and press the entire strip down the middle lengthwise, and then open and press under the sides by ½". Close middle fold and edgestitch along both sides (
see page
42
).
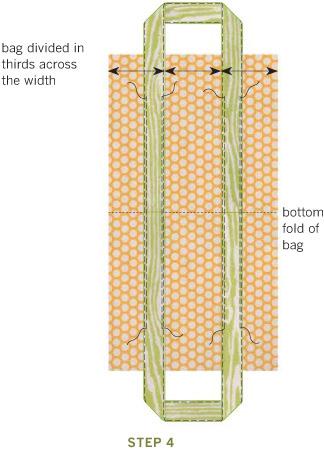
4.
ATTACH THE STRAPS
. Fold your bag fabric lengthwise in thirds, making two light creases for handle placement. With the handle seams at the halfway point on the bag (where the bag bottom will be), pin the handles along the creases. Stitch both sides of the strap to the bag, stopping 2" from the edges and backtacking.
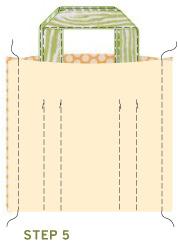
5.
STITCH THE SIDES
. Fold the fabric panel in half with right sides together, lining up the top edges of the bag. Stitch the sides together and trim off excess seam allowance. Finish the raw edges as desired (
see page
39
).
6.
STITCH THE TOP
. With the bag still wrong side out, press under the top raw edge ½". Press the edge under again 1" and edgestitch the bottom fold.

7.
FINISH THE STRAPS
. Turn bag right side out and finish edgestitching the straps to the top of the bag. Reinforce with a box stitch, if desired. (
See page
43
.)
SKILL LEVEL
pro
Here’s your chance to show your best side — twice! Use contrasting prints or complementary ones. Maybe you’d like a print on one side and a solid fabric on the other. Have fun and try as many combinations as you can think of.
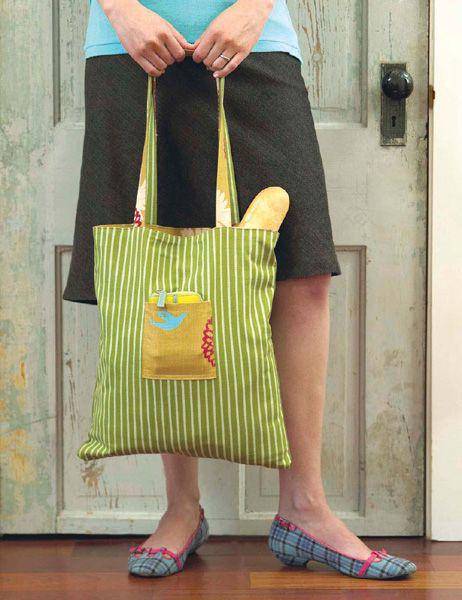
OUR FINISHED SIZE:
14" × 15½", two 26" straps
WHAT YOU’LL NEED
1 yard of fabric A
see page
18
)
WHAT YOU’LL DO