Read Sew What! Bags: 18 Pattern-Free Projects You Can Customize to Fit Your Needs Online
Authors: Lexie Barnes
Sew What! Bags: 18 Pattern-Free Projects You Can Customize to Fit Your Needs (35 page)

1.
DECIDE YOUR SIZE
. You can go by our dimensions, or make a roll to fit your own needs. (You might want to make ours first, to get a feel for how it goes together.)
To figure out your own size, lay out your tools on the right side of the exterior fabric to see how big your roll should be and how many pockets you’ll need. Be sure to allow for ease (room to get your tools in and out of the pockets). When you’re sure of the size of the roll, draw the shape and mark the divider lines for the pockets on the right side with dressmaker’s chalk, disappearing marker, or pins. (The roll and both pockets will be stitched at the same time, so you only need to mark one piece.) Cut the other pieces to match your prototype. Keep your tools nearby in case you need to tweak the pocket widths before stitching them.
2.
CUT YOUR FABRIC
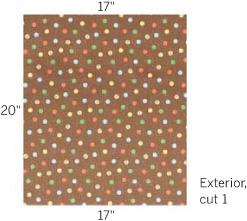
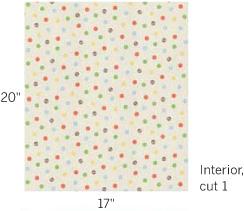
. Draw the pieces on the wrong side of the fabric and cut out the following (any of these pieces can be cut from the same fabric or contrasting fabric).
one interior and one exterior piece
Put It Together
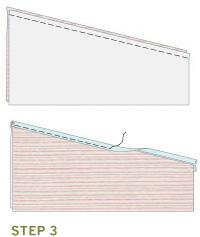
3.
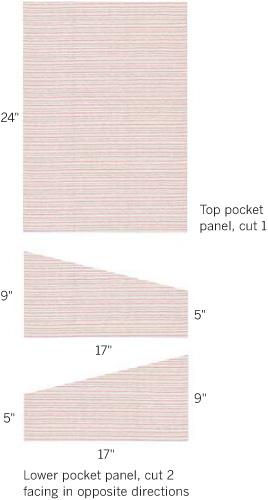
MAKE THE POCKET PANELS
. With right sides together, stitch the lower pocket pieces along the diagonal edge. Press the seam open, then put wrong sides together and press. If adding bias tape, enclose the diagonal edge (with the narrow edge of the tape on top) and edgestitch. For the top pocket, fold the rectangular pocket in half (to make it 12" × 17"), press, and add bias tape to one long side in the same way.
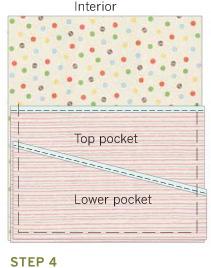
4.
ATTACH THE POCKET PANELS
. On the right side of the interior piece, pin the two pocket panels and baste around the outer edges as shown.
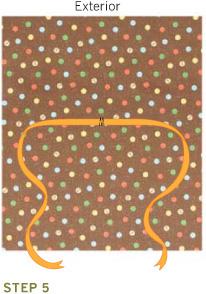
5.
ATTACH THE RIBBON
. On the right side of the exterior piece, position the ribbon in the center as shown, in the direction the fabric will be rolled. Stitch the ribbon in place, backtacking to make sure it’s secure. For a decorative touch, clip a little “V” in the ends of the ribbon.
ø
Figure the length of your ribbon ties by multiplying the width of the folded case by 2, and then adding enough extra to tie a bow. Cut more than you think you’ll need, and trim it to fit. If the roll is heavy when filled, you may want to wrap the ribbon around it twice.
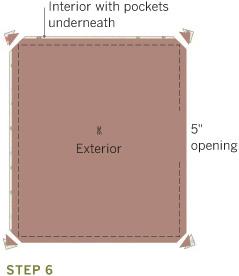
6.
STITCH THE SIDES
. Lay the exterior piece on top of the interior piece with right sides together (the pockets and the ribbon will be facing each other). Tuck the ends of the ribbon between the layers. Stitch the pieces together on all four sides, leaving a 5" opening along one side. Trim the seam allowance to within ¼" of seam, clip the corners, and turn the roll right side out through the opening. Press.
7.
ADD BATTING (OPTIONAL)
. If you want to add batting, now is the time to do it. Cut the batting to fit the size of the stitched roll, making it slightly smaller to fit within the seams. Roll the batting into a tube shape and insert it into the opening. Flatten it out by reaching in and smoothing it out to the corners. Trim to fit if necessary.
