Stitch 'n Bitch: The Knitter's Handbook (29 page)
Read Stitch 'n Bitch: The Knitter's Handbook Online
Authors: Debbie Stoller

Sometimes knitting problems are beyond the remedy of simply saving stitches: A sweater may end up too long or too short, for instance. But even these mistakes can be repaired by an experienced stitch doctor, although the patient may require an overnight stay.
You don’t have to go through years of training to be a stitch doctor. Here, I’ll let you in on some of my secrets and the procedures I practice with greatest success.
The Dreaded Dropped Stitch
Even people who’ve never knit a stitch in their lives are familiar with the concept of “dropping” a stitch. When my mother was a child and was told she had dropped a stitch, she would look around her chair on the floor, expecting to find a small U-shaped piece of yarn—the dropped stitch. But a dropped stitch doesn’t actually fall to the ground, and, regardless of its reputation, it isn’t really such a big deal. A dropped stitch is simply a loop that comes loose—usually by slipping off the tip of your needle as you work—and unravels downward, like a stocking run, one or more rows.
Dropped stitches befall even the most seasoned knitter, but they are much easier to repair when they slip just a row or two down. So, especially when you’re first beginning, keep a close eye on your knitting and count your stitches frequently to make sure that you still have the correct number on your needles.
To pick up a dropped knit stitch that has slipped down only one row, do the following:
1
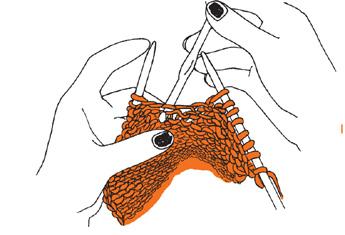
Insert your right needle from front to back into the fallen loop to stop it from unraveling any further.
2
Slip the point of the right needle, from front to back, under the loose strand of yarn that remains above the dropped stitch.
3
With the left needle, lift the dropped stitch over this strand and off the tip of the needle.
4
Transfer the stitch from the right needle back to the left needle by inserting the point of the left needle through it from front to back.
To pick up a dropped purl stitch that has fallen just one row down, you use similar steps:
1
Insert your right needle from back to front into the fallen loop to stop it from unraveling any further.

2
Slip the point of the right needle from back to front under the strand of yarn that remains above the dropped stitch.
3
Then, with the left needle, lift the dropped stitch over this strand and off the tip of the needle.
4
Transfer the stitch from the right needle back to the left needle by inserting the point of the left needle through it from front to back.
Picking Up Several Rows of Dropped Stitches
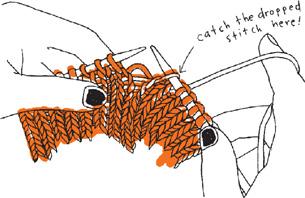
Sometimes a stitch will drop and unravel a number of rows before you notice that it has gone. If this happens, you’ll need the stitch doctor’s equivalent of a scalpel—a crochet hook—to pick that stitch back up. Crochet hooks come in a large variety of sizes, but you really only need two: a small one for finer yarns, and a large one for coarser yarns.
To pick up a knit stitch that was dropped many rows ago:
Knit up to the last stitch before the dropped stitch. Look at your work. You will have a loop a few rows down, and a “ladder”—with rungs corresponding to each dropped stitch—between your stitches.
1
Insert a crochet hook from front to back through the loop.
2
Grab the first ladder rung and pull it through the opening in the loose stitch. Then grab the next ladder rung and pull it through, and so on until you have carried the stitch all the way back up. The rungs will be very tight, especially if the stitch was dropped a ways back, but just go ahead and force them through. Later you can straighten out those stitches and make it look all better.
3
Transfer the loop from the crochet hook onto the left needle.

If you’ve dropped a
purl
stitch, just turn the work around so that the knit side is facing you, and pick up the stitches, using the directions above. Make sure to turn the work the right way around before you start purling again.
Picking Up Knits and Purls
If you’ve dropped a stitch in a fabric that uses both knit and purl—for instance, in garter stitch or seed stitch—picking up the stitch becomes a bit more complicated, and involves removing and reinserting your crochet hook at each ladder rung.
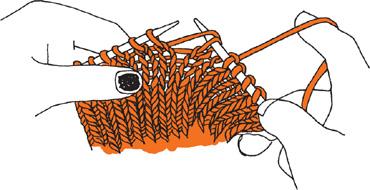
For each
knit
stitch you are picking up, insert the crochet hook into your loop from front to back and pull a ladder rung through to the front. For each
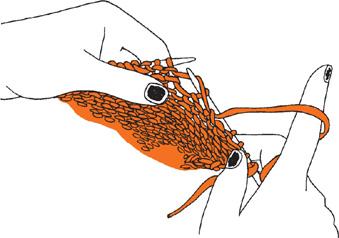
purl
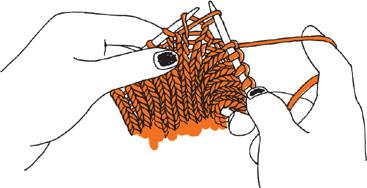
stitch, you must first remove the crochet hook from the loop and reinsert it from back to front
(figure 1)
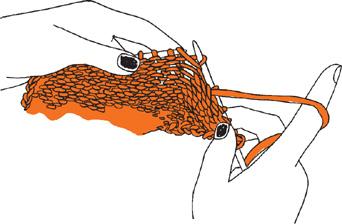
. Then pull the next yarn rung through this loop
(figure 2)
. For your next knit stitch, you’ll have to remove the hook and reinsert it again. It’s annoying, I know, but far less annoying than the alternative—unraveling all your work to the point of the dropped stitch and knitting it all over.