Stitch 'n Bitch: The Knitter's Handbook (25 page)
Read Stitch 'n Bitch: The Knitter's Handbook Online
Authors: Debbie Stoller

1
Duplicate stitch is best done on stockinette. Simply take a length of yarn in a contrasting color, thread it through a yarn needle, and come up from the back to the front of your work through the bottom point of one of your knit Vs. Pull the yarn up and through to the right, leaving a nice 6-inch tail at the back that you can work away later.
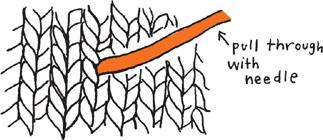
2
Now pass the needle under the bottom two legs of the stitch above the one you are duplicating, from
right to left
. Pull the yarn through, gently.
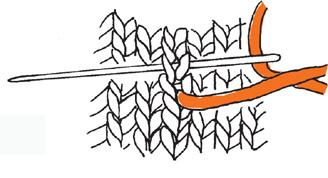
3
Insert the needle back down into the first hole you came up through. Come back up at the base of the next stitch you need to duplicate. Continue to do this with all the stitches you want to color in, pulling the yarn through so that the new stitch just sits on top of the original stitch.
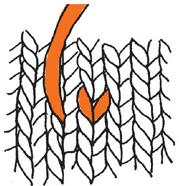
Making Cables
Cables are those twisty, snakelike things you’ve seen on countless sweaters. You may not like the look of them—I didn’t when I started knitting—but they are fun to do and can make a large knit piece more interesting to work on. Cables are pretty and decorative, but they’re also functional: They thicken up fabric by squeezing it together widthwise, thereby making sweaters and hats warmer than they would be if knit in something like plain stockinette.
The trick to making a cable is to knit your stitches in a different order than they appear on the needle. To do that, you need something called a
cable needle
(see
page 22
),
which lets you put some stitches on hold and then come back to them later. But don’t let it scare you; knitting a cable sounds more difficult than it is, and the results can be pretty thrilling. Plus, you only have to do the fancy cable-twisty thing every six rows or so—all the other rows are knit the regular old way.
So let’s lay down some cable already. Here are instructions for making what’s called a 6 × 6 front-crossed cable.
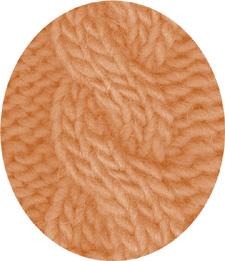
Hooked up to cable
Begin by casting on 18 stitches. On row 1, purl 6 stitches, knit 6 stitches, purl 6 stitches (p6, k6, p6). On row 2, knit the knits and purl the purls (k6, p6, k6).
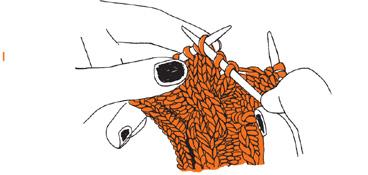
Row 3 is where the magic happens. Purl 6 stitches. Then, slip the first 3 knit stitches purlwise onto a cable needle
(figure 1)
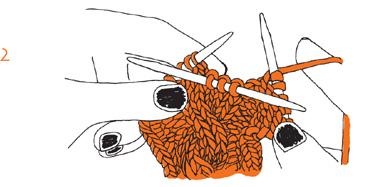
. For a front-crossed cable such as this one, let the cable needle with the stitches dangle to the front of your work
(figure 2)
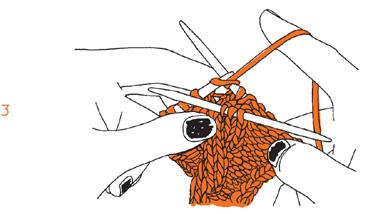
. Knit the next stitch on the needle, pull the yarn tight, and knit the next 2 stitches
(figure 3)
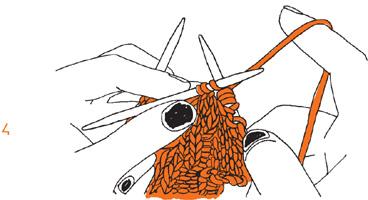
. Now knit the first stitch off the cable needle
(figure 4)
. (You may have to tug and stretch to get to those stitches, but don’t worry—it comes with the territory for cables), pull the yarn tight, and knit the last 2 stitches. Put your cable needle aside, and purl the last 6 stitches.
For rows 4–6, just knit the knits and purl the purls. Then start over again with row 1, and at row 3, do your cable twist again.
Sometimes when you’re knitting a cable, it’s difficult to tell when it’s time to do the twist. You should keep track of the rows, but, in general, if it looks like it’s time to twist, it probably isn’t yet. When it looks like you’ve forgotten to twist, it’s actually the right time to make the twist.
Cables can also be made to twist in the opposite direction; just hang your cable needle
to the back
of your work while you knit the next few stitches in the row, then knit the stitches from the cable needle.
Other configurations of cables can be 6 stitches that are twisted every 8 rows, or 4 stitches twisted every 4 rows, and so on.
Advanced Color Knitting
You see them every winter: Women of a certain age sporting cheery hand-knit cardigans with snowflakes circling the collar, or bright green sweaters with a giant, smiling reindeer on the back. Well, the next time you see one of these ladies, you should rush right up and and congratulate her, or at least give her a high five, because knitting designs into a sweater like that is damn hard work. It requires patience, skill, and lots of practice to work with so many different colors and keep a sweater from turning into a big, lumpy mess as you do so. I’m now going to introduce you to the two methods you’ll need to make similarly fancy knit projects. And if your taste doesn’t run to snowflakes and reindeer, you’ll want to learn these techniques so that you can knit yourself, say, a Hello Kitty hat or a sweater with a tribal tattoo design around the sleeves.
Intarsia
is an ugly name for the pretty method you’ll use when you want to knit a heart in the center of your bikini bottom or create a large picture on a sweater or backpack. Sometimes it is called “picture knitting,” which isn’t really any nicer and sounds cornier. But whatever you call it, intarsia can be trickier than it seems.
The effect you want with intarsia is to have your knitting look as if your yarn magically changed color from one stitch to the next. What you’re really doing is introducing a new piece of yarn for every patch of color you’re knitting, and you constantly have to twist the old yarn and the new yarn together at the back of your work to link the stitches together. Otherwise you’ll wind up with disastrous holes between the old and new stitches. (Imagine a chain-link fence where the chains aren’t linked!) This technique is pretty straightforward when making simple shapes, like a circle inside a large square, or straight blocks of color. But try making something fancier—like a strawberry with green pointy leaves on a yellow background or a daisy in the center of a field of green—and things quickly get more complicated.
Okay, here’s how it’s done:
To add a second color of yarn in a row:
1
Slide your right needle into the first stitch as if to knit (or purl if that’s what you’re doing), but don’t make the new stitch. Instead, lay the
new
color of yarn across the tip of the needle, leaving about a 6-inch tail hanging to the left and the ball end of the yarn to the right.