Stitch 'n Bitch: The Knitter's Handbook (23 page)
Read Stitch 'n Bitch: The Knitter's Handbook Online
Authors: Debbie Stoller

2
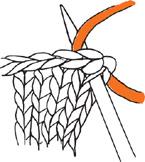
Wrap your yarn around it.
3
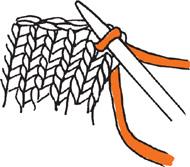
Draw this new loop from the back of the fabric to the front. One stitch picked up. Now, it’s true that you didn’t really “pick up” a stitch; instead, what you did was make a new stitch by pulling a loop of yarn through an old stitch.
T
IP:
Here’s an important thing to remember, which they never tell you in knitting instructions:
When a pattern tells you to “pick up and knit” a stitch, they really just mean “pick up” a stitch
.
Your pattern will tell you how many stitches you need to pick up from a given area, and you’ll want to space them evenly. Just measure the area and figure out how many stitches you’ll need to pick up per inch. If you have to pick up more stitches than you have stitch heads,
just pick up some stitches from the space in between your stitch heads. If you have to pick up fewer, just skip over some of the stitch heads. But whatever you do, try to pick up the stitches
evenly
around the edge.
Again, this is easy. With your work facing you, just stick your right needle between the running bars along the sides of your edges, loop your yarn around the needle, and pull it through. And because stitches are wider than they are tall, you’ll usually have more spaces between bars than stitches you’ll need to pick up. To keep things nice and even, just pick up the number of stitches that your pattern tells you to, skipping a bar here and there as necessary, and you’ll be good to go.
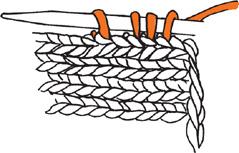
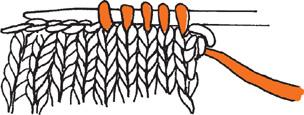
You won’t have to do this very often, but sometimes, as with gloves and mittens, you might have to pick up stitches from the bottom, cast-on edges of the fingers or from the cast-on edge of a sweater, either to lengthen it or to add edging.
To do this, first remember what you learned about how you can still see Vs created by the “arms” of the knit stitches when you turn your fabric upside down (
page 77
). Now, you want to pick up your stitches from the heads of
these
Vs; in other words, pick up the stitches from
in between
the cast-on stitches, and not in the centers of them.
Blocking is the almost alchemical process of taking your completed project, which is beautiful but will most likely have a couple of lumps and bumps, and turning it into a professional-looking, finished piece. Blocking, you should know, only works on fabrics made of natural fibers. Many patterns will tell you to block your knit pieces to size before you sew them together. Pay them no mind; I don’t know a single person who does it this way. Go ahead and sew your pieces together, then block the whole thing after it’s all done.
The following method is the one I like best. You’ll need a couple of clean towels and a place that’s flat, such as a floor, a table, or even your bathtub, and big enough that you can lay your garment out flat on it.
Fill a sink with lukewarm water. Never use hot water, because hot water can really make wool go nutso. Add a bit of mild shampoo or special wool wash to the water, mix it up a bit, then dunk your piece in there. Gently swirl it around in the water just a bit. Remember, agitation is as deadly to wool as garlic is to a vampire. Squeeze the piece to get the suds through it, then let it soak for about five minutes.
Empty the sink and refill it with clean, cool water and rinse your piece. Squeeze all the suds out, refill the sink, and rinse once more. Your piece is now ready to be blocked.
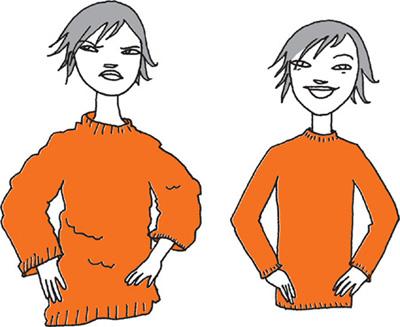
Get out a big thick towel. Lay the piece on it, flat, in the shape you want it to be. Roll up the towel, squeezing it and squeezing out the water at the same time. Toss that soaked towel in the laundry and get out another towel. Lay the towel down flat somewhere (on your kitchen table, for instance) and lay your piece out on top of it. Pull the piece lightly at its opposite corners to “set” the stitches. And now, as if the piece were a rag doll or a big lump of clay, lay it out on the towel in the perfect shape and dimensions you want it to be (you can refer to the diagram—or schematic—included in most patterns to see what the measurements should be). Straighten out the seams, scrunch up the sleeves so they are the right length for you (instead of for an ape), and pull down the body of the sweater so it’s the right length too. Then just leave it be.
You probably won’t believe this, but when you come back to it, about twenty-four hours later, your piece will actually
be
the shape that you blocked it to. It will be perfect, and even, and lovely. Stick a fork in it, baby, because it’s done!
FANCY THINGS TO DO WITH NEEDLES AND YARN
The problem with knitting—once you get good at it—is that it can get boring. And while it’s great to be able to knit large expanses of fabric while watching TV or sitting in a movie theater with nary a glance at your hands, it’s also good to have a couple of tricks up your sleeve to break up the monotony. I, for one, am convinced that this is why knitters of yore invented cables and ways to add colorful patterns to their knitting projects. In this chapter, you’ll learn tricks to spiff up your work. I’ll also show you the few crochet techniques that every knitter should know. Try them, and before you know it, you’ll be a happy hooker.
The easiest way to add a little sumpin’ sumpin’ to your knitted projects is to hang something from them. Fringe, pom-poms, and tassels can look great dangling from the ends of a scarf, the top of a hat, or even at the bottom of a sweater for that Pocahontas look.
1
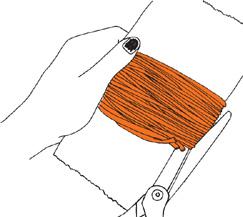
Wrap yarn around a sturdy rectangular thing that’s a bit longer than the length you want your fringe to be, such as a book, a DVD, a pack of cigarettes, or whatever. To make lots of fringe, wrap the yarn a whole bunch of times, then cut it at one end.
2
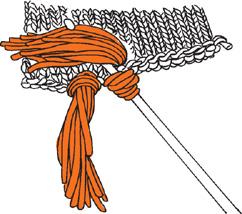
You now have a stack of strands for your fringe. Grab a few strands and fold them in half. This is how thick your fringe will be. Add or take away a few strands until it feels like what you want. Don’t worry about the ends not lining up exactly; you’ll trim them later. Stick a crochet hook
from back to front
through the space in your knitting where you want to add fringe. Hang your folded yarn over the hook and pull it through to the back of the fabric.
3
With a crochet hook or with your fingers, pull the tails of the yarn through the loop. Tighten. Et voilà! Le fringe!
4
Keep hanging fringe until your piece is all fringed up. Then trim the bottoms so they all line up like little toy soldiers.
Tassels are a more mature, slightly fancier version of fringe. Cute and jaunty whether hung from the top of a hat or the corner of an afghan, tassels are also easy to make. And of course, few things are more fun than twirling them!
1
Get a piece of heavy cardboard that is a bit longer than the tassel you want to make. In a pinch, a deck of cards or anything else that’s rectangular and sturdy will do. Then take your yarn and wrap your little heart out.