Stitch 'n Bitch: The Knitter's Handbook (21 page)
Read Stitch 'n Bitch: The Knitter's Handbook Online
Authors: Debbie Stoller

N
OTE:
When sewing garter-stitch fabric, try to grab the overbumps as close to the fabric edge as you can.
Carry on, my wayward son. When you have a few inches done, just pull the yarn taut and watch it get sucked up like a bug in a Venus’s-flytrap. Cool, isn’t it?
Using the Backstitch
Unlike most seaming methods used in knitting, the backstitch makes bulky, nonstretchy seams. Still, sometimes that’s just what you’re looking for when you want a strong, stabilizing seam on a project like a bag or a backpack. To make it, start by pinning your knit fabric right sides together. Tack your yarn at the right-most end as usual, then put your needle down through both layers of fabric, about ¼ inch from the top edges, and draw it back up about ½ inch to the left. Pull the yarn through
(figure 1)
. Put your needle back down about ¼ inch to the right, and come up about ½ inch to the left. Now, just keep putting your needle down where you came up with your last stitch, and up about ½ inch to the left of that
(figure 2)
.


Connecting the Tops of Knit Pieces
I’m going to show you two ways to sew the tops of knit pieces together—like the shoulder seam of a sweater, or the toe of a sock. They are both fun. The first is called
fake grafting,
and it’s the one you will probably find yourself using the most often. It is an almost invisible way of connecting two bound-off pieces of knitting together.
Fake Grafting
Take a look at the top edge of a bound-off piece of stockinette knitting in the photo below. You will see rows and rows of knit Vs looking at you, all nestled close together with their arms in the air. Now, turn the piece of fabric (or this page) upside down, and examine that edge. You
still
see rows of Vs. Upside down or right side up, stockinette looks like Vs. What’s going on?

Upside down or right side up, stockinette looks like Vs
.
Well, think of it this way: How many Vs do you see in a W shape? Two, right? Turn it upside down, and you will see a V shape, but only one, in the middle, with two ski poles hanging by its sides. The same thing happens with your knit Vs when you turn them upside down: You see the Vs that are formed by the sides of your original knit stitches.
Fake grafting takes advantage of this fact. Start by laying the two pieces flat in front of you, face up, with one pointing away from you (we’ll call it the
top
), and one facing toward you (we’ll call it the
bottom
). Their bound-off top edges should be next to each other. Look at the Vs on the bottom piece, the Vs on the top piece, and the gap in between. Now, with your yarn, you’re going to create a row of Vs across this gap, connecting these two pieces together. Here’s how:
1
First, tack a length of yarn to your work by bringing your needle up through the center of the right-most V on the bottom piece, just below the bound-off edge (leave a 6-inch tail). Now come back up through the center of this V again (the yarn can go around the outside edge of the piece).
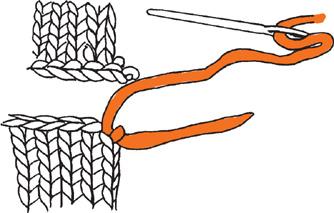
2
Bring your yarn down to the right of the bottom of the right-most V on the top piece, and back up to the left of that V, like you are wrapping a scarf around the neck of that stitch.

3
Insert the needle back down into the center of the same V in the bottom piece of fabric where your yarn originated, and come up in the center of the next V to the left. Repeat across.

4
Now, unlike for the mattress stitch, where you pull the yarn so tight it disappears, here you pull the yarn only as tight as needed to make your stitches approximately the same size as the knit Vs in the fabric.

And don’t you feel like some magical, alchemy-performing wizard right about now?
The Kitchener Stitch
To do “real” grafting—also called the
Kitchener stitch
—you need two sets of stitches that are not bound off—sometimes called
live stitches
. Grafting is often used to close off the toe of a sock, but it can also be used to sew a shoulder seam (if that edge is just a straight row of stitches, and hasn’t been shaped by decreases). You just have to plan ahead, so when your pattern tells you to bind off your pieces, don’t do it. Instead, put them on a stitch holder so you can graft them later. You will want to do this especially for baby stuff, since grafting makes a truly seamless seam, and the fewer bumps on those teeny-tiny garments, the better.
Grafting is simple, but it will require your full concentration. So turn off your music and sit somewhere quiet.
And here’s one more grafting caveat:
Grafting can only be done on two sets of stitches that have the exact same number of stitches in each set
.
Before grafting, transfer your live stitches onto two needles, if they are on stitch holders. Hold your knit pieces with their wrong sides facing each other and the points of both needles and the end of the yarn you were working with to the right. (From here on out, the needle in front will be called the
front
needle, the needle in back, the
back
needle.)
Thread the yarn through a needle. If you haven’t left a long enough tail on either of your knit pieces to sew this seam, simply make a slip knot on the end of a piece of yarn about 12 inches long, slip the old yarn through
it, tighten the knot, and slide it as close to the last stitch as it will go.
1
Slide the yarn needle through the first stitch on the front needle
as if to knit
. Pull the yarn through and drop that stitch off the needle.

2
Pass the yarn needle through the second stitch on the front needle as if to purl. Don’t drop the stitch off the needle.
