Stitch 'n Bitch: The Knitter's Handbook (9 page)
Read Stitch 'n Bitch: The Knitter's Handbook Online
Authors: Debbie Stoller

5
Pull your thumb outta there and tighten the cast-on stitch.
Continue steps 2–5 until you’ve cast on the desired number of stitches, leaving you with several loops of yarn on your needle, each with a cute, snug little butt at the bottom.

T
IP
:
If you find that you cast on stitches too tightly, you can make like the Europeans do, and cast on over two needles held together. When you are done, just pull one of the needles out and there you go—nice loose stitches remain on the other needle!
How to Make a Knit Stitch
Okay, you’ve got stitches on your needle; say amen, somebody. It’s time to try your hand at some real knitting.
There are two basic ways to make the knit stitch: English and Continental. I don’t know why the two methods are called this, because while the Brits may very well knit English style over their tea and crumpets, my Dutch relatives on the other side of the pond are downing cookies and coffee and knitting English style too, thank you very much. Most Americans knit English style, and it’s my preferred method, but most Germans knit Continental. Ja, wool!
The difference in the two methods has to do with whether you hold the ball end of the yarn in your left or right hand. You might try learning the more popular English style first, because it’s always nice to be down with the popular crowd. Later, especially if you’re the trend-setting type, you can come back and try Continental, which is starting to win more and more American fans. Or try both and see which one feels more comfortable to you. Me, I’m a stodgy diehard, and I’ll never switch my stitch, even if they do claim that the Continental method is faster. I just remember my grandma, who never knit a Continental stitch in her life, yet churned out enough socks to cover the feet of a small army.
N
OTE TO LEFTIES
:
Some folks will tell you that lefties should do everything explained here in the reverse, but others simply advise lefties to start with the Continental method, since you hold the yarn in your left hand, and knit right along with righties. That’s what I’d suggest too. It will definitely be easier than trying to learn how to knit while holding this book up to a mirror!
KNITTY DITTIES: RHYMES TO KNIT TO
Rhymes were used to teach little children to knit, but they are really helpful to grown-ups, too, because they can remind you that there are basically four moves to every knit stitch. I’ve modified one of them, and like to use it when I’m teaching knitting:

GO IN YOUR FRONT DOOR
(insert right needle up into the center of the loop on your left needle)
AND GRAB YOUR SCARF
(wrap the yarn counterclockwise around the tip of the right needle)
THEN TAKE IT OUTSIDE
(draw the right needle back out through the loop on the left needle, taking the new loop with it)
BEFORE THE CAT BARFS
(push the old loop off the tip of the left needle)
The English (Right-Hand) Method
1
Take the needle with the stitches on it in your left hand. Hold it the way you would a set of keys when unlocking a door: with your thumb and forefinger resting just behind the first stitch on the needle, and your bottom three fingers supporting the needle. With your right hand, hold the yarn using one of the methods shown on
page 38
, then pick up your second knitting needle. Hold it the same way you do your left needle, but with your pointer finger pointing up in the air. Your thumb should be resting about an inch from the tip, and your other three fingers are holding up the needle. If you are using long (14-inch) needles, you can tuck the end under your arm or in your armpit to hold it up. This is the way that I knit, and although it can result in smelly knitting needles, I like it.
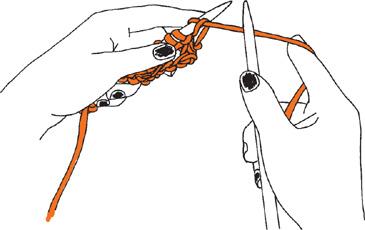
2
Slide the point of the right needle through the first loop on the left needle from front to back (and from left to right) so that the two make an X. The left needle is on the top of the X (closest to you), and the right needle is on the bottom (away from you).

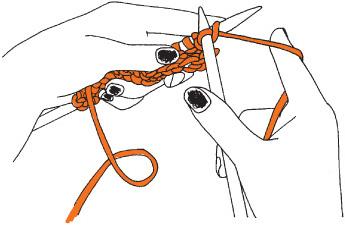
3
If you aren’t holding the needle under your arm, hold the X part of the needles (the point where they cross) with the thumb and forefinger of your left hand. (You should be able to let go of the right needle without it dropping to the ground.) Pick up the ball end of the yarn and wrap it around the tip of the right needle counterclockwise (from back to front). In English-style knitting, this is called “throwing” the yarn, and by doing it, you’ve created a new loop. Yay!

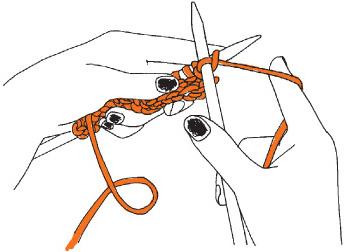
4
Now here’s the tricky part: Take hold of the right needle with your right hand again. Pull the yarn taut (not tight!) with your forefinger. Then, slide the point of your right needle down and back out of the loop the opposite of the way you came in:
from the back to the front
. Make sure you bring the new loop along!
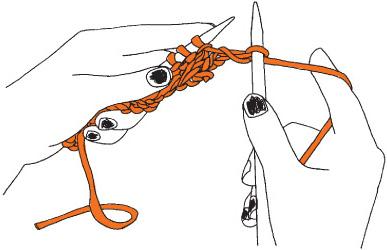
5
Once you’re back out, slide the right needle up again so that the new loop is about 1½ inches from the tip and the needles are in an X shape again.
6
Slide the right needle to the right, thereby pushing the old loop off the tip of the left needle.
Hey, you did it! You made a knit stitch! Sucked, right? Doesn’t seem like it will ever get easier? It will.
