Stitch 'n Bitch: The Knitter's Handbook (19 page)
Read Stitch 'n Bitch: The Knitter's Handbook Online
Authors: Debbie Stoller

2
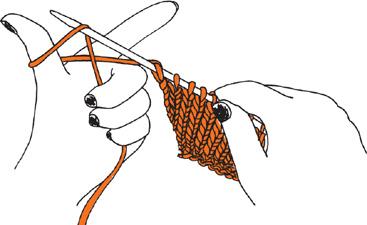
Bring the needle with the stitches on it, (now in your right hand) down and scoop up the yarn strand that runs from your three fingers to the base of your thumb from underneath.
3
Drop that loop off of your thumb. You have created one cast-on stitch. To cast on another stitch, twirl your thumb clockwise to create another loop over your thumb. Scoop up the yarn strand again with the right needle.
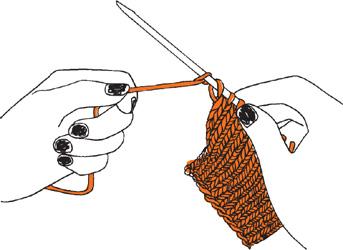
Once you’ve cast on the desired number of stitches, switch the needles around again and begin knitting. The first stitches you’ll knit will be the ones you just cast on. Knitting these stitches will not be easy, so just be patient about getting your needle point into these loops. You may also get some crazy long strands in between these stitches as you start knitting, but don’t let it get you down. Just knit away, trying to keep your stitches as regular as possible, and it will all even itself out.
At the end of a row:
You will already have the needle with all the stitches in your right hand. Just follow the exact same instructions as above.
In the middle of a row:
Knit to the point where you want to cast on stitches, then follow the same instructions as above. When you’ve cast on the desired number of stitches, just keep knitting the stitches off the left needle.
The Cable Cast-on
To add stitches that are firmer and easier to work with, use the cable cast-on method. It’s only a bit harder than the single cast-on you just learned.
At the beginning of a row:
1
Hold the needle with the stitches on it in the normal way, with the left hand. Knit a stitch, but do not drop the old stitch off the left needle.
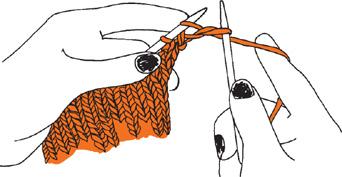
2
Transfer the new stitch to the left-hand needle by inserting the left needle into the front leg of this loop from
right to left
(and from front to back) and pulling it off the right needle. You have cast on a single stitch. (Hint: You’ll have to twist your left needle a bit and come at the front leg from underneath.)
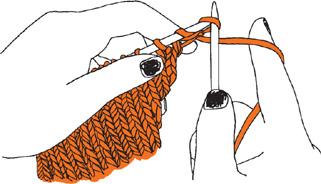
3
To continue casting on, stick your right needle
in between
the first two stitches on the left needle and knit a stitch (wrap the yarn around the needle, and pull it through to the front), but do not drop the old stitch off the left needle. Transfer the new stitch to the left needle in the same manner as you did in Step 2.
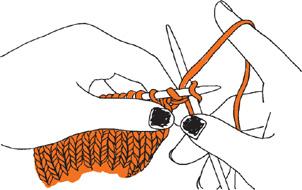
4
When you have finished casting on the desired number of stitches, begin knitting (starting with the new stitches) in the normal manner.
At the end of a row:
Switch the needle with the stitches on it to your left hand, then follow the same directions as above.
In the middle of a row:
First knit to the point where you want to create the additional stitches. Then switch hands, so that the needle with the stitches you have just knit is in your left hand. Follow the directions above to cast on the desired number of new stitches. Then switch hands again and continue knitting.
Once you’ve learned the cable cast-on, you can also use it to cast on the foundation stitches at the beginning of any piece. After making a slip knot, just follow the instructions above for the remaining stitches.
LEARNING TO MAKE A BUTTONHOLE
Now that you know how to add stitches and subtract stitches by casting on and binding off in the middle of rows, you can use this knowledge to do something else: make buttonholes!
It’s easy: Just knit to the point where you need the buttonhole, bind off the number of stitches your pattern tells you to, then continue knitting to the end of the row.
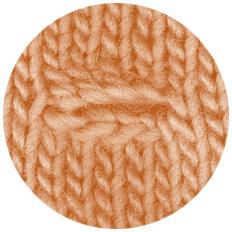
On the next row, knit to the point where you bound off stitches in the previous row. Then switch the needles: Put the right needle in your left hand and vice versa. You can use the cable cast-on method to cast on the same number of stitches you bound off. There’s a little trick here:
Before you transfer the last cast-on stitch to the left needle, bring the yarn to the front of your needles
. Switch your hands back and continue knitting the row. You may notice that the buttonhole looks a little sucky. Don’t worry about it; knit buttonholes
always
look kind of sucky. But they do the job. And you can always neaten them up later with some blanket stitches (see
page 89
).
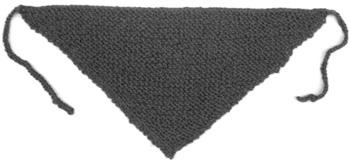
Kitschy Kerchief
This simple triangle-shaped scarf, knit in garter stitch, is a great way to test out your increasing skills. All you need is a ball of sport-weight yarn and a pair of size 8 straight knitting needles. We used Blue Sky Alpaca’s lusciously soft 100% alpaca (2 oz, 134 yards) in color #307, Turquoise.
You will need to keep track of your rows with this project, since the increases are made only on every other row. Stick a row counter onto the end of one of your needles, or wrap a rubber band around the end of one needle so you know to increase every time you are knitting onto the needle with the rubber band.
Start by putting a slip knot on your knitting needle (the needle without the row counter or rubber band).
Row 1: | Knit into front and back of the stitch. You have just increased one stitch. |
Row 2: | Knit across both of these stitches. |
Row 3: | Knit into the front and back of both stitches. You now have 4 stitches. |
Row 4: | Knit across. |
Row 5: | Knit the first stitch, knit into the front and back of the next stitch, knit into the front and back of the next stitch, knit the last stitch. You have 6 stitches. |
Row 6: | Knit across. |
Row 7: | Knit the first stitch, knit into the front and back of the next stitch, knit until there are only 2 stitches left on the needle, knit into the front and back of the next stitch, knit the last stitch. |
Repeat rows 6 and 7 until your kerchief is about 7½" long, or the size you want it to be. You should have about 64 stitches on your needles at this point, but count the number of stitches you actually have, then bind them all off.
To make ties for your kerchief, cast on half as many stitches as you ended up with, then just bind them all off. Make 2 ties this way. Put a knot in the end of each, and sew the other end to the corners of your kerchief.
