Stitch 'n Bitch: The Knitter's Handbook (15 page)
Read Stitch 'n Bitch: The Knitter's Handbook Online
Authors: Debbie Stoller

Row 1:
Knit 2 stitches the usual way. Now, bring your yarn between the tips of your needles to the front. You are in purl position! So go ahead, purl 2 stitches. Then, bring yarn to the back between the points of your needle, and you’re all ready to knit once more. Go ahead and knit the next 2 stitches, then purl 2 more. Keep alternating 2 knit stitches and 2 purl stitches this way. Always remember to take that extra step of bringing the yarn to the back before knitting or to the front before purling, and always carry it between the needle points when you do so. Repeat knitting 2 stitches and purling 2 stitches, till you get to the end of the row. You should end with 2 purl stitches. If you don’t, unravel and try again, because it’s important that the stitches are in the right places. This first row will be a bit slow going, but that’s okay; in time you’ll pick up speed with this maneuver.
Row 2:
You purled the last 2 stitches of that first row. Now, going back, you are going to knit those same 2 stitches. By doing this, you are lining up the Vs of the knit stitches with the Vs on the back of the purl stitches on the row below. So, start by knitting the first 2 stitches. Then, bring the yarn between the needle points to the front, and purl the next 2 stitches. Carry on till the end of the row. You should end with 2 purl stitches.
How to Tell When to Knit or Purl
When making ribbed fabric, you could chant “knit, knit, purl, purl” across every row to keep track of which stitch to make next. But that can be risky, because it’s easy to lose track or get interrupted. Besides, it can be annoying to the Stitch ’n Bitcher sitting next to you. Luckily, there’s a better way. In fact, you can learn to let the stitches
themselves
tell you whether they need to be knit or purled. Here’s how: Look at the base of the next stitch on your needle. If you see a little V hanging around its neck—as if the stitch is wearing a scarf—it means that, in order to stack another V on top of it, you will need to knit it. However, if you see a little rounded bump at the base of the stitch—as if the stitch on your needle has a little noose around its neck—then in order to stack another bump on top of it, you will need to purl that stitch. This is what instructions for ribbing mean when they say “knit the knits and purl the purls.”
Unlike stockinette stitch, ribbing looks exactly the same on the front and the back, which makes it perfect for scarves, because they’re usually seen from both sides when wrapped around your neck. Its stretchiness also keeps the bottom edges and sleeve cuffs of sweaters close to your body and around your wrists, so you can stay nice and warm. And also, as I explained before, it keeps those edges from rolling up.
Ribbing does not have to be done with two knits and two purls; a
1
×
1 rib
is made by alternating only one knit stitch and one purl stitch across an entire row. Fabric made with 1 × 1 ribbing is not as stretchy as 2 × 2 ribbing, but, like its cousin, it is just as flat and reversible.

MIND YOUR P’S AND K’S
Having trouble remembering which stitch makes V shapes and which one makes bumps? One way is to think of the little bump as being kind of pearl-like (I actually think of it as pearl barley). You could also think of the middle of the letter K (in Knit) as having a V in it, and the top of the letter P (in Purl) as having a bump.

Seed stitch
Making the Seed Stitch
There is another very nice stitch pattern you can now make using knits and purls. It’s called seed stitch by American designers, and moss stitch by the British. The two are exactly the same, though, so you can call it whatever you want, including Fred.
Anyway, making seed stitch is a little bit like what would happen if you were to do a 1 × 1 rib while you were drunk: Instead of knitting the knits and purling the purls, you will be
knitting the purls and purling the knits
.
To create the seed stitch, you will knit one stitch, then purl one stitch all the way across a row. (I don’t have to remind you always to bring the yarn to the back before you make a knit stitch, and to the front before you purl, do I?)
On the second row, you are going to knit the purls, and purl the knits. If you are working across an even number of stitches, this means you will start with a knit and end with a purl; if you are working across an uneven
number of stitches, you will start and end with a knit. Basically, every time you see a purl bump (a little noose on your next stitch), you will knit it. And every time you see a knit V hanging off your next stitch (a cute li’l scarf), you will purl that stitch. Do that all the way across the row. And on the next row.
Seed stitch makes a very interesting fabric. Like garter stitch, it is bumpy; like stockinette, it is flat; and like ribbing, it doesn’t curl in at the edges. It is a very textured stitch that has kind of an earthy, organic look. It is also reversible, so it works well for scarves. And because it’s less stretchy in the vertical direction than a garter stitch, it will take fewer rows to knit the same amount of fabric. Use it for whatever you’d like; it’s fun to make, and now you know how to do it.
Making Designs with Knits and Purls
Since knit stitches make a smooth surface, and purl stitches make a bumpy surface, and since you now know how to do both, you can make fabric that has a raised design made of purl bumps on a smooth knit background. Instructions for making purl and knit patterns are often given on a graph or chart like the one on the right.
The chart represents how the fabric looks from the front; each box represents a stitch. Empty boxes represent knit Vs, and boxes with little dashes represent purl bumps. So, if you are knitting with the front side of the fabric facing you, you will knit the blank spaces and purl the dashes.

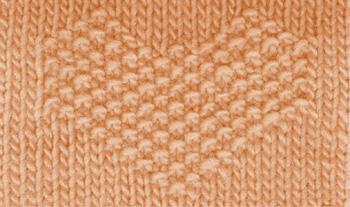
Knit your heart out
But what happens when you turn around and knit back the other way? When you are knitting with the
wrong
side of the fabric facing you, you must do the
opposite
of what I just told you: That is, you must knit the dashes and purl the blanks. Think about it: From this side when you knit the dashes, you’ll be putting the bump part of the stitch on the
front
of the fabric, which is where you want it, and when you purl the blanks, you’ll be putting the flat, or V, part of the stitch on the front of the fabric, which is also what you want.
Try making the heart design above. Start by casting on 23 stitches, and knit a few rows in stockinette stitch.
Then, starting on the knit side, begin the chart. The row at the bottom of the graph is the first row you are going to make, and you will read it from right to left. In fact, when reading a graph like this,
you always read the odd-numbered rows from right to left
. So, according to this graph, you will knit 11 stitches, purl 1 stitch, then knit 11 more stitches.
For row 2, read the next row up on the graph from left to right. Yup:
You always read the even-numbered rows from left to right
. Remember, too, that this row is being knit with the wrong side of the work facing you, so you will do the opposite of the stitch shown on the chart: You will purl 10 stitches, knit 1, purl 1, knit 1, then purl 10.
Row 3 is an odd-numbered row, so you will read it from right to left, making knits for the blank boxes and purls for the dashes. It can be difficult to keep your place when you are knitting from a chart, so here are some techniques you can use to keep track of where you are:
1
Use a row counter on the end of your needles. Usually, people use one row counter at the end of one needle, but there’s no rule saying you can’t use two row counters, one on each needle. When you come to a new row, turn the counter
two numbers
(since you will always be knitting odd-numbered rows from one needle, and even-numbered rows from the other needle).
2
Make a photocopy of the pattern. Each time you complete a row, put a line through it with a highlighter (to show it’s been done, but so you can still see it). By looking at the row you’ve just completed, you can use the stitches from it as pointers for the row you are working on (like, “On this next row, I have to start making my purl bumps one stitch earlier than in the last row, and I have to continue them for one stitch longer”).
3
Make vertical lines through your graph every 5 or 10 stitches, and put matching stitch-counter rings on your needles at the same intervals.
BINDING OFF IN PATTERN
When binding off fabric that’s made in ribbing or seed stitch, it’s best to bind off in pattern. In the last chapter, you learned how to bind off knitwise. Now you are going to bind off in purl, which is no big shakes, really. To do it, just purl a stitch, then, while your yarn is still in front, stick the needle into the back of the previous stitch to lift it up and over your purl stitch, and off the needle.
To bind off in pattern, just bind off knitwise after making a knit stitch, and bind off purlwise after making a purl stitch.
S
HE
G
ETS
A
ROUND
: K
NITTING ON
C
IRCULAR AND
D
OUBLE
-P
OINTED
N
EEDLES
Now that you know how to make a purl stitch, you should know that there is a way to avoid having to make them very often, and that is by knitting stockinette stitch in the round—which involves making row after row of knit stitches.
To knit on circular needles, you will need to have a needle whose length is smaller than the circumference of the fabric you are knitting—you can’t knit a hat that’s only 22 inches around on a 26-inch circular needle, for instance. Your knitting pattern will tell you what size needle you need.