Read Stitch 'n Bitch: The Knitter's Handbook Online
Authors: Debbie Stoller
Stitch 'n Bitch: The Knitter's Handbook (17 page)

2
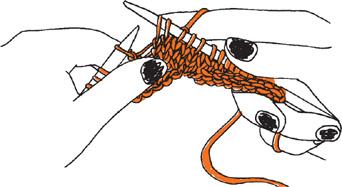
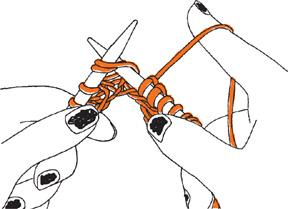
Lift this strand off the right needle and onto the left by inserting the left needle under it
from front to back
and dropping it off the right needle.

3
Knit into the back loop of this stitch. This is a little tough, and you may have to use the fingers of your left hand to pull this stitch down so that you can insert your right needle into that back leg from front to back. Knitting into the back loop causes the bottom of this new loop to twist, and it needs that twist to become invisible.
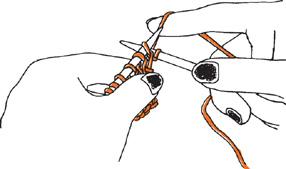
C
AUTION:
If you accidentally knit into the front of the loop (the way you usually make a knit stitch), you will create an extra stitch, but you will also create a gaping hole underneath it.
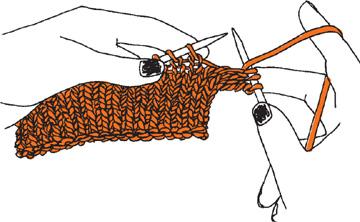
You can also make this increase on the purl side of the fabric; just purl into the back loop of the stitch that you pick up instead of knitting into it.
The Yarn Over (YO)
Yarn overs add stitches, but they also create big holes in your knitting—in fact, you probably made a lot of them, accidentally, when you were first learning to knit. Making a hole in your work on purpose can sometimes be a good thing—for instance, when you want to create a small buttonhole, or in lace knitting. But remember: While you can pretty much use the M1 and bar increases interchangeably, don’t use a yarn over to add an extra stitch unless your pattern instructs you to.
To make a yarn over between two knit stitches:
1
Knit the first stitch, then bring your yarn to the front between the two points of your needles.
2
With the yarn still in front, instead of in back where it usually is while knitting, knit the next stitch. Knitting a stitch this way will leave an extra strand of yarn lying across your needle. When you come back to it on the next row, you just knit that strand as if it were a regular stitch.

To make a yarn over between two purl stitches:
Follow the same directions as above, but in reverse: Purl a stitch, then bring your yarn to the
back
of your work between the points of your needles before purling the next stitch.
INCREASING EVENLY ACROSS A ROW
Sometimes a pattern will tell you to “increase X number of stitches evenly across a row.” It’s often called for right above the ribbing at the bottom of a sweater, and it usually only happens once in a pattern. There is a formula for calculating where you should increase your stitches, and it’s pretty simple:
Add 1 to the number of stitches you are supposed to increase, and divide the stitches on your needle by that number
.
So, let’s say you have 20 stitches and you have to increase 4 stitches evenly spaced. First, you’d divide 20 by 5 (4+1) and come up with 4. If you increase once every 4 stitches, your first increase will come after your first 4 stitches, and your last increase will land 4 stitches
before
the end of your row. Ahhh … that’s easy, isn’t it?
Of course, I was sneaky in choosing an example that divided nicely by the number of increases; that won’t always happen. Let’s pretend I had 22 stitches on the needle to start with. When I divide that number by 5 (the number of increases I need to make plus the magical number 1), I get 4.4. How on earth are you supposed to increase every 4.4 stitches? Well, you can’t. Instead, you gotta be a little fancy. You just increase every 4 stitches a couple of times, and then every 5 stitches a couple of times. And it’s all good.
Decreasing Stitches
Whereas increases are usually made the same way no matter where in a row you make them, decreases slant either to the left or to the right. Most often, you’ll want to make a right-slanting decrease on the left side of your work, and a left-slanting decrease on the right side of your work, and the effect will look like the stitches on the left and right sides are doing a nice yoga stretch toward the center of your work. But sometimes you don’t want a decorative edge—you want the fabric to get narrower, but you want the stitches on the sides to point straight up. In that case, you’d do the opposite: You’d use a right-slanting decrease on the right side of your work, and a left-slanting decrease on the left side. Luckily, you won’t have to worry your pretty little head about this too much, since knitting patterns usually tell you which type of decrease to use at the beginnings and ends of rows.
Left-slanting decrease on right edge

Right-slanting decrease on right edge
Knit Two Together (k2tog)
This is the only right-slanting decrease you’ll ever need, and it’s as simple to make as it is lovely to behold. It’s what you use when creating something that has multiple decreases that go around in a spiral, like the top of a hat, for instance.
1
Stick the right needle into the next two stitches on the left needle knitwise.
2
Knit these stitches together as one.
Piece of cake, right? And, just as you can knit two knit stitches together, you can also purl two purl stitches together.
Slip, Slip, Knit (ssk)
My fave by far, slip, slip, knit makes a very nice left-slanting decrease. The technique is a little odd, but it’s not hard, so hang in there.
1
Stick your right needle into the next stitch as if you were going to knit it, but then just slide it off the left needle and onto the right without actually doing anything else. This is called “slipping as if to knit” or “slipping knitwise.”
2
Slip the next stitch knitwise, too.