Stitch 'n Bitch: The Knitter's Handbook (46 page)
Read Stitch 'n Bitch: The Knitter's Handbook Online
Authors: Debbie Stoller

FRONT
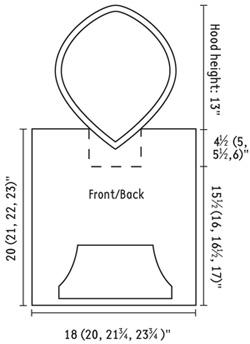
Work as for back through rib patt, then change to larger needles and work 3 rows St st. Place a safety pin in the 14th (17th, 19th, 21st) st from either end to mark where you will be picking up sts for the pocket later.
Using the row counter to track rows, work another 43 (43, 47, 49) rows in St st. This is very important, as it ensures that the pocket lines up neatly with the body of the sweater! Your last row should be a WS row. Place all these sts on a holder.
POCKET
With the RS of your sweater facing you and a separate skein of A at WS of front, pu the center 58 (61, 66, 71) sts between the safety pins by *inserting the RH needle into the center of the next st from front to back, wrapping the yarn as if to k, and pulling the loop through. Rep from * across the center sts to be pu.
Work 13 (13, 17, 19) rows St st, working first and last 5 sts in border patt, end with a WS row.
SHAPE POCKET
Rows 1 and 3 (RS): Work 5 border sts, ssk, work to last 7 sts, k2tog, work 5 border sts.
Rows 2, 4, 6 (WS): P across, working first and last 5 sts in border patt.
Row 5 (RS): K.
Rep rows 1–5 four times more—30 shaping rows worked, 38 (41, 46, 51) sts rem.
JOIN POCKET TO SWEATER
K 24 (27, 29, 31) sweater sts from holder. Now, with the pocket sts in front of the sweater sts, k across the next 38 (41, 46, 51) sts, knitting 1 st from the pocket tog with 1 st from the sweater. Once the pocket sts have been joined, k across rem 24 (27, 29, 31) sts. Congratulate yourself on completing the pocket!
Cont to work front as for back through the stripe section. When rejoining A after completing stripe, join it with the RS of the sweater facing you and at the right-hand side of your knitting, so that the first row worked with A will be a k row (this is where working on a circular needle comes in handy!). Work 3 rows with A.
NECK SHAPING
On next WS row, divide for neck opening.
Right front: P 50 (55, 59, 64) sts, then work border patt over next 5 sts—55 (60, 64, 69) sts. Place rem 31 (35, 40, 44) sts on holder. Next row (RS), work first 5 neck edge sts in border patt, then k to the end of the row. Cont to work in this manner, keeping 5 neck edge sts in border patt, until right front measures 20 (21, 22, 23)", ending with a RS row. BO 27 (31, 35, 38) sts and place rem 28 (29, 29, 31) sts on holder.
Left front: With RS of garment facing you, rejoin yarn and k across 31 (35, 40, 44) sts on holder. Cont across row, pu 24 (25, 24, 25) more sts by knitting into the purl bumps of sts already worked along right front neckline (you are picking up sts on the inside of the garment, but working with the RS of your sweater facing you)—55 (60, 64, 69) sts. Work as for right front, working border patt at neck edge, until left front measures 20 (21, 22, 23)", ending with a WS row. BO 27 (31, 35, 38) sts, and place rem 28 (29, 29, 31) sts on holder.
SLEEVES
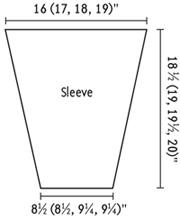
With smaller needle and B, CO 41 (41, 44, 44) sts. Work 5 rows rib patt as indicated, ending with a WS row. Change to larger needle and work 1" in St st, end with a WS row.
Cont in St st, inc 1 st each side every 6th row 18 (12, 16, 14) times; then every 4th row 0 (7, 5, 9) times—77 (79, 86, 90) sts. Work even until sleeve meas 18½ (19, 19½, 20)" from beg BO.
HOOD
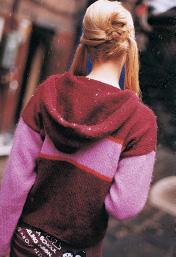
Sew shoulder seams. Place rem right front, back neck, and left front sts on larger circular needle—88 (91, 96, 99) sts. Work in St st for 13", cont border patt on first and last 5 sts. On final RS row, dec 0 (1, 0, 1) st at center of row—88 (90, 96, 98) sts. Divide sts evenly over 2 needles—44 (45, 48, 49) sts per needle. Working with RS tog, join hood seam using 3-needle BO.
FINISHING
Mark armhole depth by placing pins 8 (8½, 9, 9½)" down from shoulder seam. Sew in sleeves, lining up sleeve edges with pins. Sew sleeve and side seams. Block sweater to shape (especially hood edges, which will want to curl until you straighten them out). Now go out and wear your hoodie with joy!
ABOUT KRISTIN

I became interested in design in the early 1980s when I discovered the work of Vivienne Westwood. During my freshman year at college, my roommate taught me how to knit. Alas, both interests languished while I pursued a more academic path. Then one day, inexplicably, I found myself making for the nearest yarn shop, where I bought the hottest hot-pink mohair, needles, and a reference book to explain it all. I happily went home and knitted my heart out. Later, my two interests merged into an apparel design degree from Bassist College in Portland, Oregon. When I graduated, I knew I wanted to work in knitwear design with a focus on hand knitting, and so I have.
When not knitting, I spend time volunteering at a local animal shelter, practicing yoga, taking hip-hop dance classes, riding my bike, cooking, and reading novels written at least one hundred years ago. My first knitting book will be published in spring 2004.
LAURA JEAN BERNHARDSON
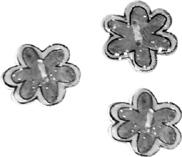
I’ve made different versions of this pattern for years. I love the chunky mohair trim and enjoy playing with the color combos. Experiment with fun combos to really make it your own. I used handmade flower buttons to match both colors, which you can order from
www.freshbakedgoods.com
, my Web site, or find your own crazy buttons and use them as an inspiration. Have fun with it!
SKILLS | PAGE |
CAST ON | |
KNIT | |
PURL | |
INCREASE | |
DECREASE | |
BIND OFF | |
SEW SEAM | |
CROCHET CHAIN | |
SINGLE CROCHET |
S
IZES
Small (Medium, Large, Extra-Large)
Finished bust: 37 (40, 43, 46)" buttoned
Finished length: 20 (21, 22, 23)"
M
ATERIALS
MC:
Emu
Superwash DK
(100% wool; 50g/130 yds), 8 (8, 9, 10) skeins #170
CC:
Katia
Ingenua
(78% mohair/13% polyamide/9% wool; 50g/153 yds), 1 skein #15
US 4 (3.5mm) knitting needles, or size needed to obtain gauge
Seven 1" buttons
G/6 crochet hook