The Washington Manual Internship Survival Guide (45 page)
Read The Washington Manual Internship Survival Guide Online
Authors: Thomas M. de Fer,Eric Knoche,Gina Larossa,Heather Sateia
Tags: #Medical, #Internal Medicine

BOOK: The Washington Manual Internship Survival Guide
4.41Mb size Format: txt, pdf, ePub
11. Remove the catheter when finished collecting peritoneal fluid.
12. Bandage the site.
13. Write a procedure note, whether or not you were successful.
14. Depending on the clinical situation, samples should be sent for the following: cell count and differential, total protein, albumin, LDH, glucose, specific gravity, Gram’s stain, routine culture, fungal stain and culture, and AFB stain and culture. The highest culture yields occur when blood culture bottles are inoculated at the bedside. Greater than 250 neutrophils per microliter is suggestive of peritonitis. Other tests (e.g., cytology, amylase, and triglycerides) may be done as the clinical situation dictates. Refer to Table 3 regarding the interpretation of ascitic fluid studies.

ARTHROCENTESIS OF THE KNEE
Anatomy
The knee joint is a relatively easy target for aspiration of a significant effusion, given that the joint contains the largest synovial cavity in the body. The effusion may be accessed from either the medial or lateral aspect of the patella.
Equipment
• 18-gauge needle and 30- to 50-cc syringe
• Extra small gauge needles, syringes, and local anesthetic (just in case)
• Chlorhexadine to cleanse the skin
• Sterile gloves
• Mask and goggles
• Bandage
Procedure
1. Obtain informed consent.
2. Enlist someone else to be your nonsterile assistant (not always necessary but nice to have around).
3. Have the patient lie supine with knee completely extended or slightly flexed. Identify landmarks to determine the site for needle entry. Possible entry sites include 1 cm medial or lateral to the superior third of the patella and directed toward the intracondylar notch.
4. Put on sterile gloves.
5. Cleanse the area and drape the patient.
6. Anesthetize the skin and the deeper tissues with a 22-gauge needle in the anticipated trajectory of the arthrocentesis needle. Intermittently aspirate to exclude intravascular placement.
7. Attach a 30- to 50-cc syringe to an 18-gauge needle. Direct the needle behind the patella and toward the intracondylar notch.
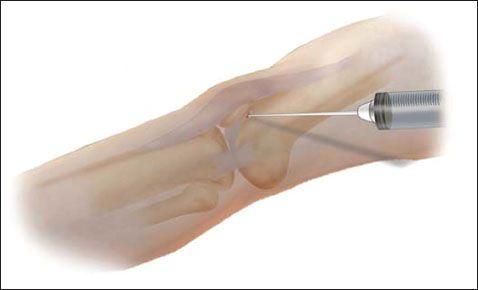
8. Advance the needle and aspirate the effusion once the synovial cavity is entered. Compress the suprapatellar region with the opposite hand to aid aspiration. Avoid injuring articular cartilage by directing the needle behind the patella.
9. Remove the catheter when finished collecting the effusion.
10. Bandage the site.
11. Write a procedure note, whether or not you were successful.
12. Depending on the clinical situation, samples should be sent for the following: cell count and differential, crystal analysis, Gram’s stain, and routine culture. The highest culture yields occur when blood culture bottles are inoculated at the bedside. Refer to Table 4 regarding the interpretation of synovial fluid studies.

Table of Contents
4. Books, Web Sites, and Other Resources
Other books
21 Ways to Finding Peace and Happiness by Joyce Meyer
Believing by Wendy Corsi Staub
Lessons From a Scarlet Lady by Wildes, Emma
When He Dares by Emma Gold
Close to You by Mary Jane Clark
Three Brothers by Peter Ackroyd
Anno Zombus Year 1 (Book 3): March by Rowlands, Dave
The Color of Night by Madison Smartt Bell
Movimientos religiosos modernos by Alberto Cardín
Peony Street by Pamela Grandstaff