Read Yoga for a Healthy Lower Back Online
Authors: Liz Owen
Yoga for a Healthy Lower Back (12 page)

Stand tall with your fingertips on the table for a few moments (
fig. 2.13
). Elongate your spine upward and find your center. On an exhalation, bend forward at your hips and start to walk your hands forward along the table. You are the judge of how far to go; if your hip is getting a comfortable stretch, keep going until your torso is lying down over your thigh (
fig. 2.14
). You can stop anywhere along this journey if your hip is feeling too strong a stretch. Stay in a sustainable stretch, take three or four breaths, then ask your hip if it is ready to move more deeply into the pose. Hold for a few breaths, then come out of the pose by slowly walking your hands back toward your body, then lifting your trunk to an upright position. Repeat the pose on the opposite side. This pose and its prone cousin, Resting Swan Pose, which we will practice later in this chapter, are especially good for stretching the piriformis muscles, helping, among other things, to relieve sciatic nerve pain.

FIG. 2.13

FIG. 2.14
I hope you feel a sense of openness and space around your hips after all the stretches you just completed. Before we move on to a series of strength poses, take a few moments to envision your hips “breathing.” Feel how they gently open and expand as you inhale and soften and relax as you exhale. Notice your feelings and thoughts after you have helped your hips stretch and open, and see how they may be different from when we began and your hips felt contracted and strained.
A Note about Strength Poses
Now you are ready to move on to two poses that focus on strengthening your hips. When I talk about “strengthening,” I mean developing tone so you can feel confident in your body's ability to carry the weight of your torso and distribute it through your hips and legs down into the earth. Be sure to go slowly at first, checking in with your hips and lower back often to make sure you are comfortable. As I often say, in yoga practice in general and especially when it comes to healing your lower back, the slow road is the best road. (Remember the phone book story I told in chapter 1?)
I suggest practicing only Bridge Pose for a week. When you feel confident that your hips and lower back are completely comfortable in Bridge, add the second pose, Reclining Single Leg Lift.
Bridge Pose
Stretch and Strengthen | Setu Bandha Sarvangasana
Bridge Pose stretches the psoas, abdominal, and front thigh muscles, it strengthens the muscles of the buttocks, lower back, and legs, and it can help with sciatic pain. It is also your “bridge” into the “Grow and Progress” section of this chapter, which focuses more on strengthening your hips.
Lie down on your back. Bend your knees and place your feet flat on the floor, about hips' distance apart and about one foot from your hips. Place your arms flat on the floor by your sides, palms facing downward. Ground your shoulders by gently pressing them down. Be sure not to pull your shoulders away from your ears, which can strain your neck. As you ground your shoulders, feel the bottom tips of your shoulder blades lifting upward and toward your front chest, an action that will help open and broaden your chest.
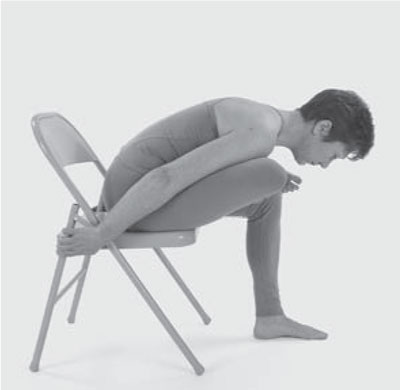
FIG. 2.15
To get ready to lift your hips into Bridge Pose, scoop your tailbone upward as you exhale, as you practiced in
Pelvic Tilt
. Engage your abdominal wall back toward your spine. Firm your buttock and leg muscles completely and take a breath. On your next exhalation, first lift your tailbone off the floor, then lift your hips, lower back, middle back, and upper back (
fig. 2.15
).
Start by coming up only as far as your lower back is comfortable. Pause halfway up, when your hips are lifted but you are not yet in a backbend, and check in with your body. If it's comfortable, proceed farther into the full pose until you've lifted your hips high and your lower, middle, and upper backs are all in a backbend.
You have created a bridge-like shape with your body, with your feet as your supports at one end and your arms and shoulders as your supports at the other. Hold the pose for fifteen to twenty seconds, breathing fully and deeply, then slowly lower your body down to the floor in the reverse order that you went up, first lowering your upper back, then middle back, lower back, hips, and finally regrounding your tailbone to the earth.
TIPS FOR A COMFORTABLE BRIDGE POSE
Sometimes it takes some work to create a comfortable feeling in Bridge. Here are three variations that are good for all bodies, and are especially helpful if your sacrum is tender and this is a difficult pose for you:
â¢Â  Turn your toes inward, drop your inner thighs down toward the floor and lift your outer hips strongly upward. This creates internal rotation in your hip joints that allows your sacral joints to widen and spread, bringing space and comfort to your sacrum.
â¢Â  Place a belt around the middle of your thighs. The belt should be about hips' width so that your knees are in line with your hips. Press your
thighs into the belt and lift your hips up into Bridge. This should create a unifying feeling of strength through your legs to help support your hips.
â¢Â  Place a belt around the middle of your hips, as if you could imagine it holding your hips together. This usually feels good for overly flexible or weak hip muscles.
â¢Â  If there is discomfort in your lower back, walk your feet farther away from your hips to allow more room for your back to extend and elongate. Move your buttocks toward the backs of your knees while you lift your back ribs up and toward your chin. Visualize creating as much length for your lower back as you can by moving the areas next to it in opposite directions.
â¢Â  Practice Bridge Pose on a block to help balance your sacral joints and your hips. The block should be placed across your buttocks, right under your sacral joints. Be sure the block is not under your lower back. Choose the height position of the block that feels right for your bodyâwhere your back hip and leg muscles stay active and you feel a gentle, sustainable backbend in your lower and middle back.
It's important to rest after a backbend in order to release any tension that may have crept into your lower back. When you finish Bridge Pose, lie on your back for a few breaths, with your feet flat on the floor. Now draw your knees into your chestâif your back feels tender, pick your legs up one at a time. Hug them, move them around in small circles, and massage your lower back and sacral joints by gently rocking your hips from side to side.
Reclining Single Leg Lift
Stretch and Strengthen | Eka Pada Apanasana Variation 1
Start by lying on your back with your knees bent and feet flat on the floor. If your lower back feels vulnerable, place a folded blanket under your hips. Draw your navel down toward your spine and scoop your tailbone up while keeping your hips on the floor. Bring awareness to your abdominal core, and draw your abdominal wall toward your lower front ribs, as if you were shortening the distance between your hips and ribs. You should feel your abdominal muscles firming, which will help support your lower back during this pose. (For more instructions about how to engage your abdominal muscles, see chapter 5.)
Bring your knees into your chest. Hold your right shin or the back of your
thigh with both hands, and press your thigh into your hands so your arms are straight, creating an equal action in your arms and leg. This should engage your right buttock muscles.
On an exhalation, lift and stretch your left leg away from your body at about a thirty-degree angle to the floor (
fig. 2.16
). Hold this position as you inhale, and with an exhalation take your left foot slowly down, almost to the floor.

FIG. 2.16
With your next exhalation bring your leg back up to its thirty-degree position. As you lift your left leg, visualize your thigh muscles drawing your thigh bone strongly into your hips; maintain that feeling as you take your leg down.
Repeat four or five times, switch legs, and practice the same number of times taking your right leg up and down. After you have practiced this pose for a few weeks, increase the number of repetitions on each side.
This pose helps realign the hip bone of your moving leg while it stabilizes the hip bone of your bent leg. If you found that one of your hip bones is tipped backward when you assessed your hips in
chapter 1
practice this pose to that side every day until you experience more balance in your hips.
7
Practicing this pose is helpful regardless of whether or not your hip bones are balanced, because it strengthens the psoas and abdominal core muscles. It brings awareness to the role of your abdominals in achieving tone and balance in your hips. If you practice it regularly, you will see a noticeable difference in the strength of your lower abdominal area. This in turn creates support for your hips and lower back, which will set you up for success in the rest of your yoga journey.
Reclining Bound Angle Pose
Rest | Supta Baddha Konasana
Ahh! Now you finally get to rest. You've worked hard both stretching and strengthening your hips, and your reward is this restorative, gently hip-opening pose. A restorative pose is one in which your body is completely supported so no active work is required on your part. Staying in the pose for five to ten minutes gives your body time to rest deeply and allows it to open and unfold, releasing subtle stresses and tensions.
