Yoga for a Healthy Lower Back (13 page)
Read Yoga for a Healthy Lower Back Online
Authors: Liz Owen

FIG. 2.17
You'll need a bolster or two lengthwise folded blankets for your feet, blocks for your knees, a folded blanket or towel for your head, and an eye pillow if you would like to rest your eyes. Start by placing your folded blankets or bolster across your mat about two feet from one end of the mat. Fold the end of your mat up over the bolster (you'll be resting your feet on the bolster, and the sticky mat will help to hold your feet in place). Place your feet on the bolster with the soles of your feet together and your thighs releasing out to the sides. Rest your outer shins and knees on the bolster. If they don't rest all the way down, place folded blankets or blocks under your knees or shins for support. Support your head on another folded blanket or on a towel (
fig. 2.17
). If you feel an uncomfortable stretch along your inner thighs or pain in your lower back, cross your shins and rest them on your bolster.
The optimum position for your feet and legs is one in which your inner groins and lower back are completely comfortable. Before you rest in the pose, take your hands on the back of your hips and scoop the tip of your tailbone upward. This should help your lower back stay long and comfortable. Be sure your abdomen and navel are resting downward to help maintain length in your lower back. Drape the eye pillow over your eyes, if you are using one, and feel them softening inward as you relax. Briefly reach your arms over your head to elongate the sides of your torso for a good stretch, then rest your arms either draped out to the sides, or hold your elbows and rest your forearms on your forehead.
If your lower back likes backbends, you can practice this pose with a bolster or folded blanket placed under your torso instead of under your feet, and a folded blanket under your head, as shown in a pose from chapter 4,
Reclining Lower Back Meditation
.
Remember that a restorative pose is one in which your body is completely supported, so all you need to do now is rest! Close your eyes and let them soften deeply down toward your heart. Take long, deep breaths and feel the flow of your breath down into the deepest part of your hips, feeling your front hips opening and expanding with each breath. Visualize an unfettered flow of luminous, soft energy all through your hips. Visualize every part of your hips brightened with lightness. Feel your sacrum as the center of your hips and visualize glowing, restorative energy pouring outward from your sacrum and filling your hips.
You can stay in this pose as long as you are comfortable. I recommend staying at least five or ten minutes so you feel rested and refreshed when you are finished.
To come out, bring your hands to your thighs and manually help them to come together. Roll over onto the right side of your body and rest for a few breaths, then bring yourself up to a seated position. Mindfully coming out of the pose is as important as the care with which you moved into it; it allows you to maintain the softness and opening in your front body that you created in the pose, and it helps your mind stay quiet and passive.
Child's Pose
Rest | Balasana
When you are done with your practice, or at any point during practice when you need to rest and release, it's time to practice Child's Pose. Sit down with your hips resting on your feet and your knees about one foot apart. Fold your torso over your thighs and bend forward at your hips, taking your arms either forward along the floor or by the sides of your body. Your front ribs should rest gently along your inner front thighs (
fig. 2.18
).
The value of resting in a forward-bending position where the torso is supported on the thighs and your back is gently rounded is that it allows breath and life force to move more easily into your lower back. Bring your mind into your back hips and your lower back and feel the soft flow of vital energy throughout these areas. Visualize your lower back gently expanding upward with each inhalation, and letting go into relaxation with each exhalation. You are massaging the myofascia in your hips with your breath flow, as well as all the nerves that come out from the sacral and lumbar spines. Don't visualize the flow of energy through your nerves as a strong “power surge,” but see it as a smooth and gentle pulse of electrical power that softly powers your body. Take the time to finish in Child's Pose after every yoga practice, and before long you will discover the restful, soothing qualities it can create.
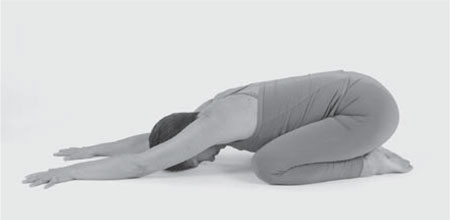
FIG. 2.18
TIPS FOR A COMFORTABLE CHILD'S POSE
Child's Pose sometimes sounds more comfortable than it feels, so here are some tips to help you receive a restful, restorative experience:
â¢Â  If your ankles complain when you sit down on your feet, place small rolled towels or folded washcloths between your ankles and the floor.
â¢Â  If your knees bother you, place folded blankets between your calves and thighs.
â¢Â  If your head doesn't reach the floor, or if your hips can't stay resting on your heels while your head is on the floor, support your head on a block or on folded blankets.
â¢Â  For extra comfort, place a stack of folded blankets or a bolster lengthwise under your torso, from your lower abdomen up to your head. Be sure the bolster is not under your hips so that they can descend as much as possible. Your abdomen, chest, and head should rest on the bolster. Rest your head by turning it to one side, then turn it to the opposite side and rest it for an equal amount of time (
fig. 2.19
).

FIG. 2.19
Deep Relaxation: Move into Your Center
Rest | Shavasana Variation 1
This deep relaxation is designed for maximum comfort in your hips. I suggest a few extra props for complete relaxation throughout your entire body. You'll need one bolster or two folded and stacked blankets, two blocks, a folded blanket or towel for your head, and an eye pillow if you'd like the added benefit of resting your eyes.
Place your bolster or folded blankets crosswise on your mat, and place two blocks at the foot of your mat. Sit with your hips on the floor and take your thighs over the bolster. Adjust your bolster so your knees are supported. Place your feet on the blocks, about hips' distance apart. Check that your knees are resting on the bolster slightly higher than your heels so that the backs of your knees are completely comfortable. Your hips will be in a slight pelvic tilt, just enough so you feel your entire back hips resting and spreading outward. Lie down and check that your body is comfortable. Place your hands on your lower abdomen and feel it descending and resting into the space you have just created at the back of your hips.
Place a rolled and folded blanket under your neck and head. Adjust the height of the roll so your neck rests down into it and the back of your head is slightly higher than your neck. Tuck your chin slightly, symbolically descending your mind down to your heart. If you are using an eye pillow, place it gently and evenly across your eyes and then take your arms out to the sides, resting your hands palms-up on the floor. Finally, roll your shoulders down to the floor so you feel an opening across your middle and upper chest. Let your whole torso relax (
fig. 2.20
).
With your eyes closed, observe your body. Feel all the parts of your body balanced around your center. Your feet, legs, arms, and hands should all be equidistant from your centerline. The right and left sides of your body should be resting evenly into the earth. Let go of all muscular effort and holding, from the tips of your toes and throughout your feet, ankles, shins, calves, and thighs. Your inner upper thighs and front groins should feel deeply relaxed. Breathe softly and gently into the backs of your hips and feel them melting away from each other; let your buttocks and deep hip muscles surrender to the ever-present support of the earth. Imagine your spinal muscles soft and supple, rippling softly along the earth like gentle ocean waves lapping on the shore.
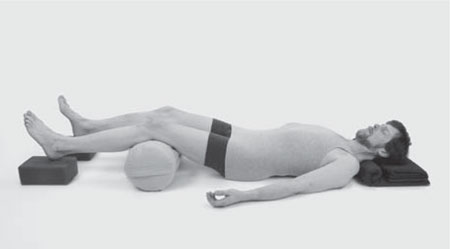
FIG. 2.20
When you feel that your physical body has relaxed, visualize a door to your inner self opening and your mind drawing into your center. This “center” has numerous names in yoga philosophy. Some of its names are the Anahata chakra (the heart center); the
Hridaya pundarika,
or “lotus of the heart”;
8
and the
Hrid akasha,
the “radiant space of the heart.”
9
Visualize the lotus of your heart, a beautiful bud that faces downward, waiting for light and nourishment to bring it into bloom. Reflect on the work you did in your hips, and let that warm strength drift upward into your heart center. Continue to meditate on the qualities that live in your heart, and sense the lotus bud turning upward and opening into a radiant bloom.
Stay in Deep Relaxation for between five and fifteen minutes, or as long as you are comfortable. When it is time for you to come out, let your breath softly reawaken your body and mind. Breathe from your center outward, feeling the quiet, balanced feeling of your center moving into every part of your body as you inhale. Gently start to move your body as you exhale, beginning with your toes and fingers and slowly bringing movement to your arms and legs. When you are ready to come up, draw each knee into your chest and slowly turn over onto the right side of your body. Rest there for a moment, then use your left hand to press yourself up to a seated position.
Bring your hands together in Anjali mudra, the hand posture of offering, and close your eyes for a few moments. Offer your practice to the health and well-being of your hips, and to the well-being of your life. You can finish by softly saying “
Namaste,
” the Sanskrit word that is translated as, “I bow to you,” and is often said with the intention of honoring and respecting another person's deepest self and innermost light with your own.
Grow and Progress
After you have practiced and become comfortable with the poses in step 2, you are ready to move on to poses that will give a deeper stretch to and build more strength in your hips.
First, a word of caution: These stronger poses should be approached
slowly and carefully. If you feel any strain or discomfort in your hips or lower back, immediately (but gently!) come out of the pose and rest in Child's Pose or another position that is calming to you. Then, return to the “easier” poses I've already described. Over time your body will change, and the more challenging poses will be within your reach.
A yoga practitioner should approach asana practice as outlined by part of verse 2.30 of Patanjali's Yoga Sutras: with consideration for all living things through the practice of ahimsa, or nonviolence.
10
Ahimsa not only applies to our thoughts and actions toward others, it also applies to how we treat our own bodies. Plainly put in Western terms, I urge you to practice the following poses with a slightly modified version of a well-known saying in mind: “No pain, no gain . . . is insane.” Listen to your body!
Awaken Your Inner Hips: Root Lock
Mula Bandha
A great way to warm up your body before you learn the poses that follow is to review and practice Mula Bandha (Root Lock), which you learned in
chapter 2
. You'll find that Root Lock's anchoring and lifting actions in your pelvic floor and lower abdomen create physical support to help protect your lower back, and the practice also gives you energetic support to free the flow of prana throughout your body.